How I Doubled The Storage Space in Our Coat & Cleaning Closet
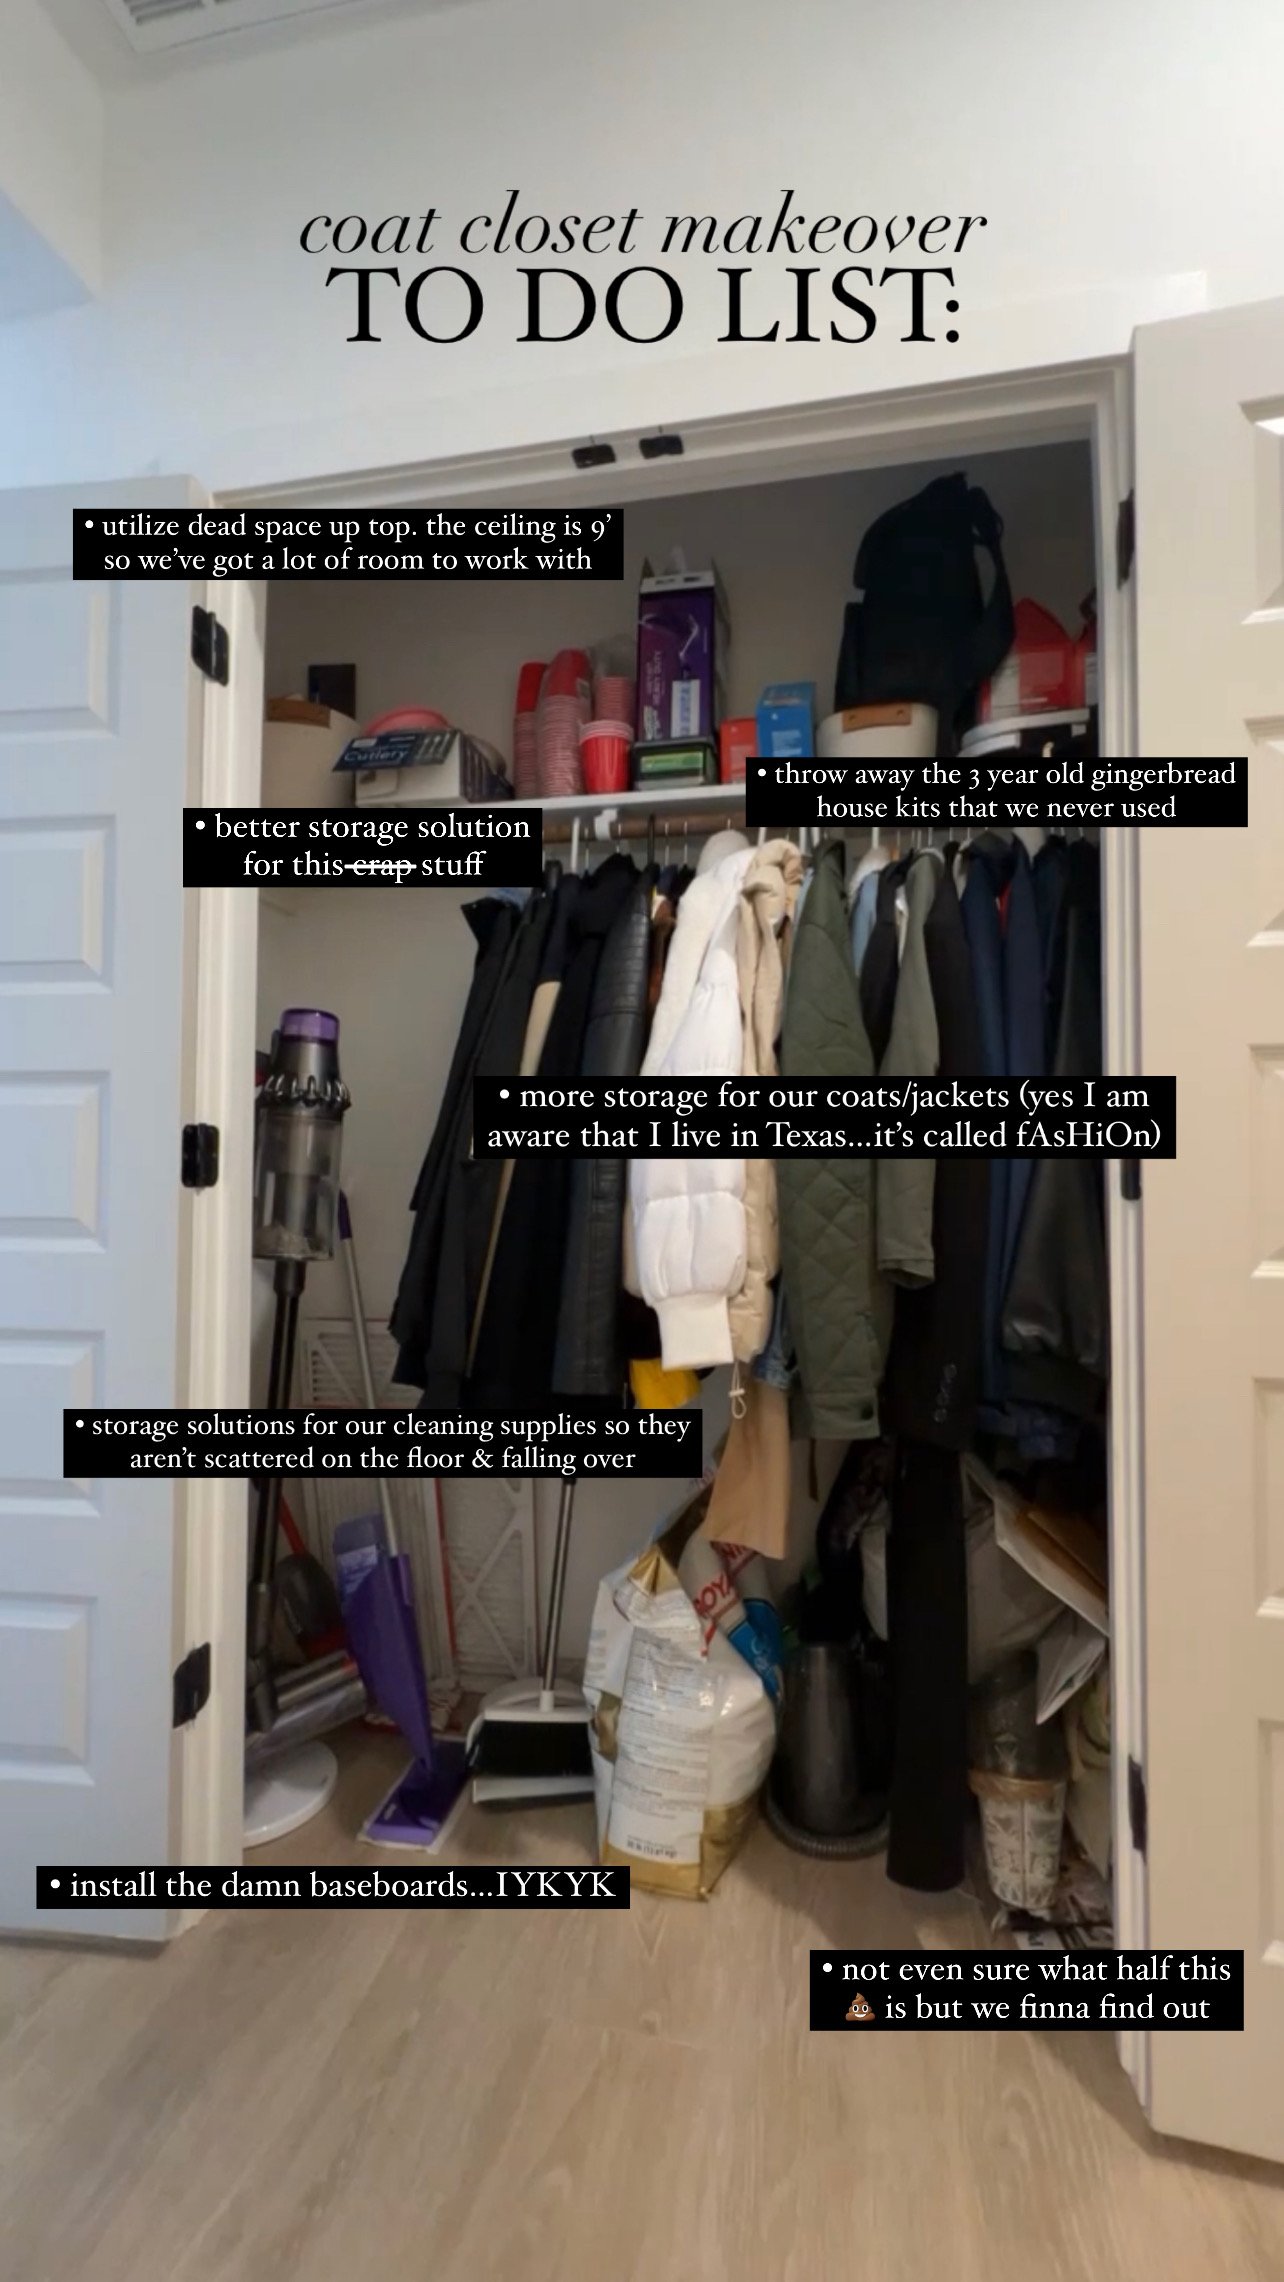
For the last few years, our coat closet has been kind of a catch-all—not just for our coats, but also for our cleaning supplies, party cups, coolers, plastic bags, aaand pretty much anything else that didn’t already have dedicated storage in our house. I’ll show you how I doubled the amount of usable storage space, made this closet functional for housing both coats & cleaning supplies, and of course, seriously upped the aesthetics in here — all with just a few days’ work & wood scraps from my garage!
Paint & Painting Supplies
Lauan Plywood
Paint Brushes
My cleaning supplies, hangers, and clear storage bins can be found here!
Clean Up & Tear Out
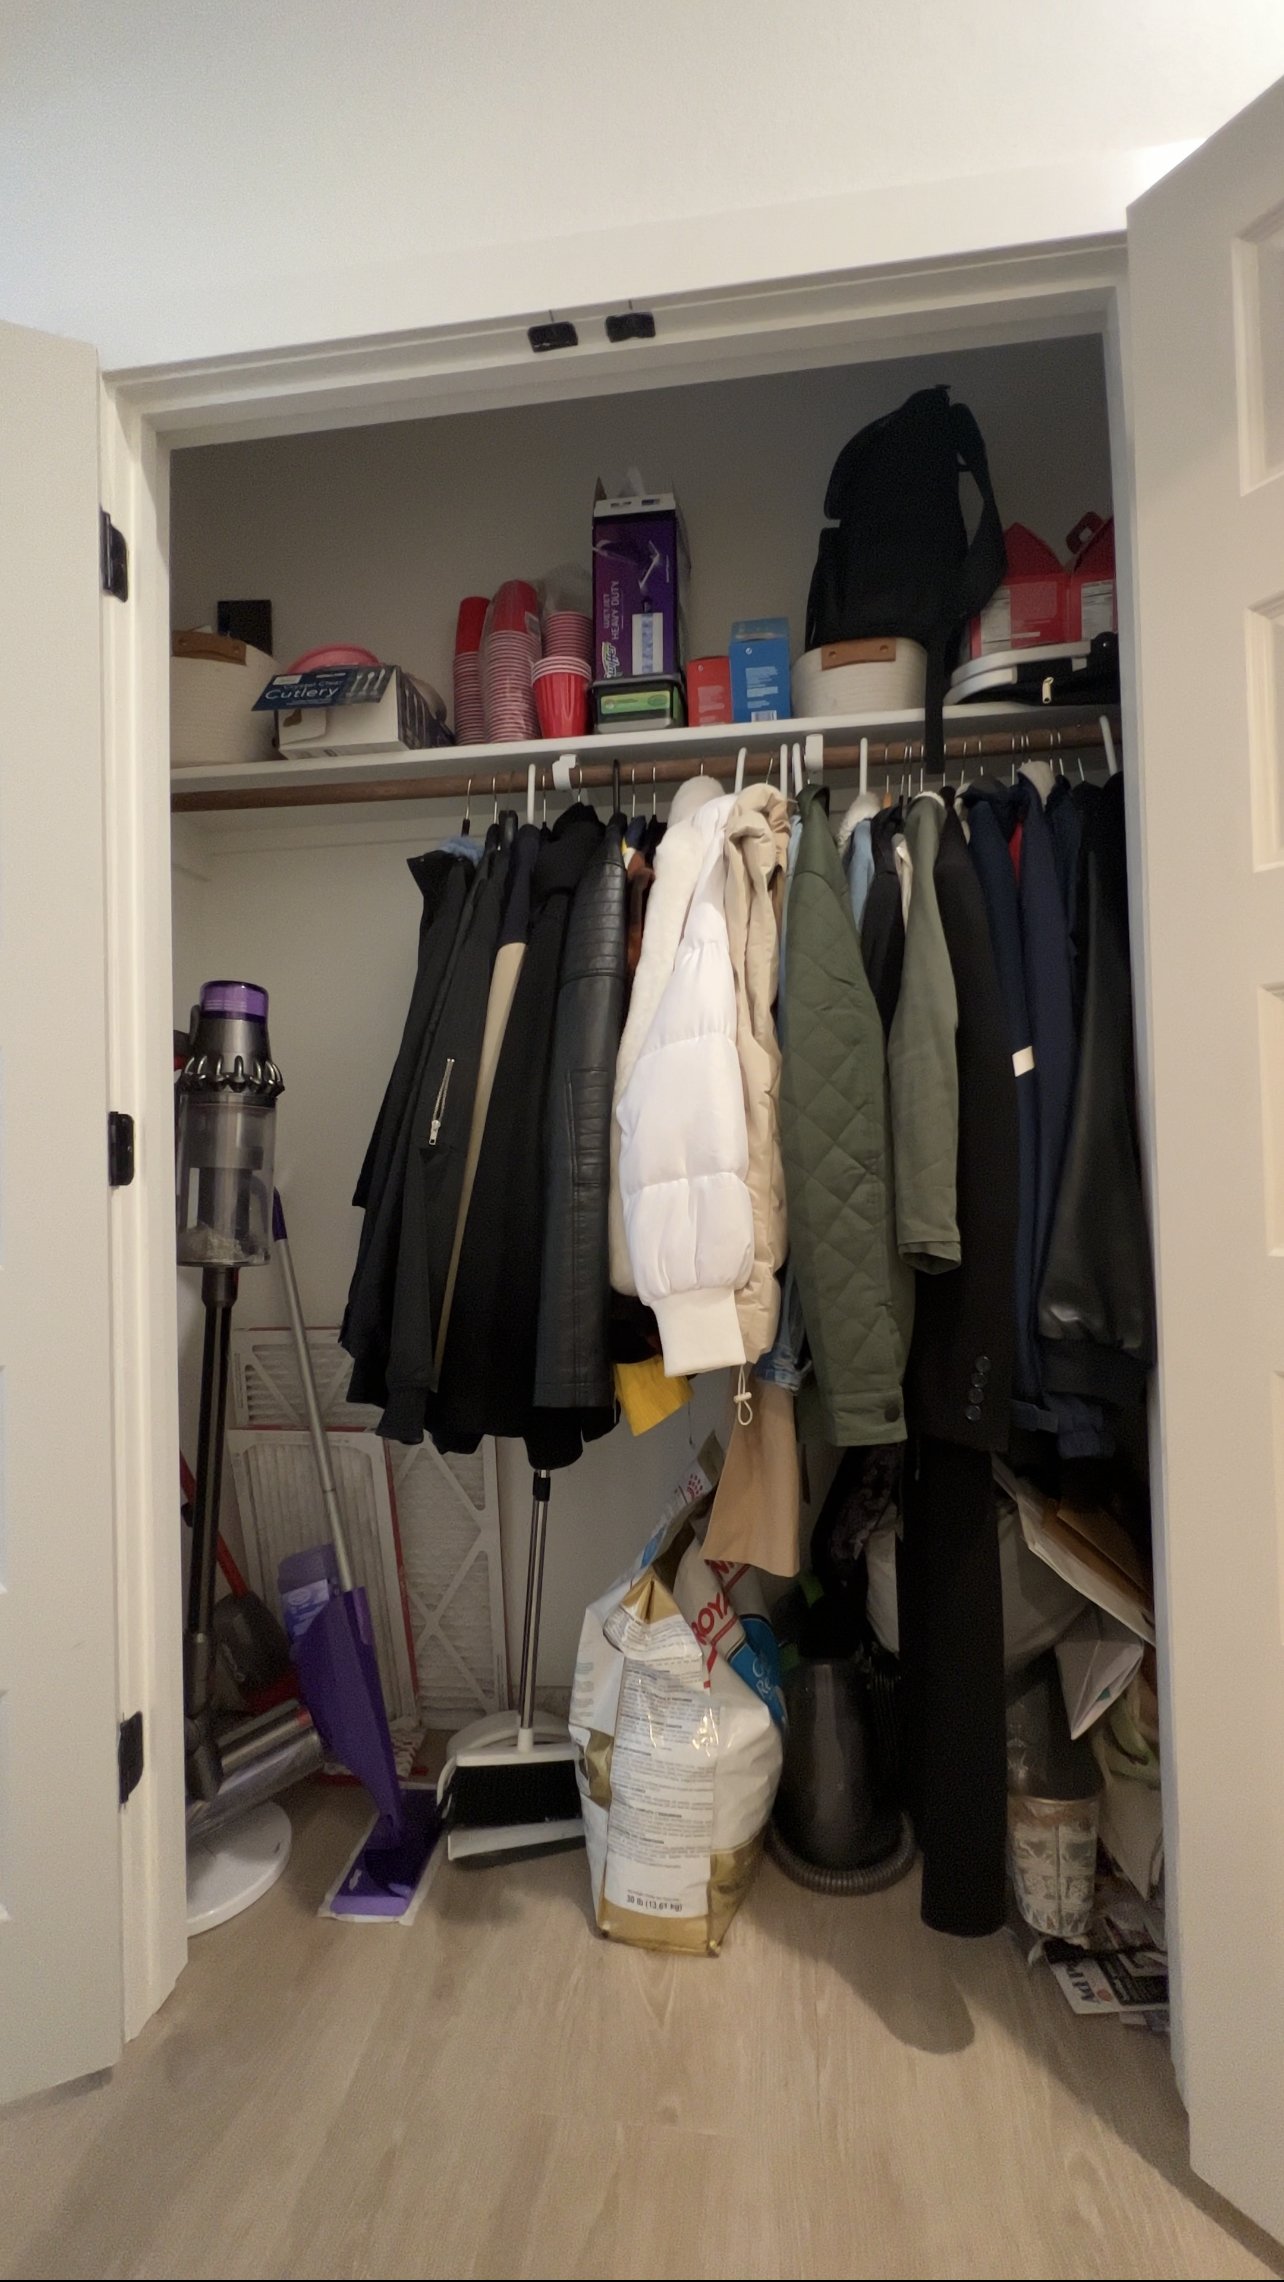
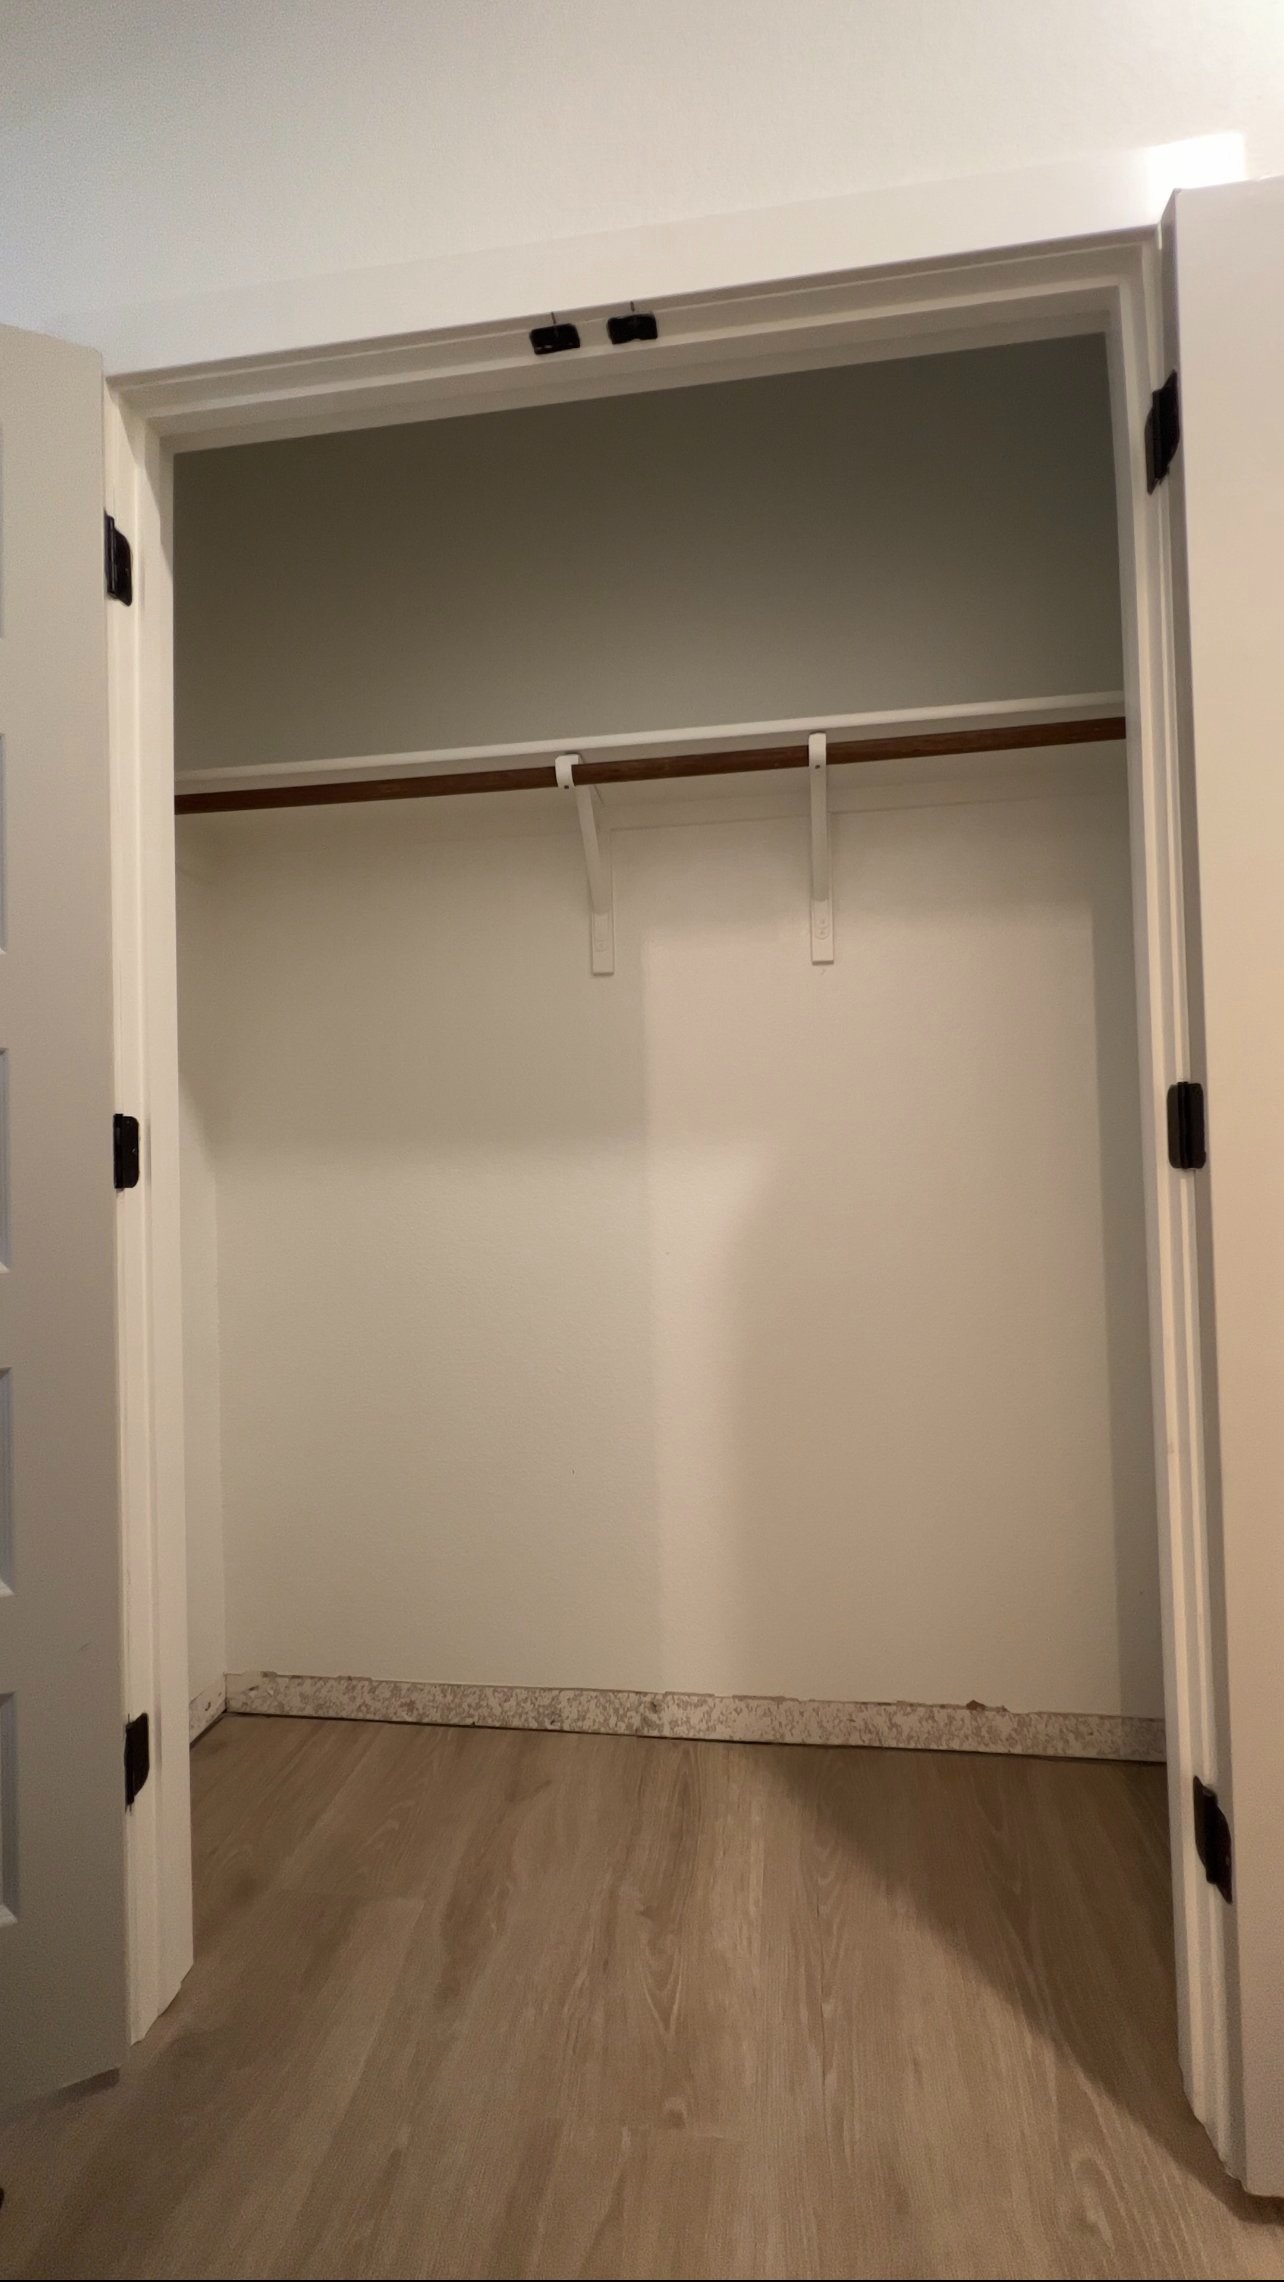
The first step of this project (most projects, really) is to get the space to a blank slate so you can really see what you’re working with. I started by removing everything from the closet—tossing what we no longer needed, putting away things that never should’ve been in there in the first place, and setting the rest aside in our spare room for later. Once the closet was cleaned out, I removed the existing shelf and hanging rod.


Unscrew and remove the hanging rod bracket.
Use a utility knife to score the caulk around the shelf and shelf supports.
This kind of shelf is typically just attached to the support with small gauge nails. Apply force to the underside of the shelf and it will usually just pop right out. Mine got stuck on the surrounding walls when trying to remove it in one piece so I cut it down the middle with a circular saw.
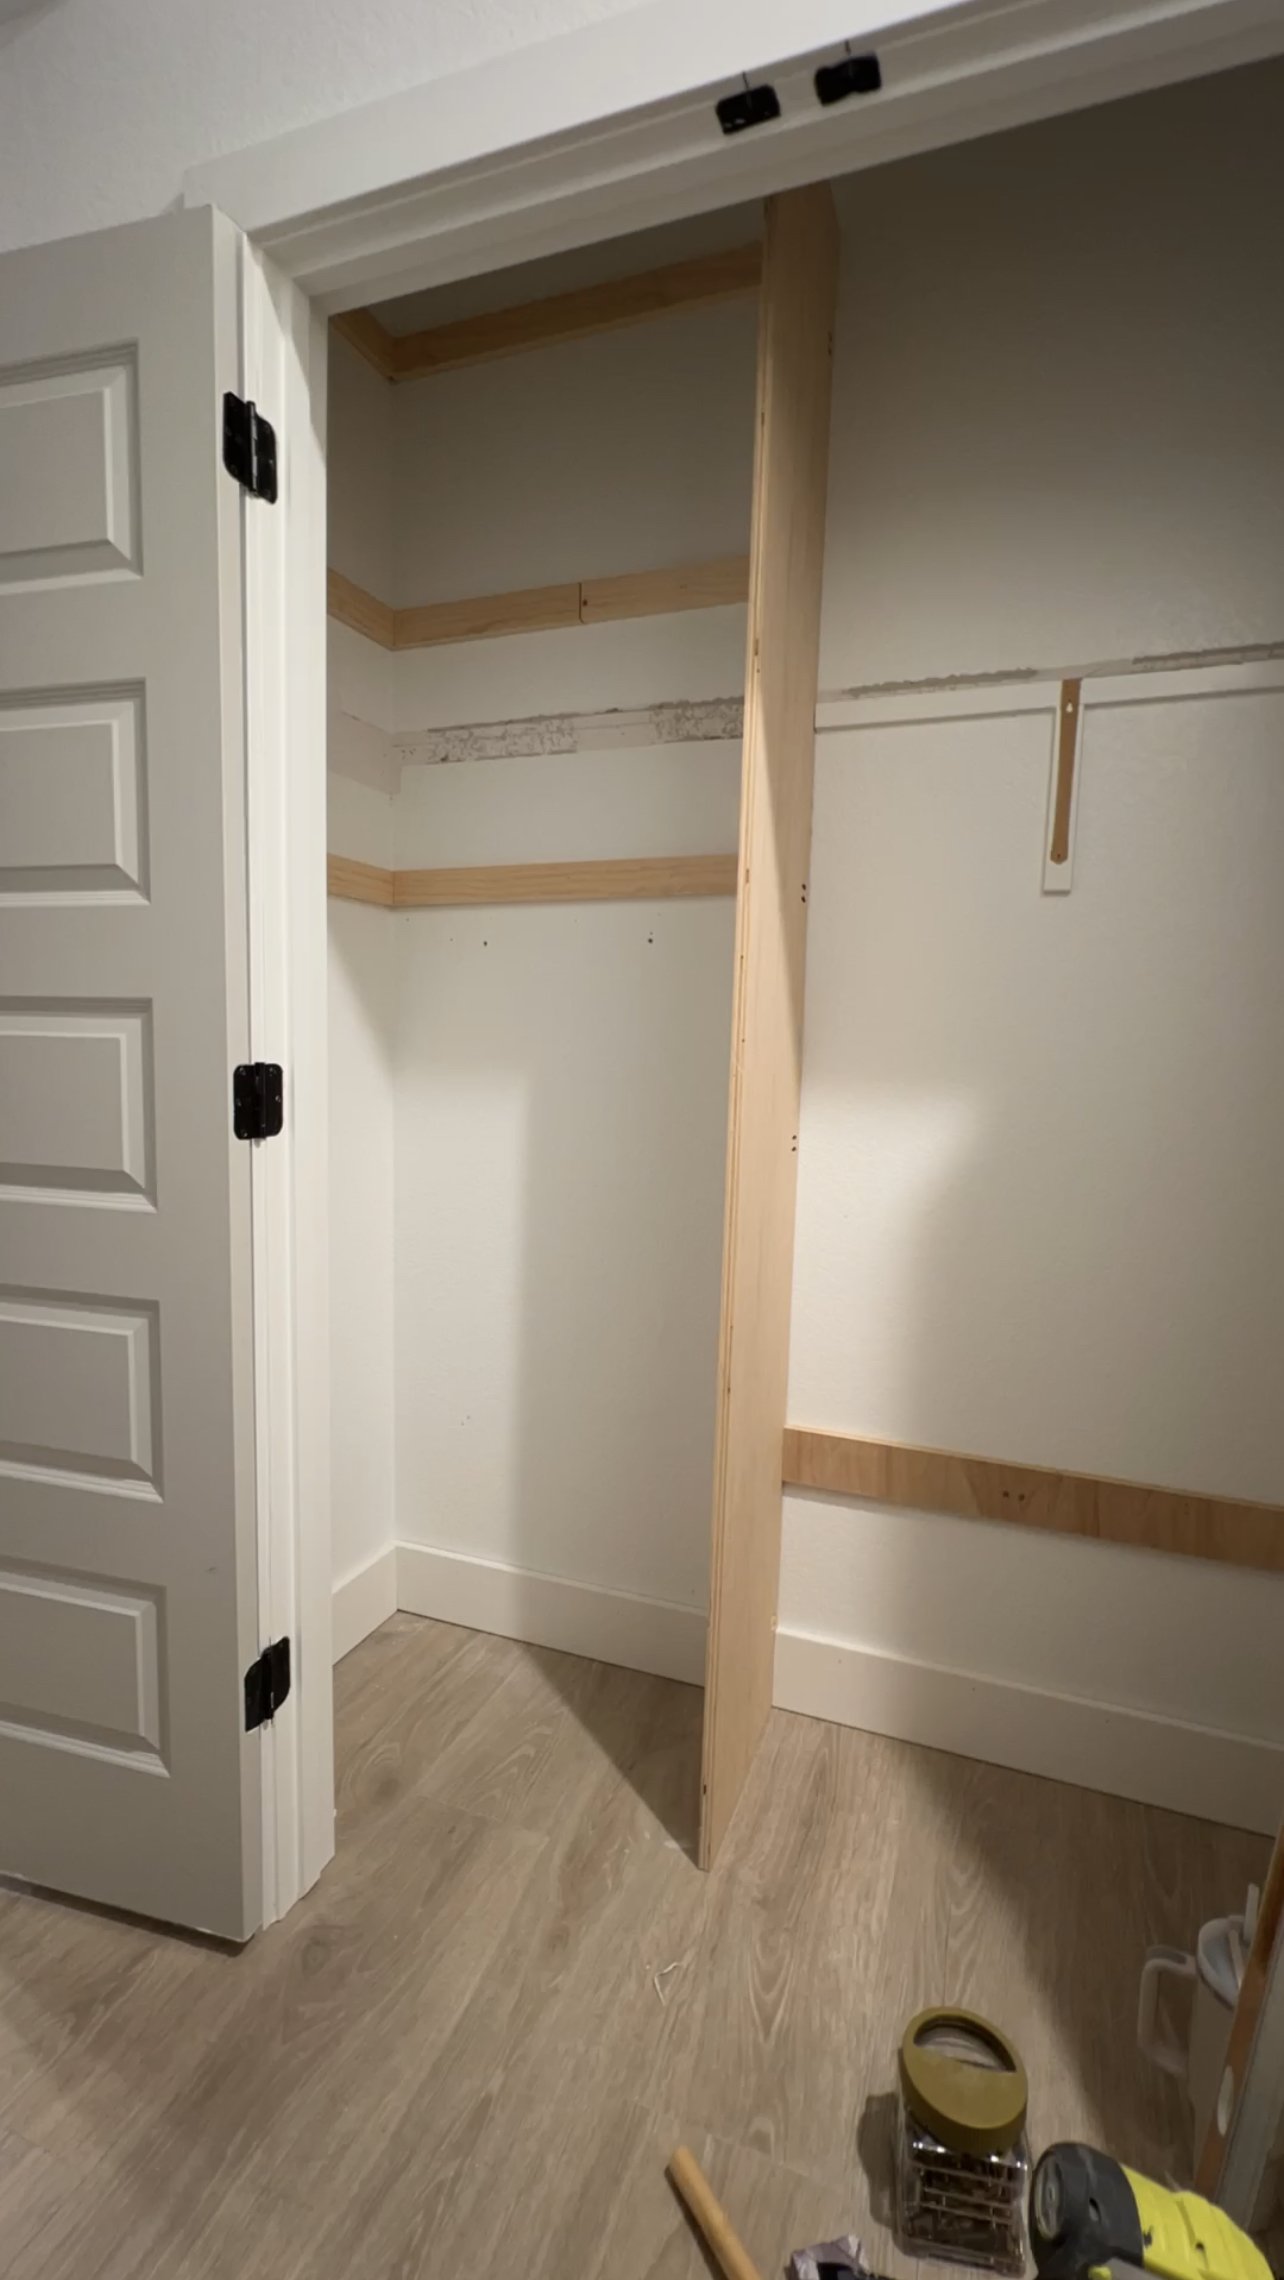
Frame Out The New Closet Design
For my design, I plan on adding a center “wall” divider using 3/4” plywood to separate the closet into 2 halves—one for cleaning supplies and one for coats. I based the location of the center wall on where my studs are located to make it easier, which is why it’s not perfectly centered.
On the coat side of the closet, I’ll be reinstalling the hanging rod and a faux floating shelf, so I left the existing shelf support in place.


Locate the studs with a stud finder. A good rule of thumb is that there will be a stud wherever the original hanging rod supports were located. Double check the exact location though because although my builder tried to mount these to the stud, they were actually off by about 1/2”.
Mark the center of the stud on the existing shelf support.
Measure 3/8” of an inch from the stud center and use a multi-tool to cut the shelf support. Cutting 3/8” over from the center will make the center of your 3/4” plywood line up with the center of the center.
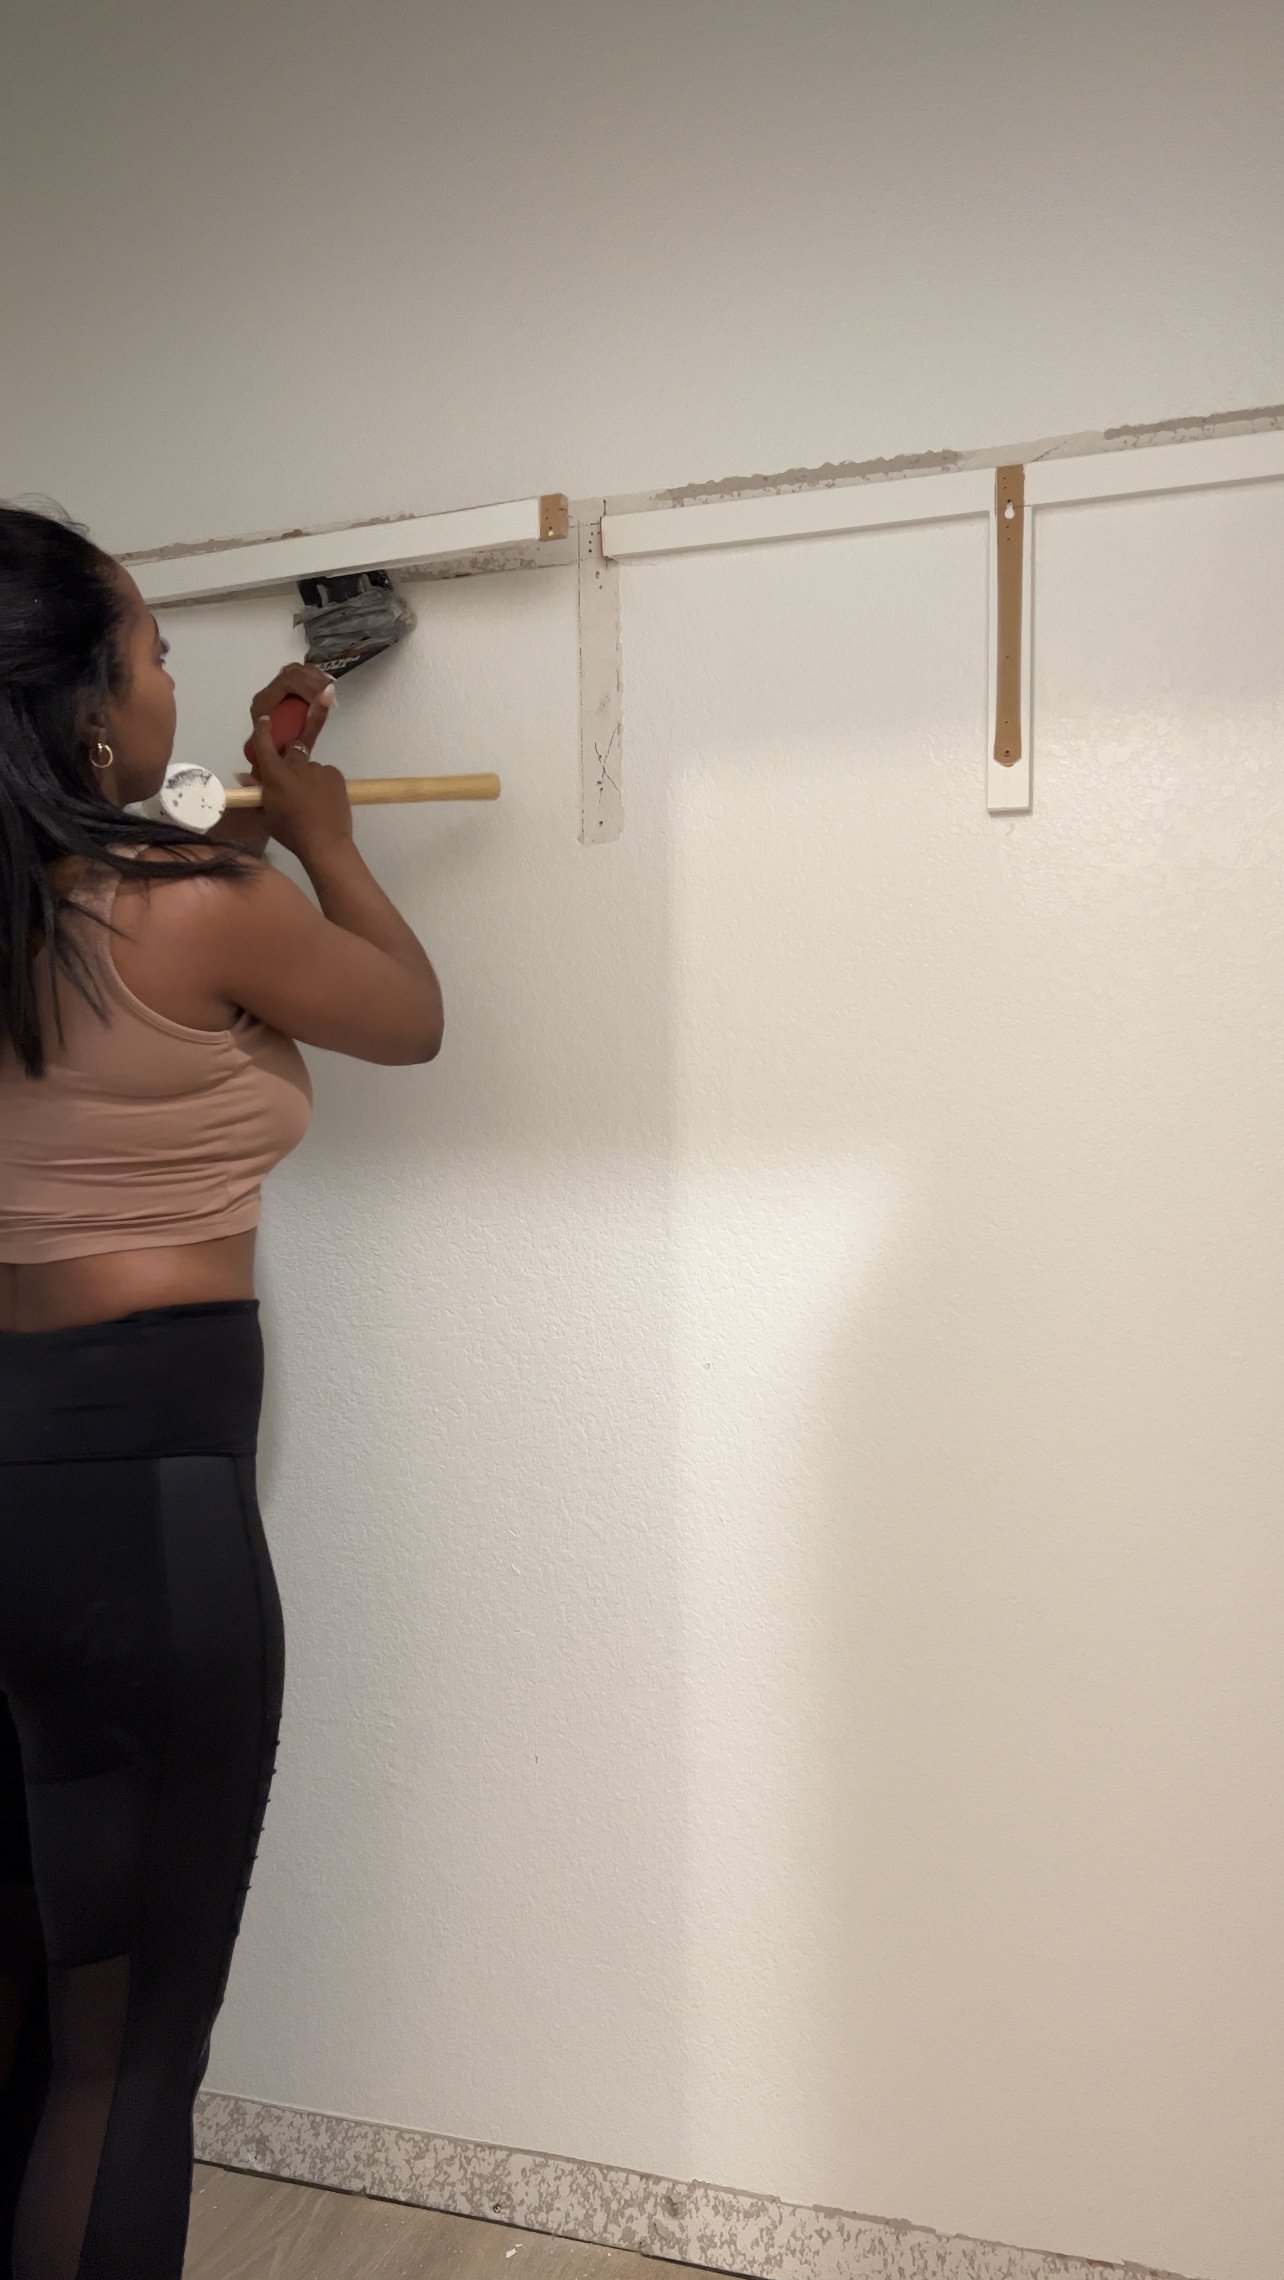
Use a trim puller & rubber mallet to remove the unwanted shelf supports from the back and both sides of the closet.
My faux floating shelf on the coat side of the closet will be a total of 15 3/4” deep in order to hide the hanging rod.
Use 2” select pine or MDF to create the side shelf support (actual dimensions = 1.5”)
Cut the side shelf support to 15” long using a miter saw and install it with brad nails to hold it in place and a screw directly into the stud for support.
Locate the stud closest to the center of your hanging area.
Use 2” select pine or mdf to create a support for the hanging rod bracket to mount to. Make sure it’s level, then install it with brad nails to hold it in place and screw it directly into the stud.
Attach your hanging rod bracket with screws.

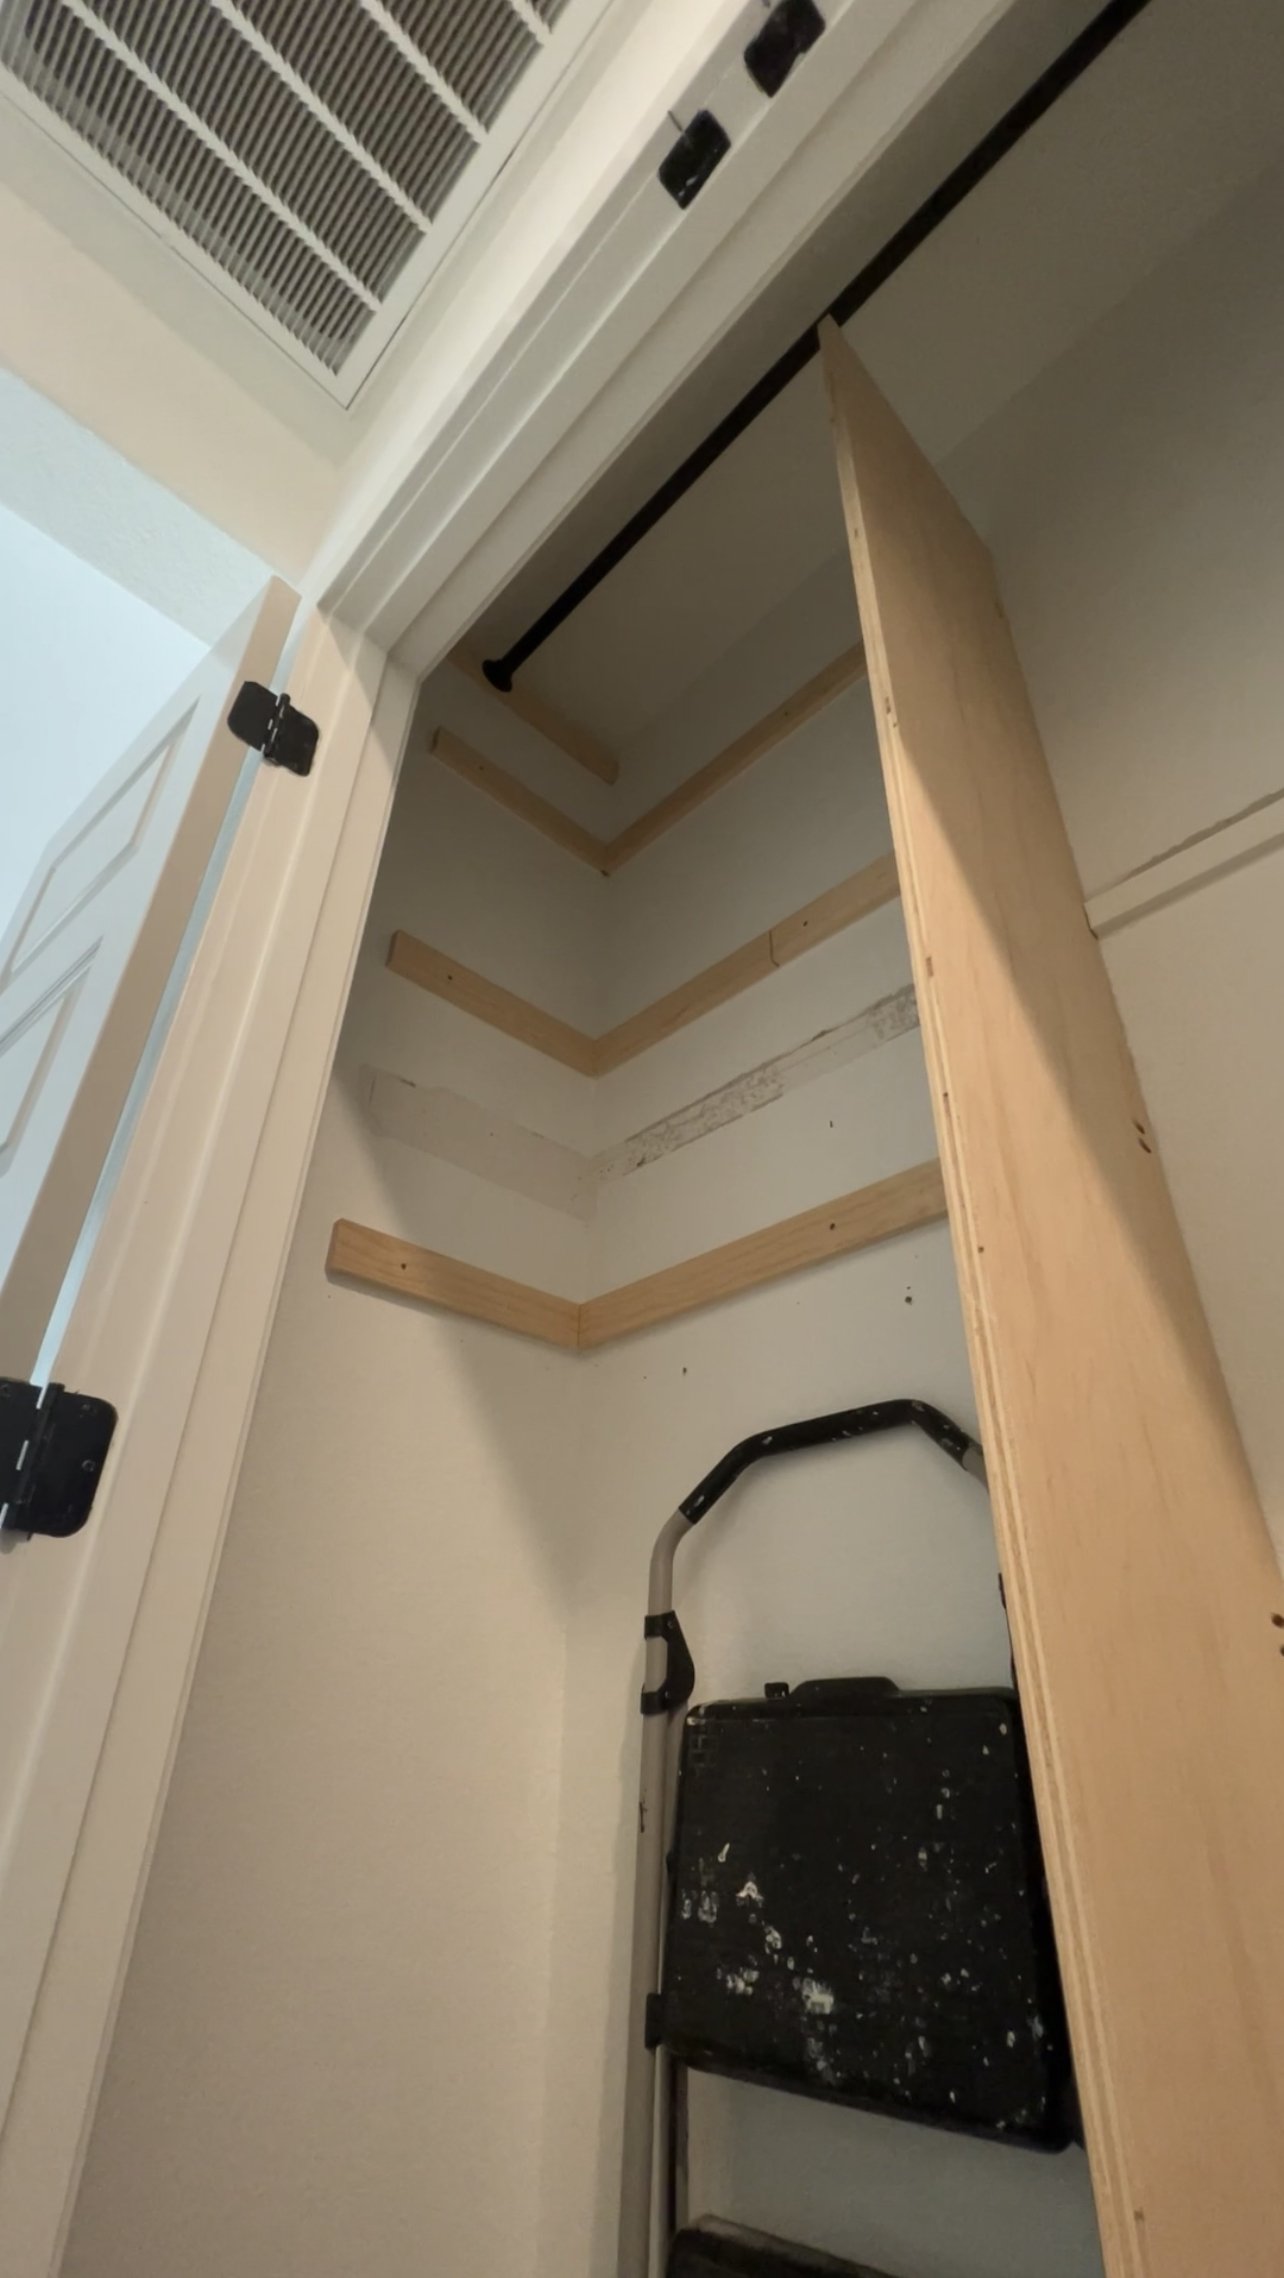
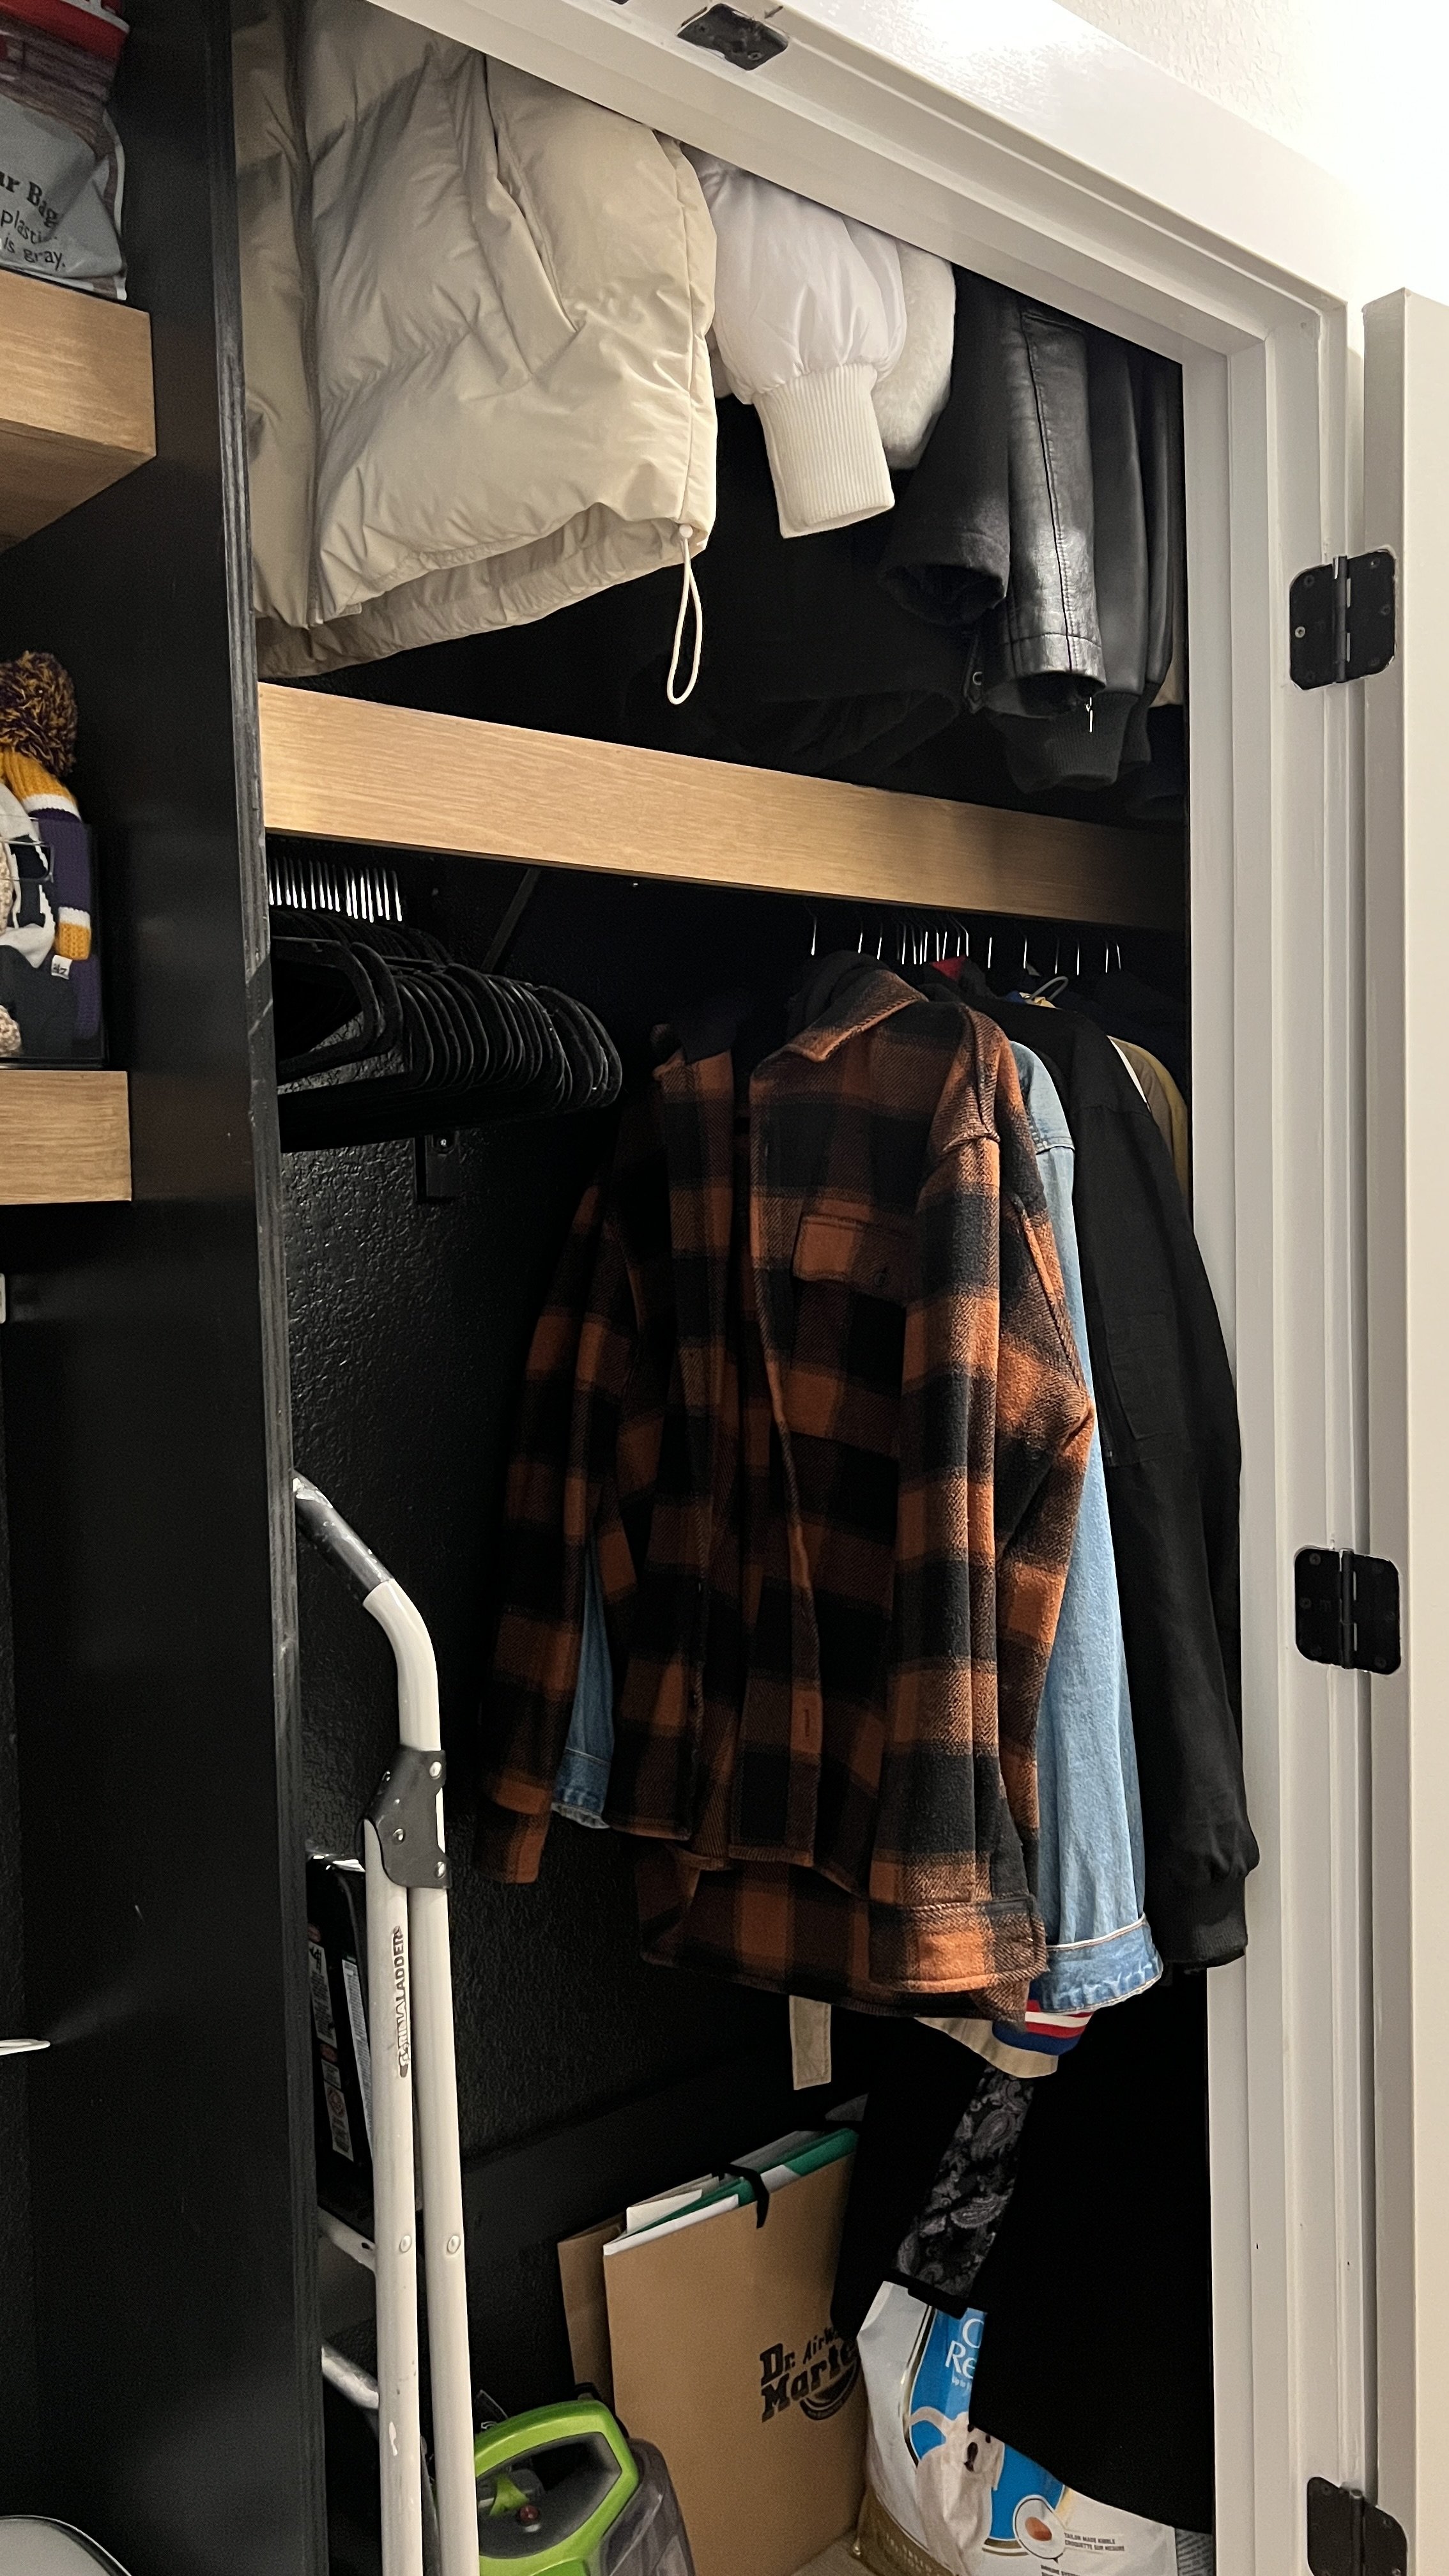
I’ll also be installing a second hanging rod above the old/existing hanging rod, as close to the ceiling as possible. We have 9’ ceiling, but only 6’8” doorways. That means that the majority of this upper hanging space will be hidden above the door and behind the walls of the closet, but that’s what we want! This area will be used to store out-of-season coats and jackets that we don’t wear very often, so having them up high and out of the way is actually perfect for us.
The upper hanging rod will go all the way across the closet. We won’t be utilizing the hanging rod on the left (cleaning) side of the closet at all, but this was the easiest way to mount the rod.
Repeat the steps for installing the side shelf supports on both the right and left walls of the closet.
Use a laser level or tape measure to ensure both supports are mounted at the same height.
Install hanging rod end caps on upper and lower supports.
Repeat the steps for installing the hanging rod bracket support as close to the center of the hanging area as possible
Install the upper closet hanging rod, securing it to the center support bracket with screws.
I used the original hanging rod from this closet and just spray-painted it black.
Create The Center Wall/Divider
I used 3/4” plywood to create the center wall/divider because that’s what I already had on hand (and it was already cut to the correct dimensions) but you can use whatever material you prefer. I didn’t find it necessary to build a real structural wall with true framing and drywall, plus that would’ve eaten up a few more inches of space than this method. Also, the plywood I’m using for the center divider is only 8’ tall so it will not interfere with the hanging rod at all.

Rip a sheet of plywood down to 16” x 8’
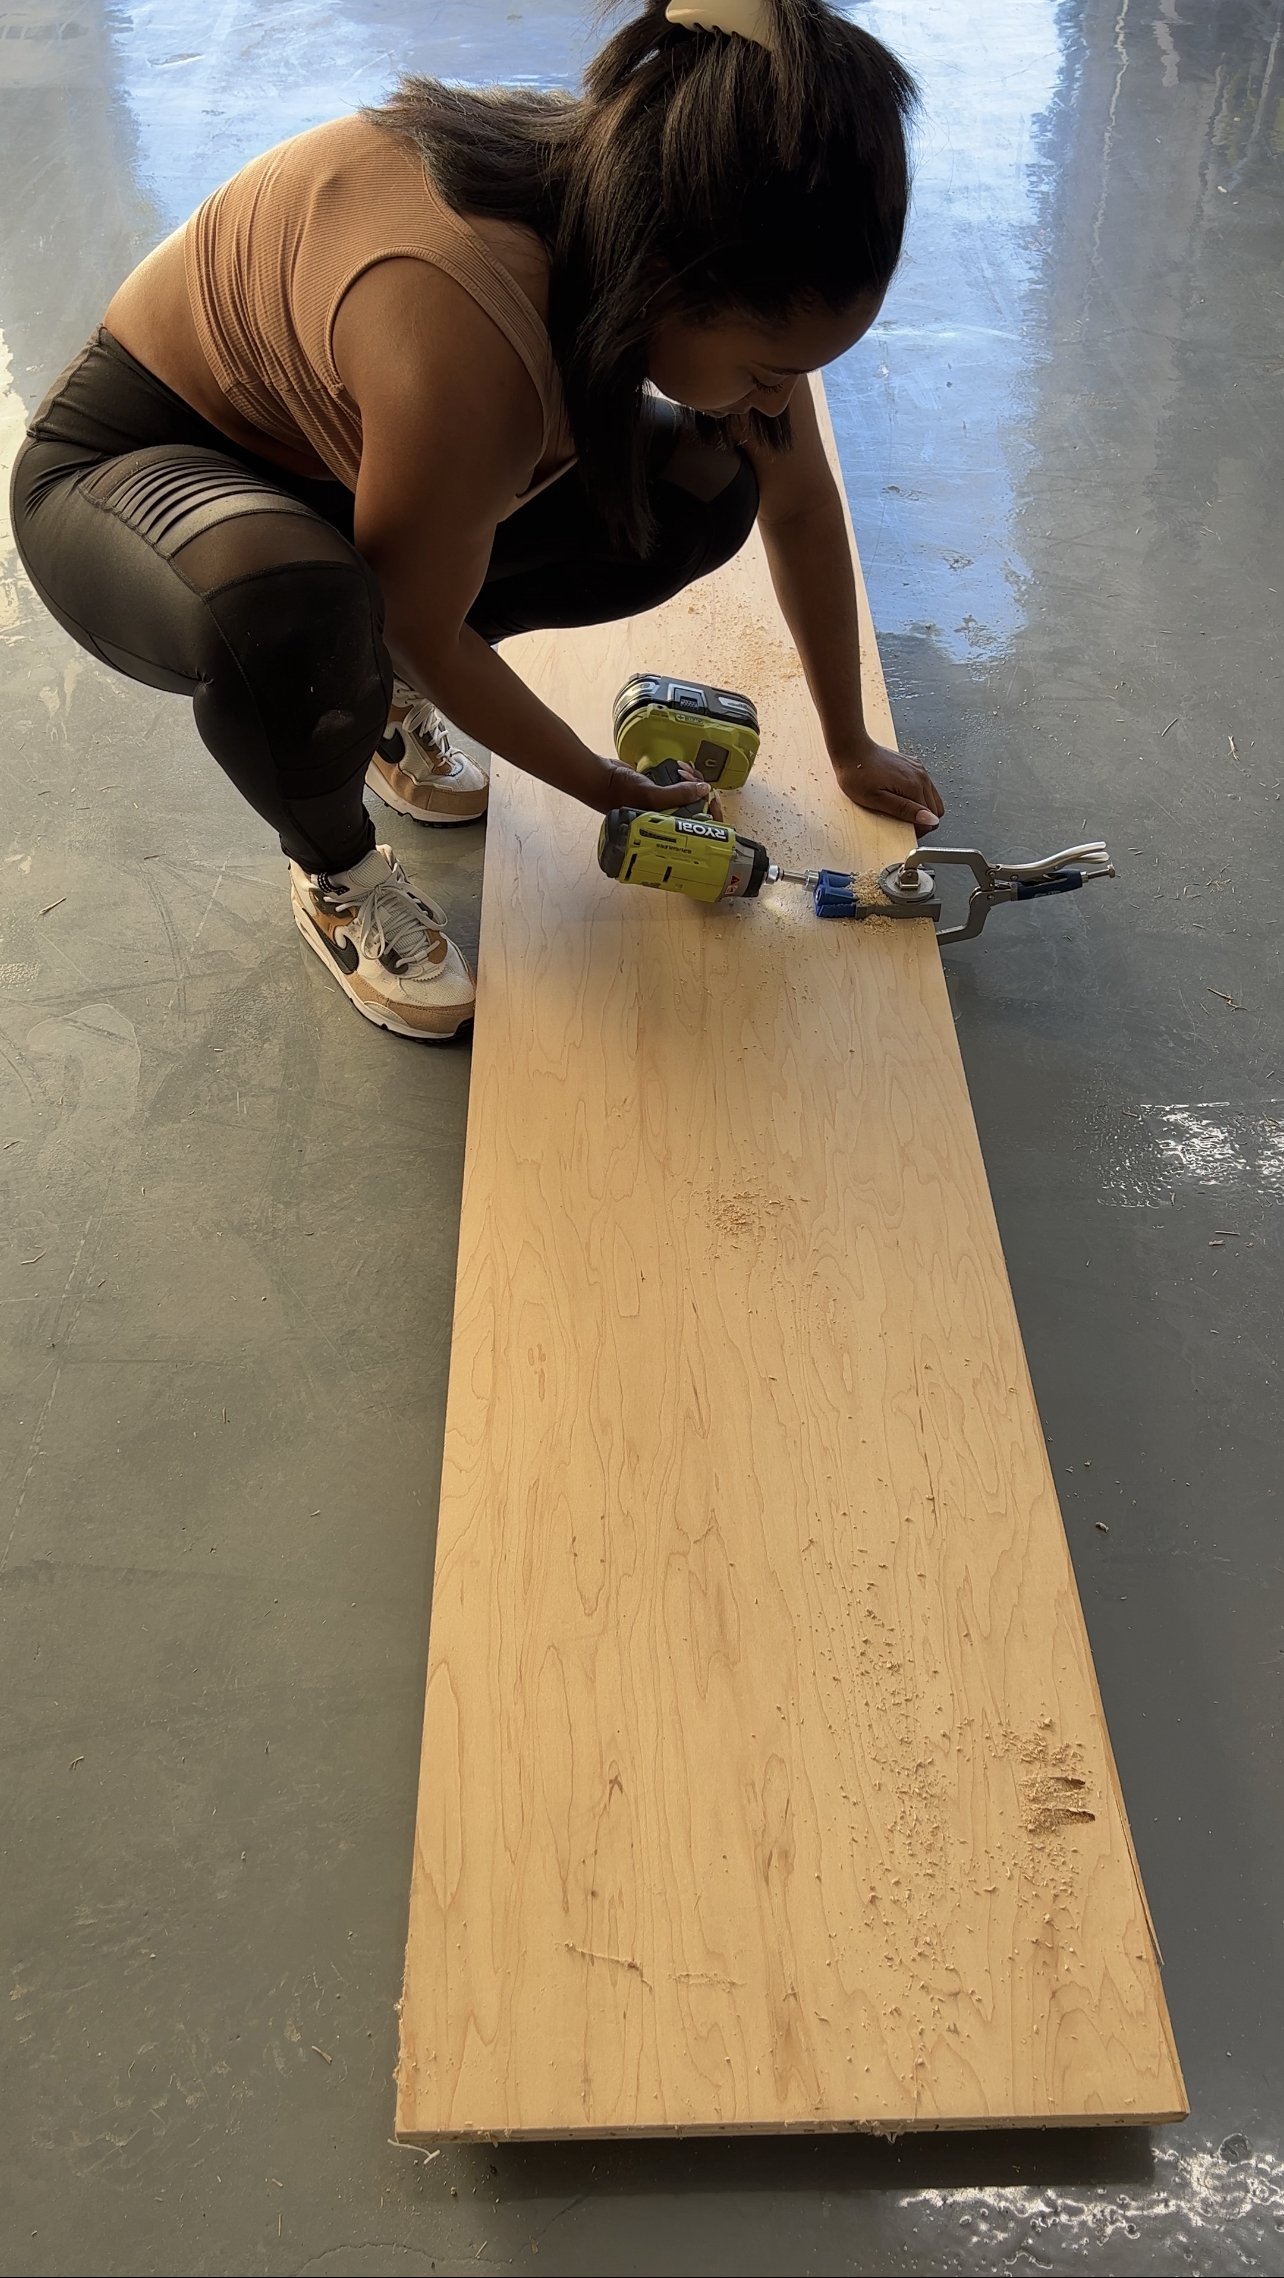
Drill 4 sets of pocket holes along the long side of the plywood
Install the plywood vertically in the closet, butting it directly up against the cut edge of the original shelf support.
Use 2 1/2” pocket hole screws to secure it directly to the stud
Okay now pay close attention because here is where I messed up the first time around.
(you can witness the whole, tragic process for yourself here in HD)
Even though the center divider is secured to the wall in the back, there’s nothing holding it square, perfectly perpendicular to the back wall. Or if you imagine it from above, nothing keeps it from looking like / or \ instead of |. In order to make sure that your shelves don’t come out all wonky or need any weird cuts, the center divider MUST be square.
Determine which way your center divider is bowing. Mine bowed to the right (\) towards the side with the pocket holes, so that’s what I’ll use for my example.
Measure the distance on the back wall from the right face of the plywood to the right wall. I used my laser measuring tool for this instead of a measuring tape and it was much easier.
Cut a scrap 2x4 to length and wedge it in between the divider and the wall to hold the wall square.
Paint The Closet
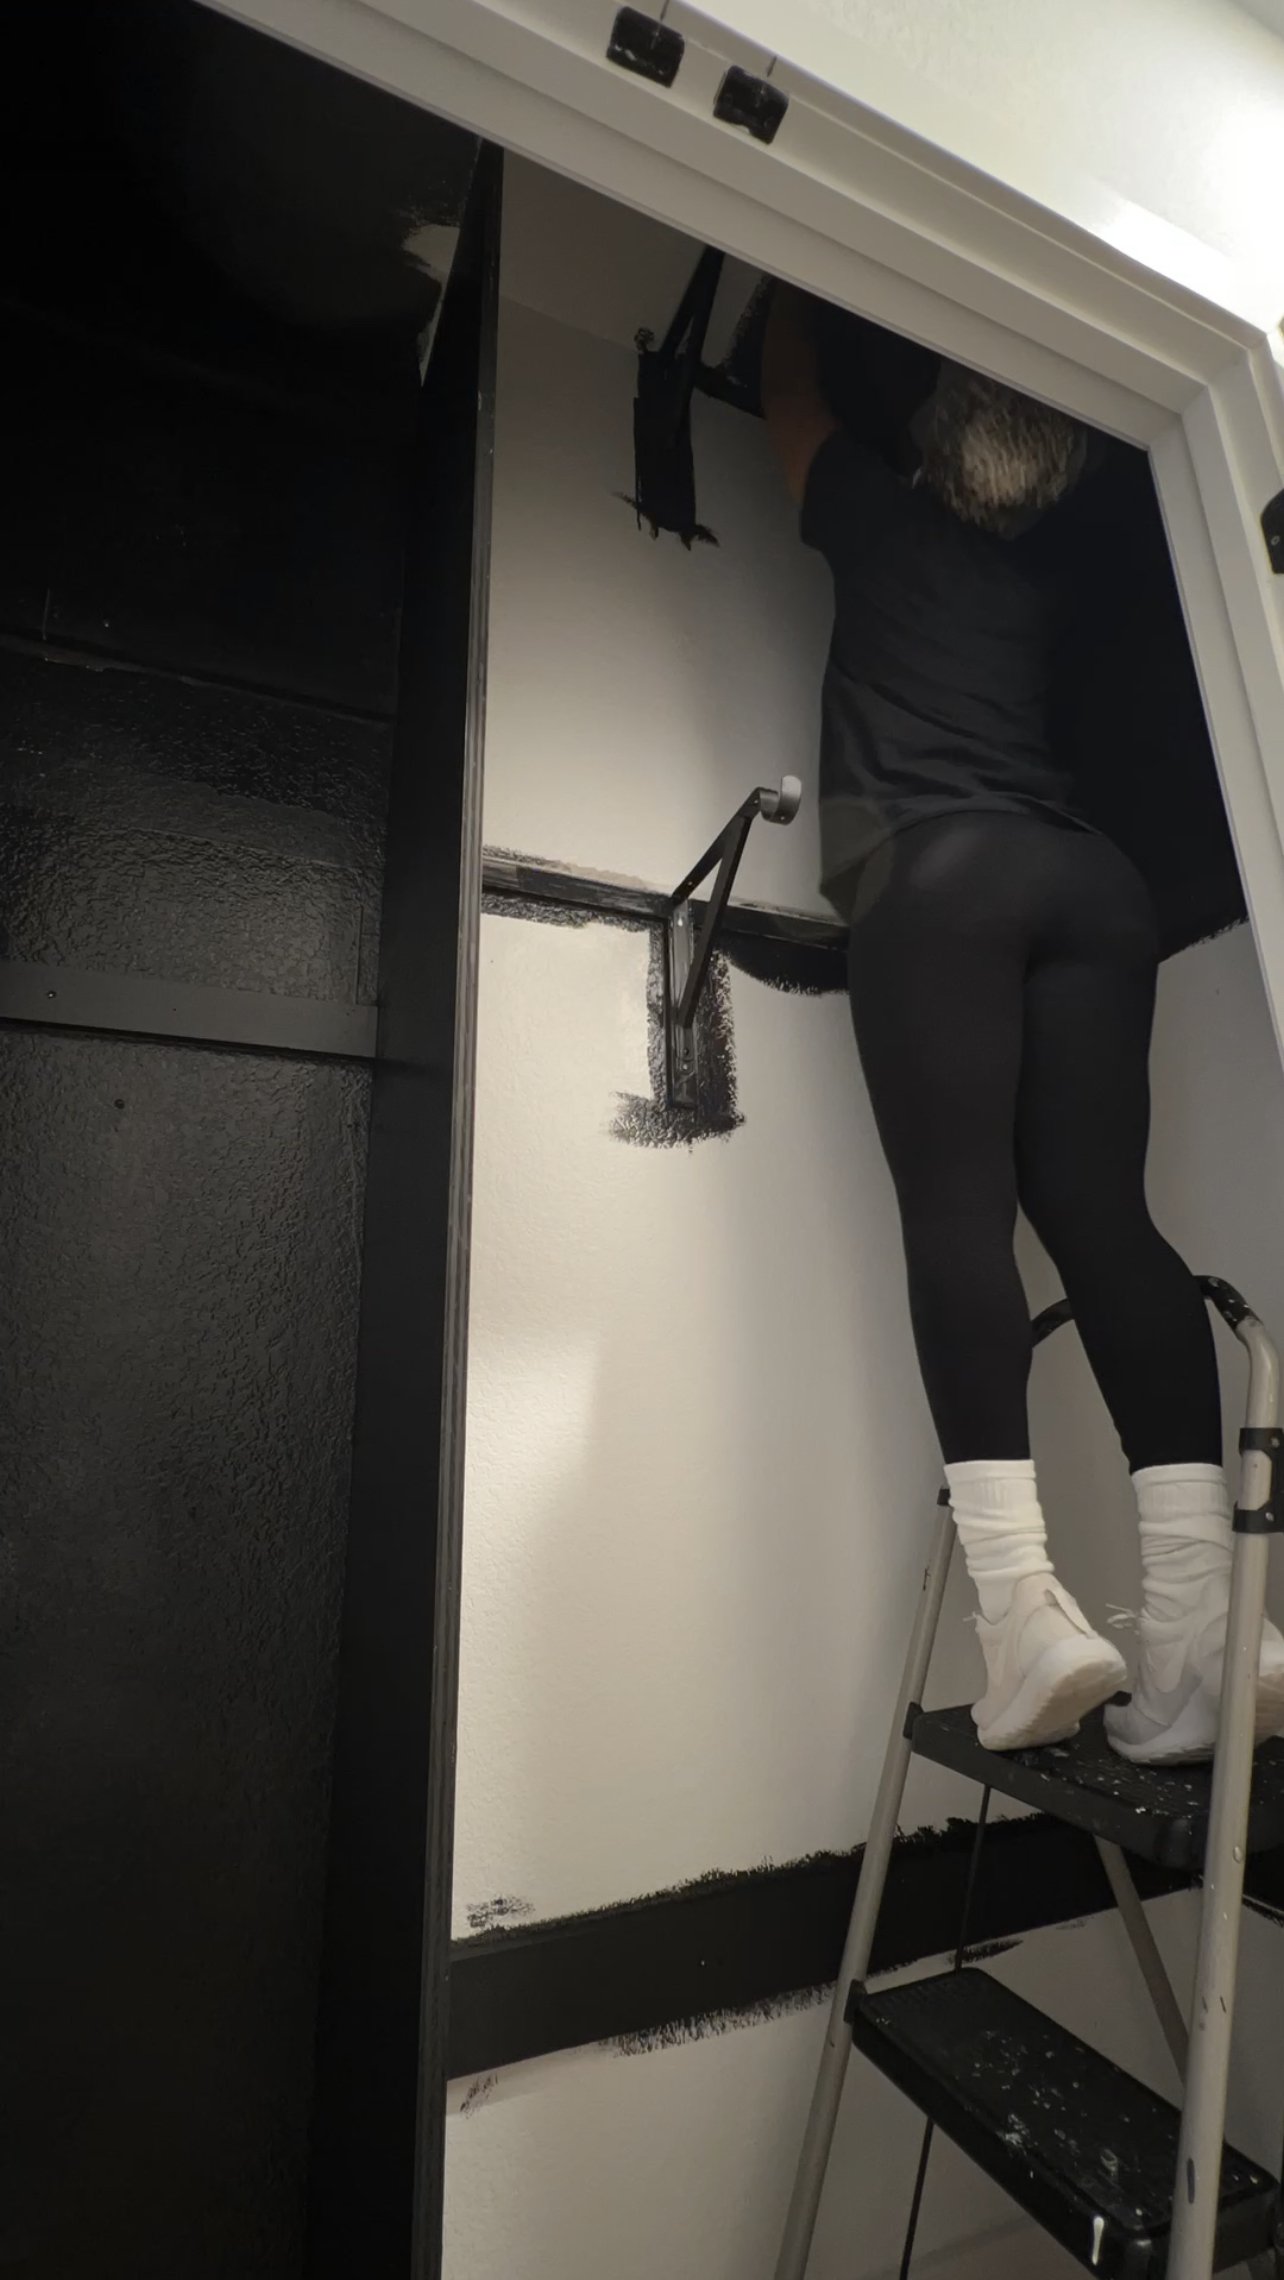
If you’re gonna paint, now’s the time to do it while there’s still plenty of room to maneuver around the closet. I used Behr Marquee, tinted to SW Tricorn Black in Semi-Gloss. I did 2 coats of paint (no primer needed) and completely ignored any spots that obviously could have used some spackle or touching up bc I’m *lazy*. And it’s just a coat closet. (I did touch up the paint after I was done banging all the shelves around in there though, I’m not a complete slob.)
Also, please add edge banding to your center divider/wall and paint that too. It’ll give you a nice clean edge instead of that rough, tacky plywood edge I have haha. I ran out before I started this project so I guess that task is on my list. Add this project to my long list of projects that only 95% complete. :’)
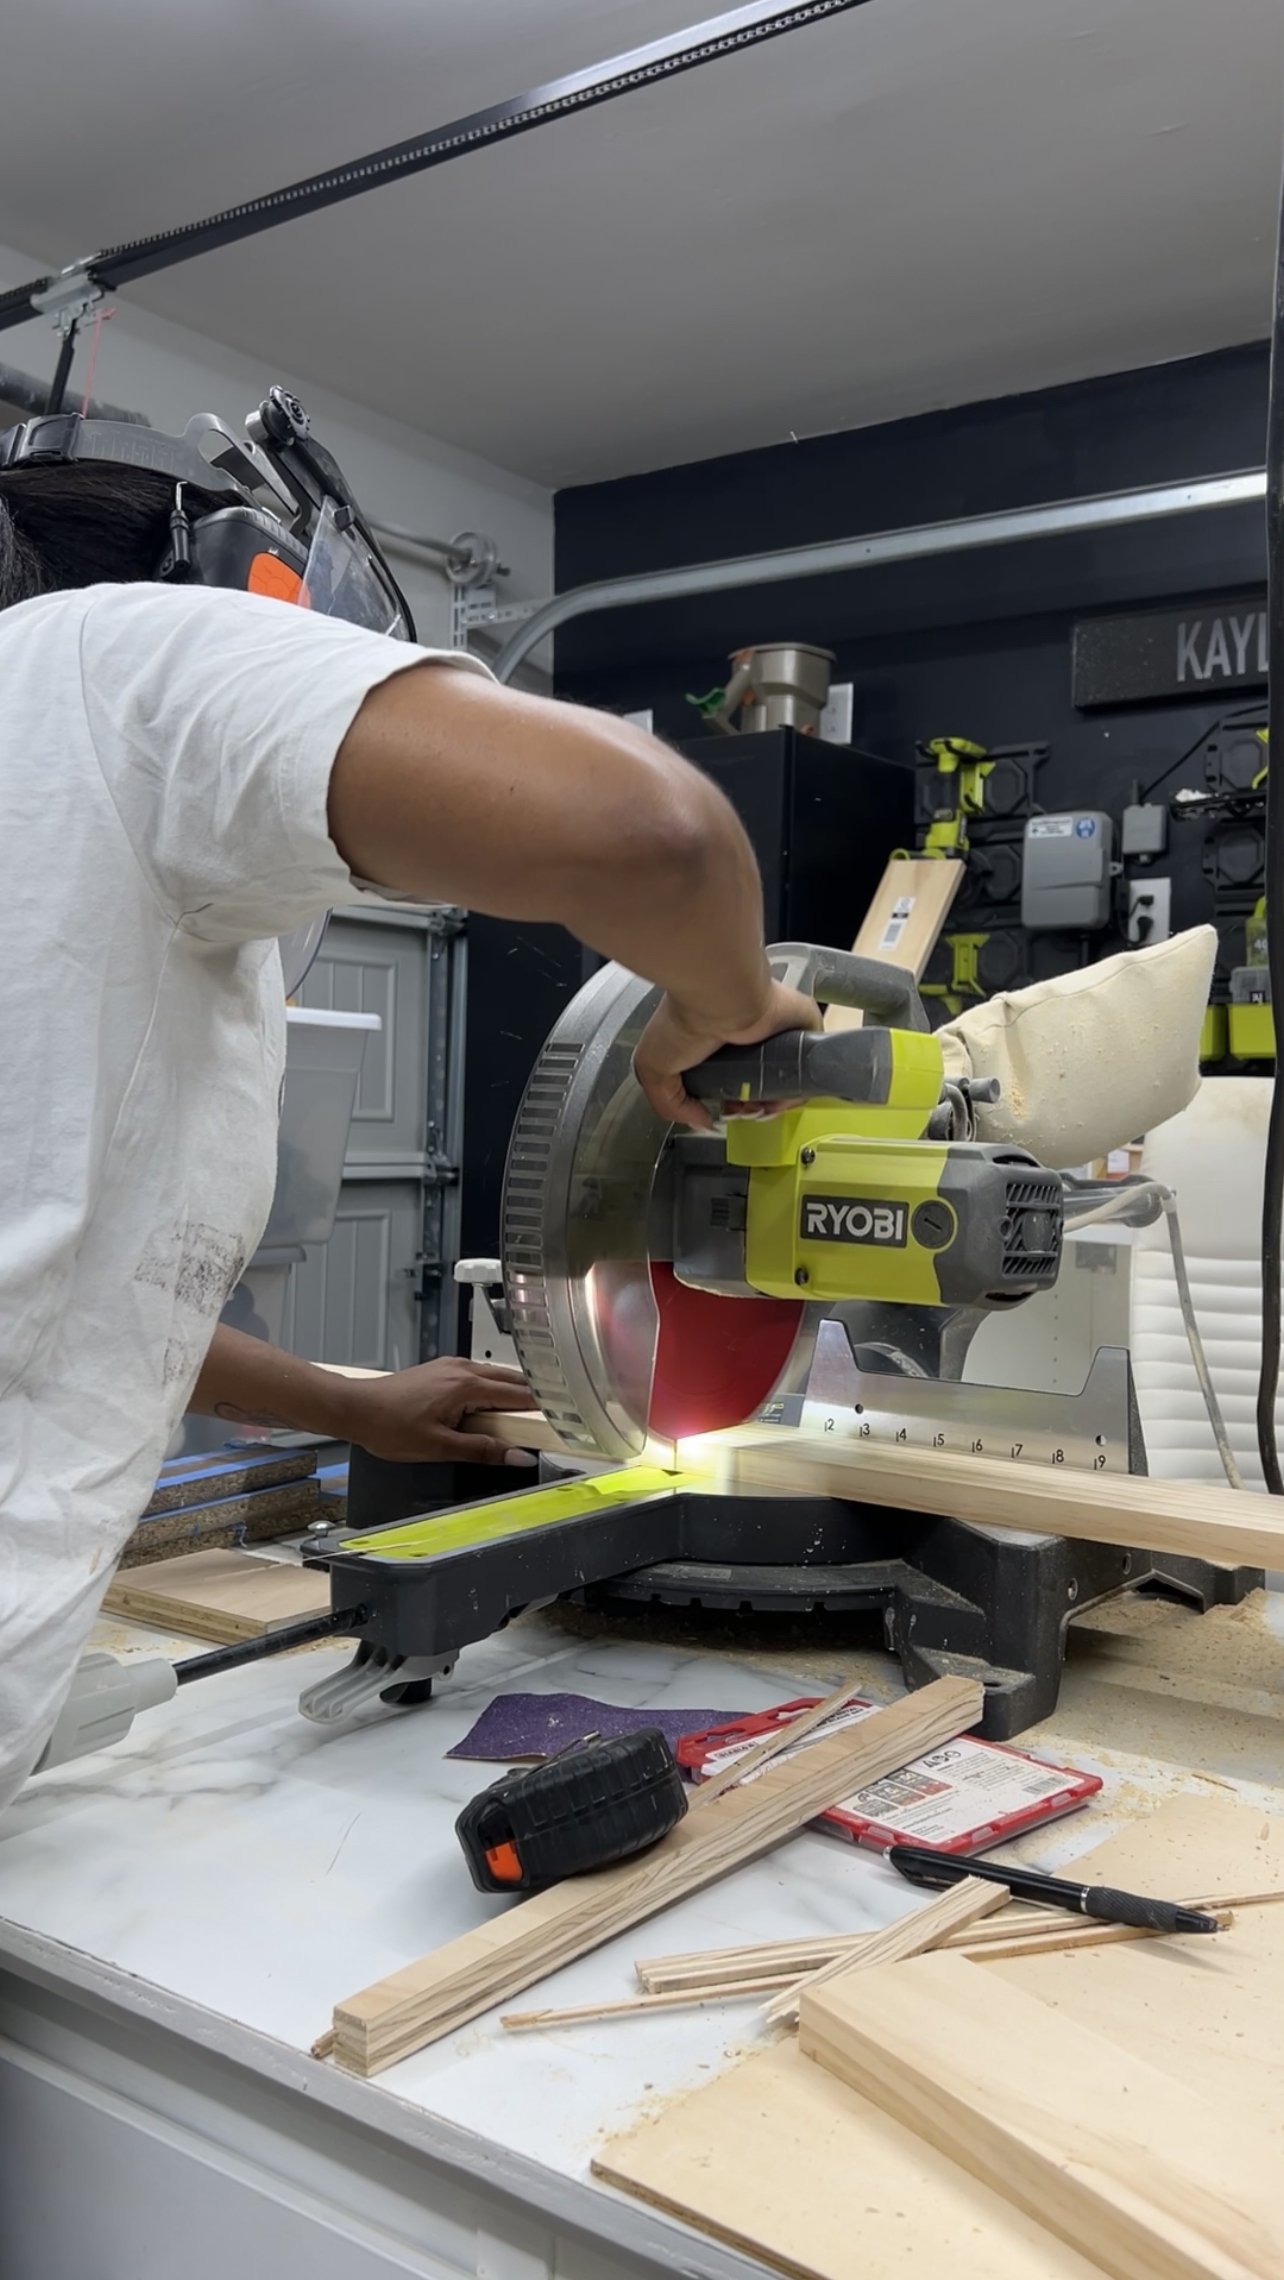
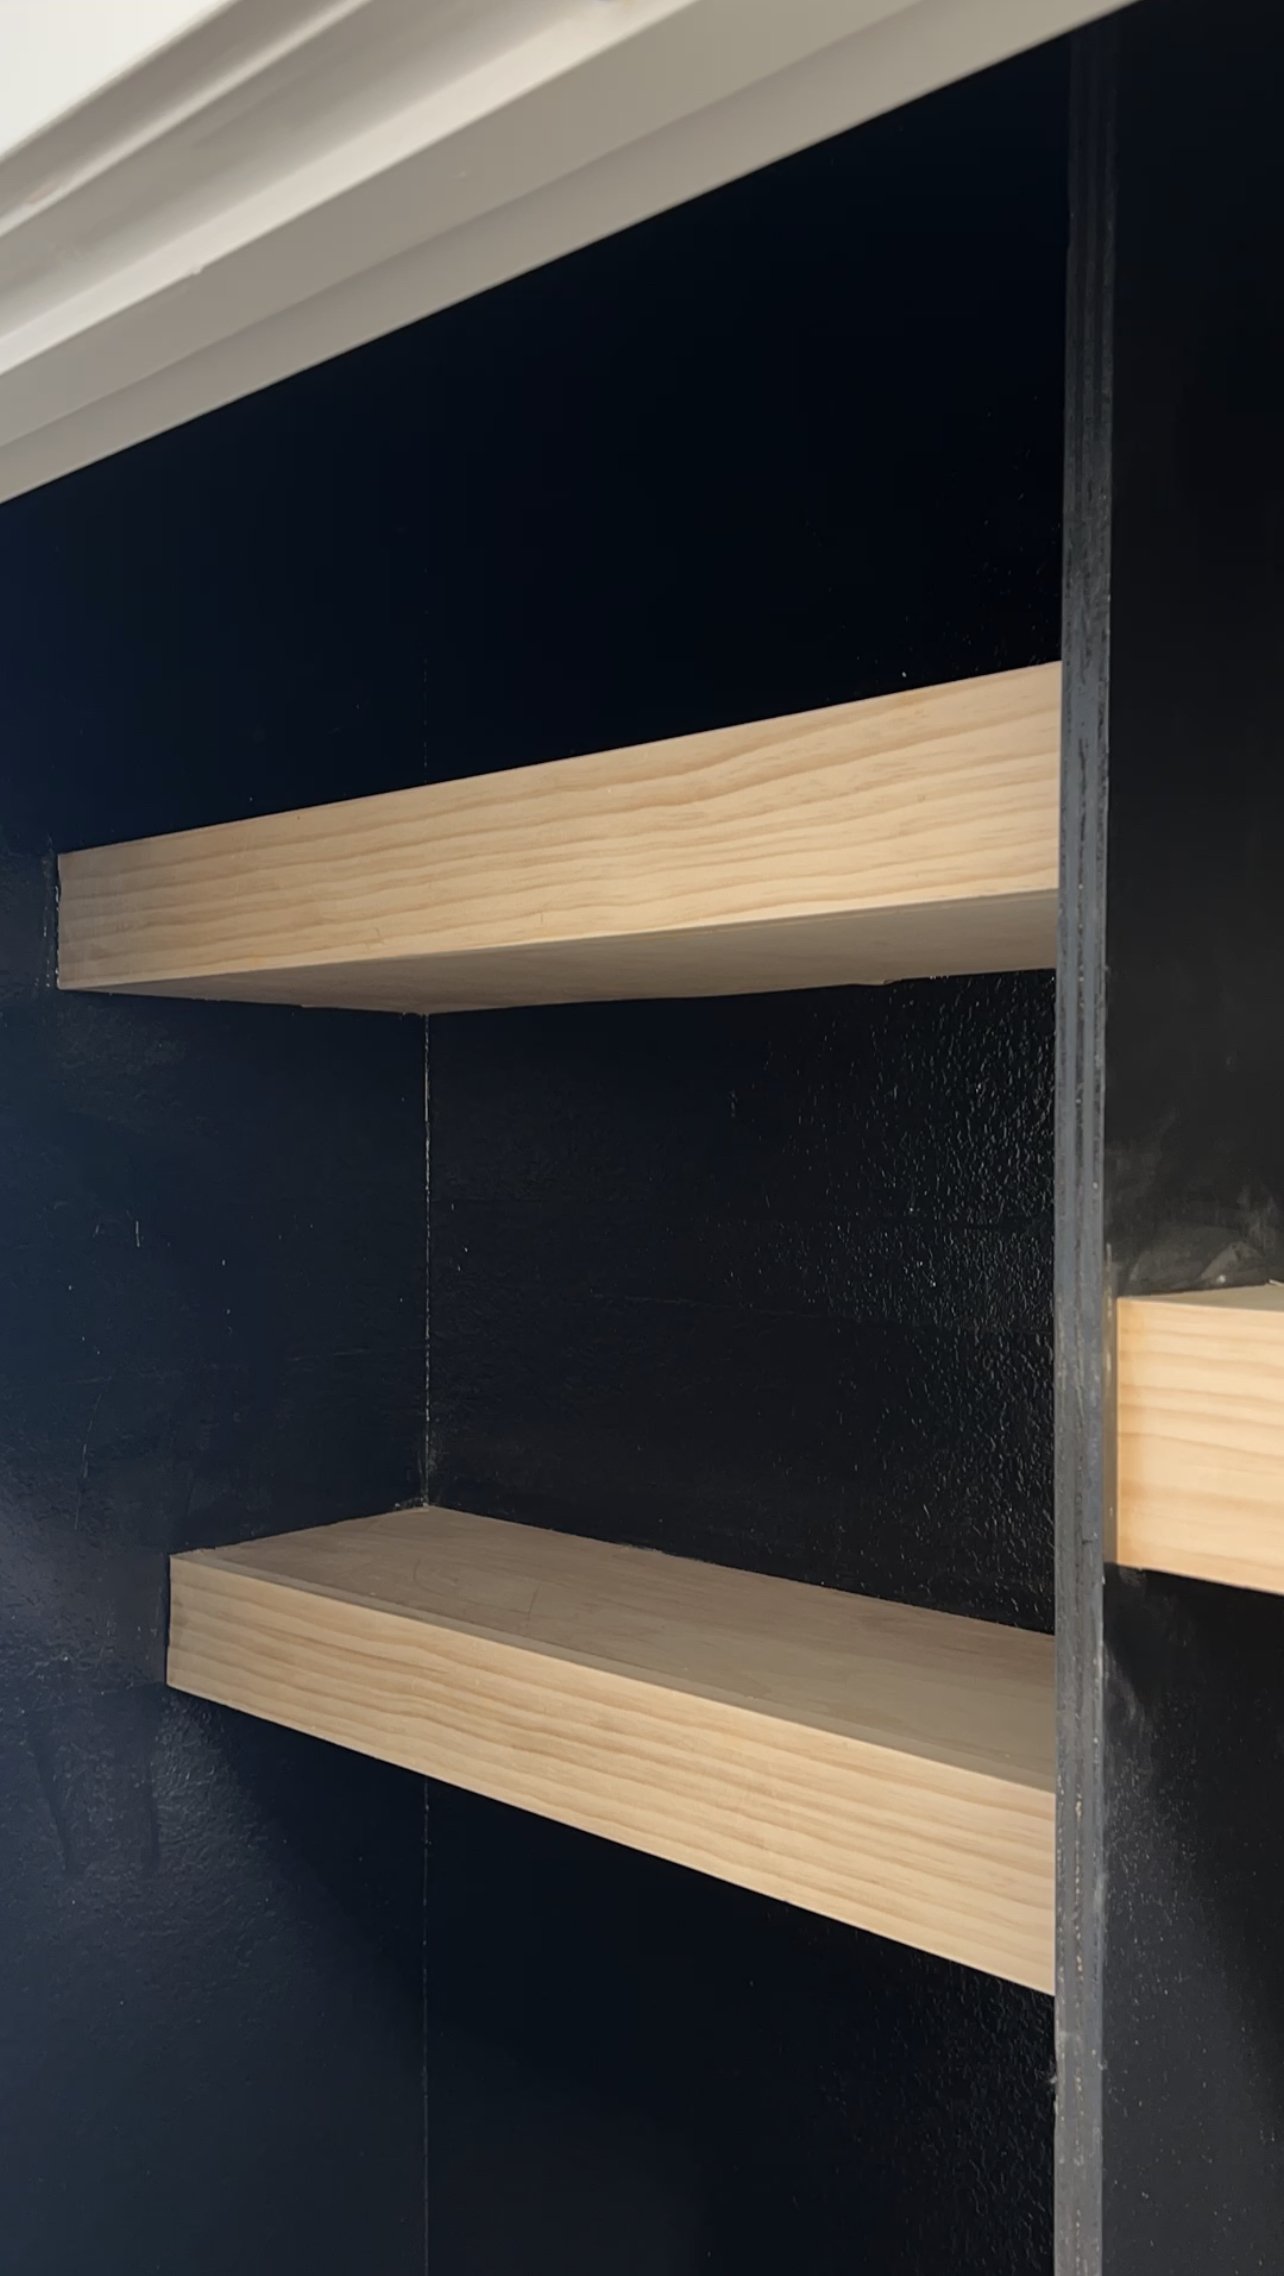
Cut The Floating Shelves
After the paint was dry, it was time to add the floating shelves. My first shot at these shelves was equal parts embarrassing, comical, and frustrating. Seriously you would’ve thought I had never built floating shelves before, but alas, it was actually like my 10th time so there was truly no reason for the foolishness. I’m skipping over everything I did wrong (because you can watch that on Youtube if you enjoy that kind of thing) and I’m just going to tell you how to do it correctly.
Determine how deep you want your shelves to be. The total depth of my shelves (including the front cap) are:
Cleaning Side
16” deep at the top (technically not a shelf, but the cap/top that turns the center divider into more of an enclosed cabinet type space)
12” deep in the middle (I kind of wish I had made this one just an inch deeper to accommodate a wider variety of storage bins/baskets, but I made it work)
9” deep at the bottom
Coat Side
15 3/4” deep
Determine how much distance you want between each shelf. A good rule of thumb is 18” which is the standard backsplash height. Mine are spaced 18” and 15” apart.
Cut 3/4” plywood and lauan (aka 1/4” plywood) to the correct dimensions for each shelf. The dimensions of my shelves were:
Cleaning Side
Top - 31 1/2” W x 16” D. This will be secured to the top of the center divider.
Center - 31 1/2” W x 11 1/4” D. This will be secured between the wall and divider.
Bottom - 31 1/2” W x 8 1/4” D. This will be secured between the wall and divider.
Coat Side
41” W x 15” D. This will be secured between the wall and divider.
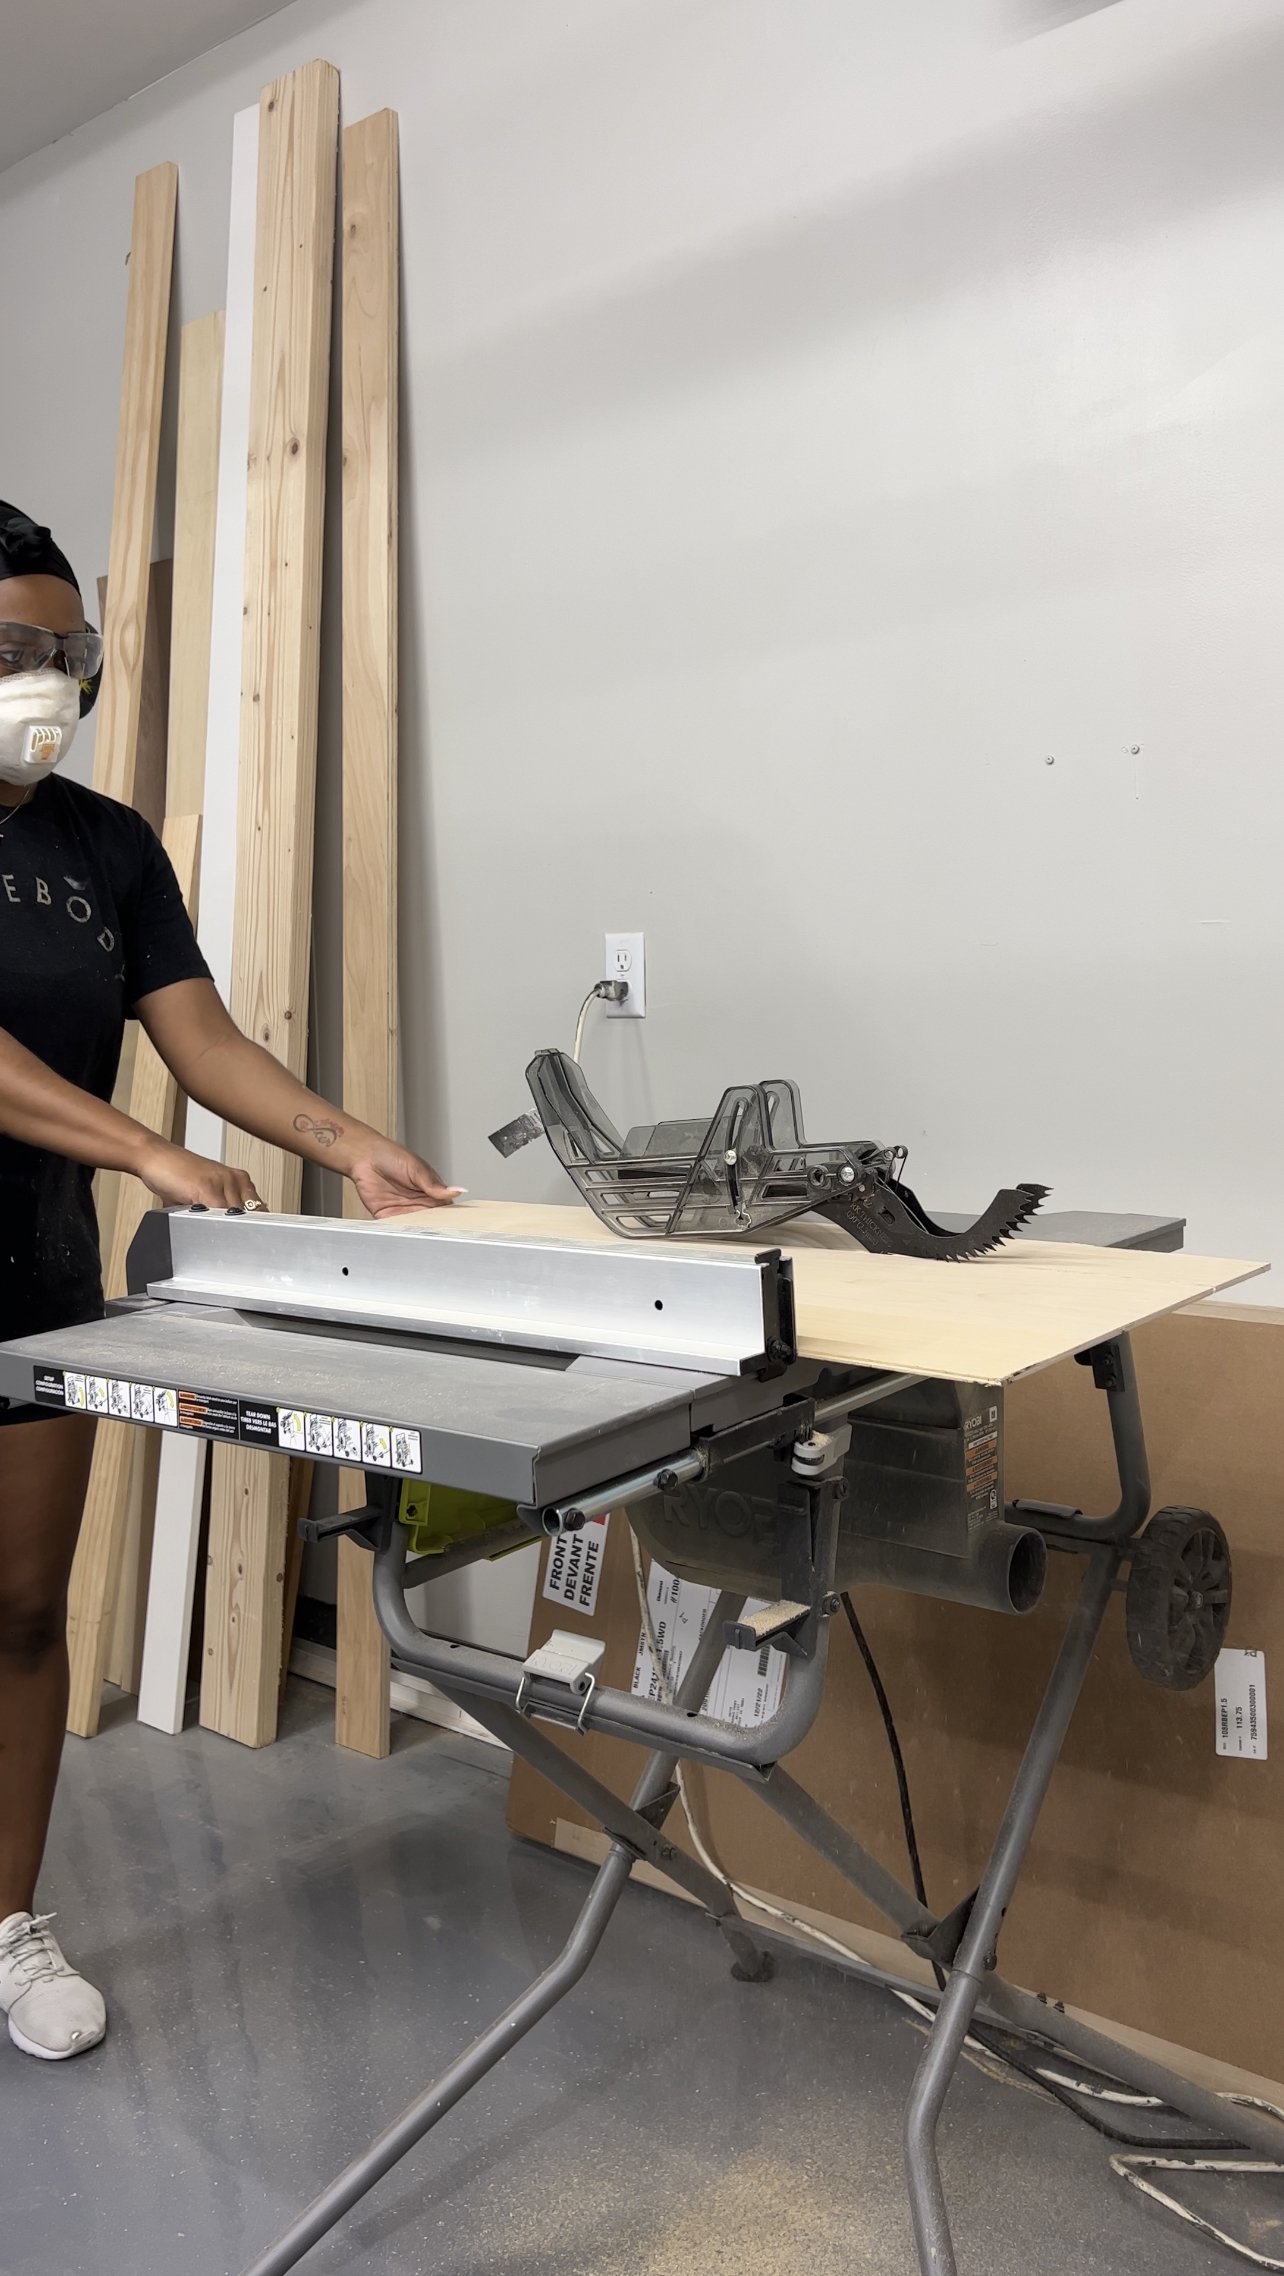
Cut 2” select pine or MDF to create the back wall shelf supports (actual dimensions = 1.5”). The length for each support should be equal to the distance from the wall to the divider (in my case, 41”)
Cut 3” select pine to create the front edge of the shelf for the middle, bottom, and coat shelf only. (actual dimensions = 2.5”). The length for each front edge should be equal to the distance from the wall to the divider (in my case, 41”)
Cut 2” select pine or MDF to create the side wall shelf supports (actual dimensions = 1.5”). The length for each support should be equal to the depth of each shelf (in my case, 15”, 11 1/4”, and 8 1/4”)
Make sure each support piece is level, then install it with brad nails to hold it in place and screw it directly into a stud.
Floating Shelf Math, Explained
Although wood is labeled using nominal dimensions (like ’2” select pine’), it’s important to make sure you’re using the actual dimensions when creating floating shelves so you can be sure that it is assembled correctly, with no gaps or overlapping.
The math for the thickness of our floating shelf should look like this:
3/4” plywood top + 1 1/2” shelf support + 1/4” lauan underside = 2.5” total shelf thickness (and width of select pine front cap)
The math for the depth of our floating shelf should look like this (using the coat closet shelf as the example):
desired total depth of 15 3/4” - 3/4” (thickness of the front cap) = 15” total length of the side support
Assemble The Floating Shelves
Now you should have all of your shelves cut and the supports in place on both sides of the closet, so it’s time to actually assemble the shelves. I use what I call ‘the sandwich method’. Basically, we just add a top, bottom, and front to the shelf by sandwiching them around the supports we just installed. This makes the shelf appear as if it’s one thick piece of wood and hides the fact that it’s mostly hollow on the inside.


Slide your plywood into place above each shelf support. Push, shove, use a rubber mallet; do whatever you gotta do. I won’t judge.
Secure the plywood to the supports with 1 1/2” brad nails.
Slide your lauan into place below each shelf support.
Secure the lauan to the supports with 1” brad nails.
Secure the select pine (front cap) to the front edge of the shelf with 1 1/2” brad nails.
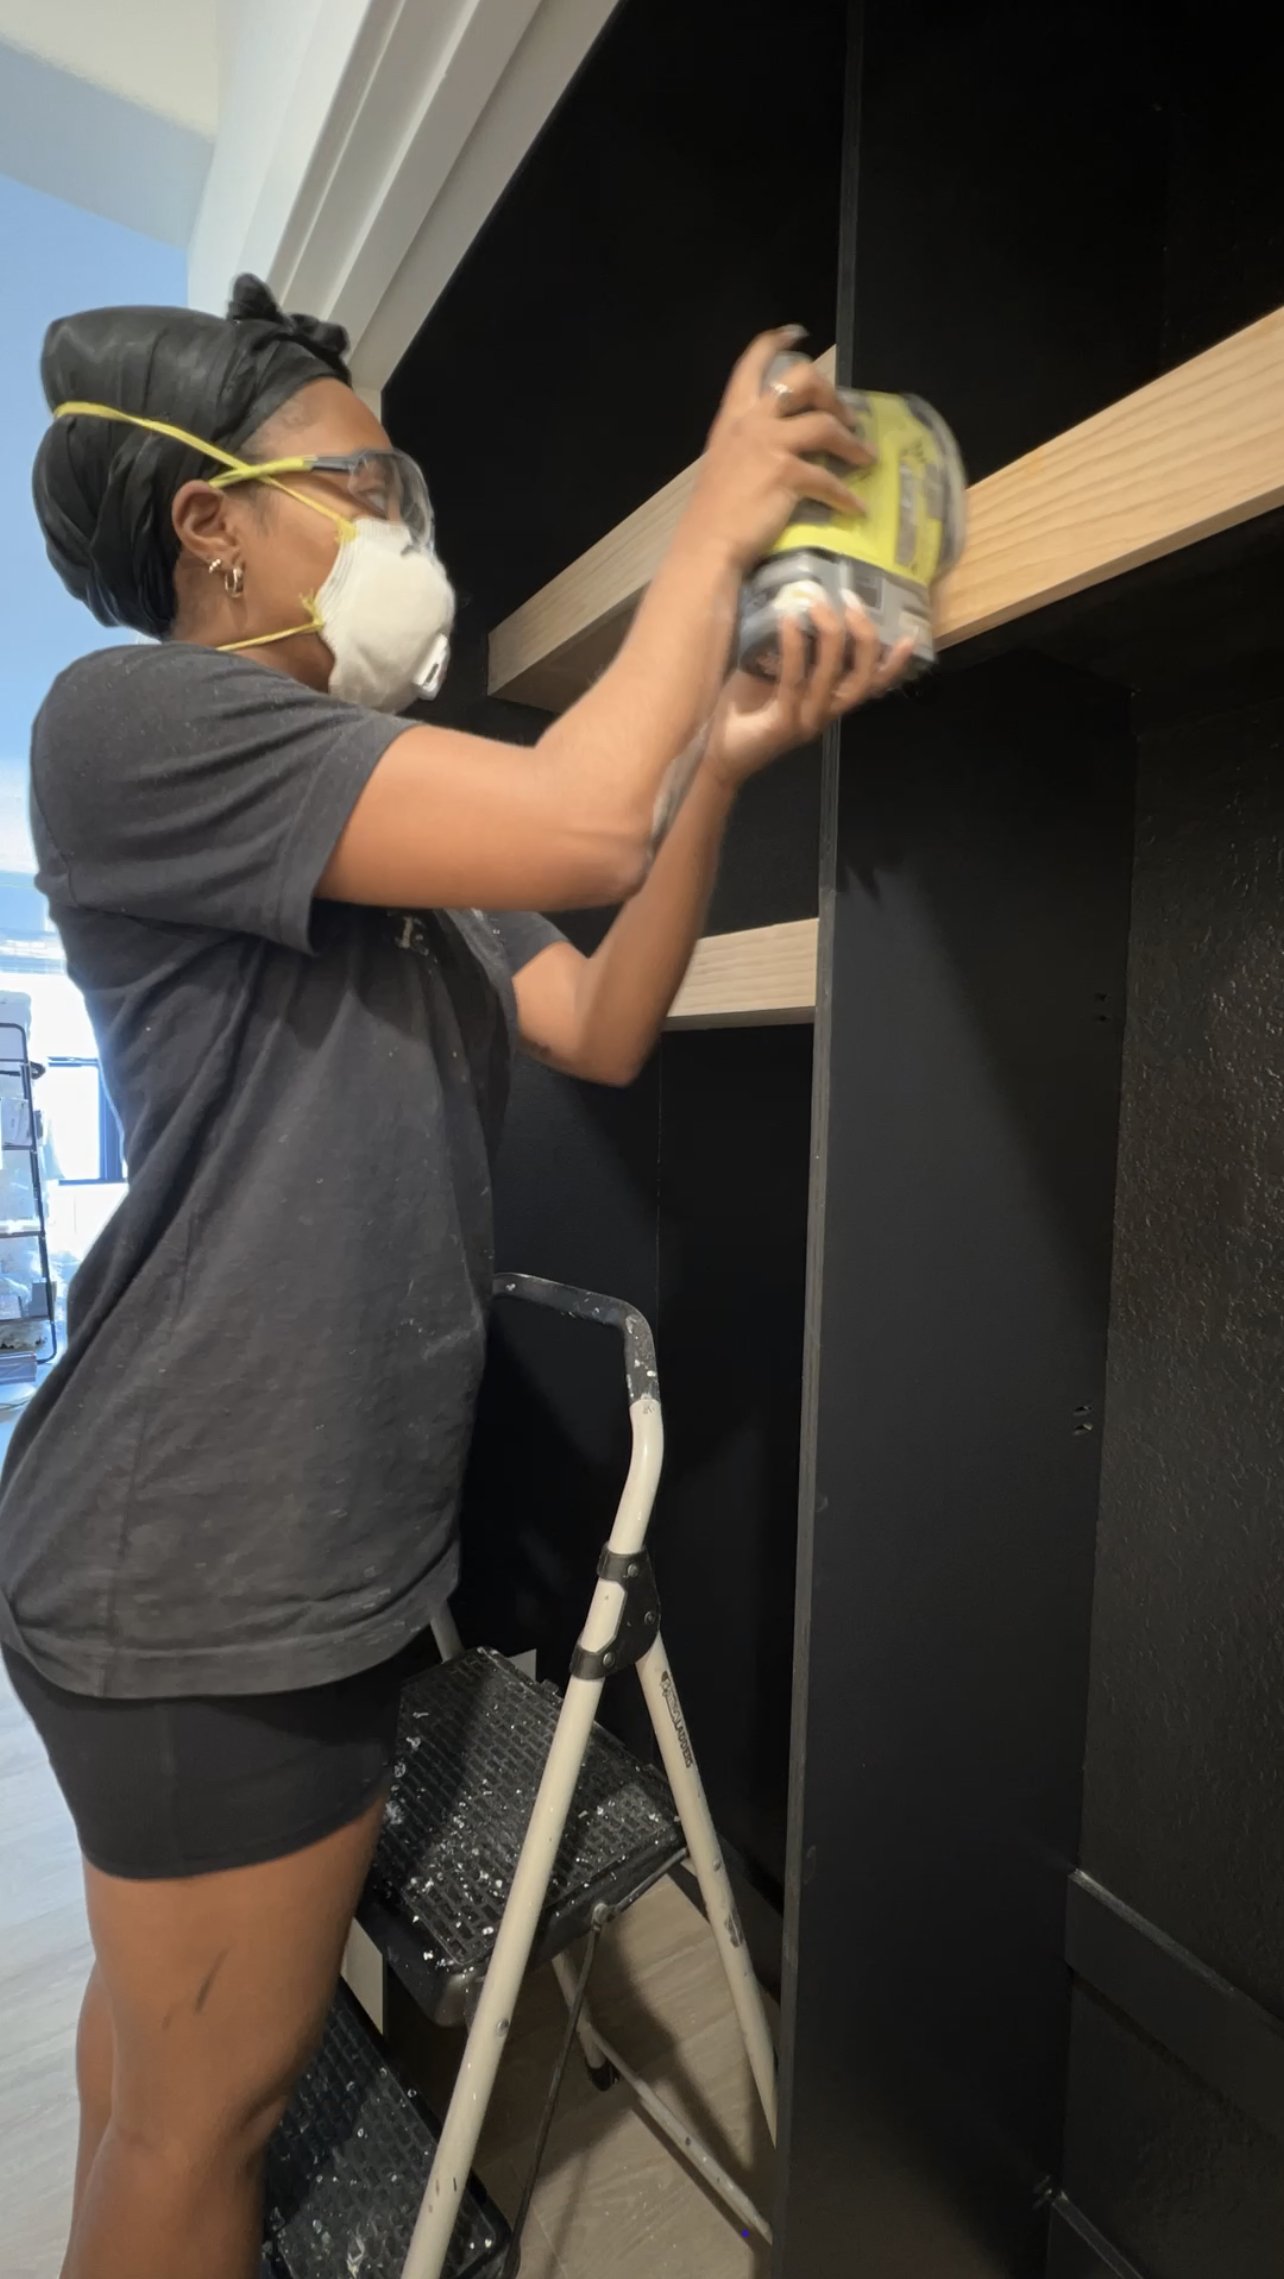
Stain The Shelves
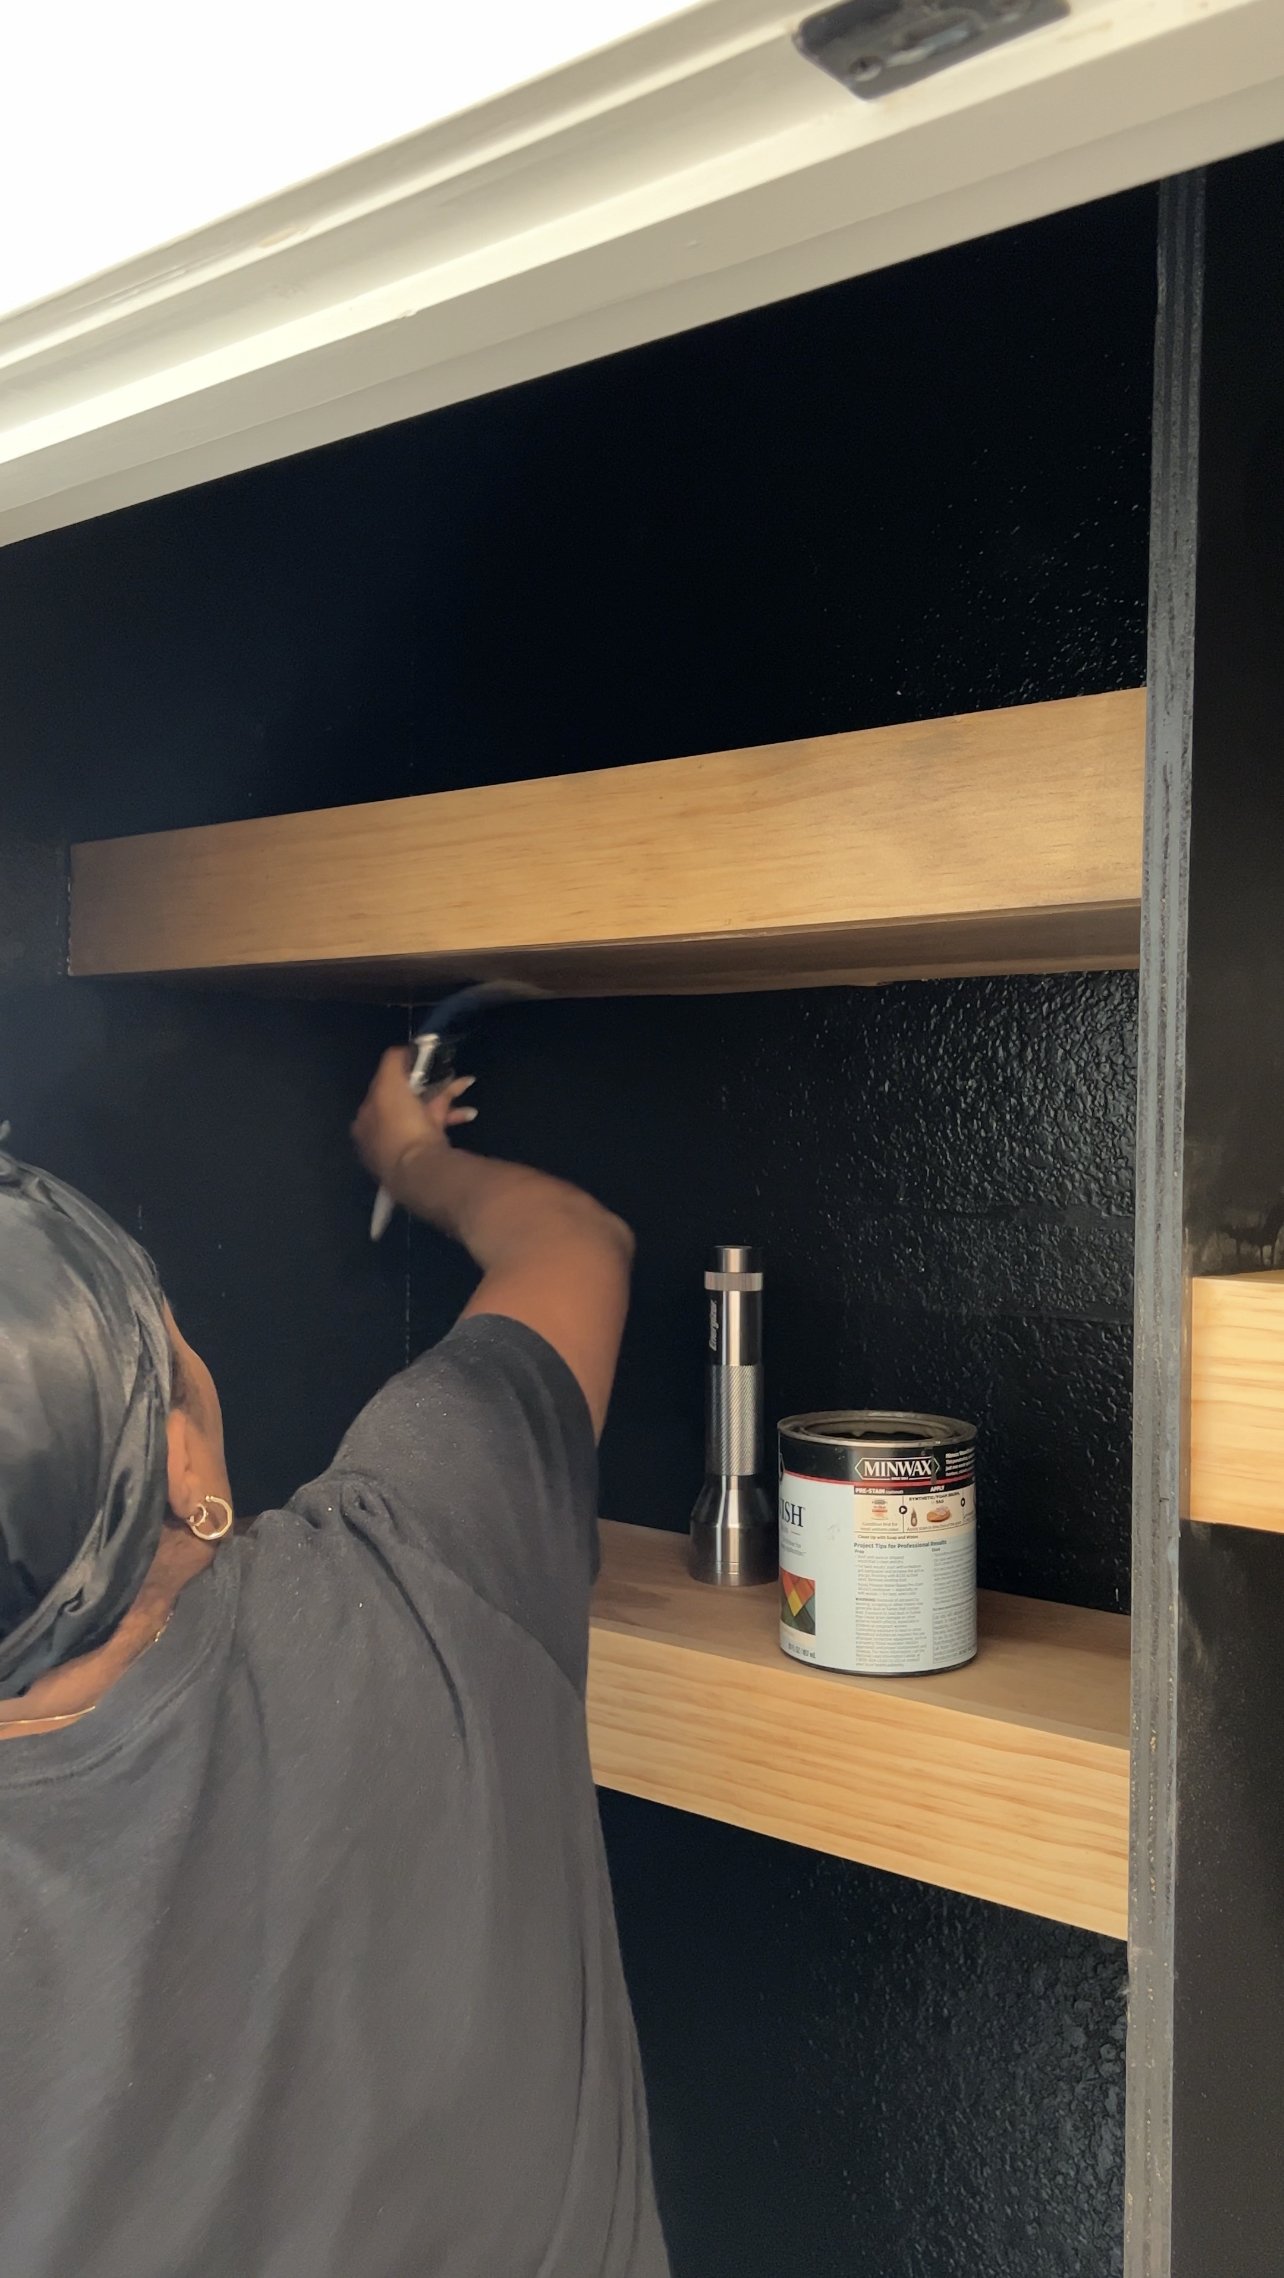
The final step of making your floating shelves is to stain them, so let’s get a move on!
Fill all of the nail holes with stainable wood filler. The one I linked above is the only wood filler I’ve used that gives me zero blotchiness.
After the filler is dry, sand down the shelf. I did the top and front but skipped the lauan since it’s so thin. Also, I know you’re not supposed to skip grits when sanding buuut I did it anyway. I sanded with 180 grit only and everything turned out just fine. Do you, though. I’m not gonna tell you how to live your life. Also also, yes, I’m aware that I probably should've sanded in my garage before I brought the shelves inside to assemble. BUT I still would’ve had to sand again inside after the nail holes were filled and I hate doing things twice, so yeah. Just hook up your corded sander to a shop vac and you’ll be fine.
Clean off all of the sawdust with a shop vac and tack cloth.
Apply 1 coat of wood conditioner to each shelf (I use a paintbrush for this).
After about 15-20 minutes, apply 1 coat of wood stain to the shelves. I have had such bad luck with staining in the past, but the water-based, tintable stain has never done me wrong. I apply a thin coat with a paintbrush in the direction of the wood grain and don’t wipe anything off, just let it soak in. This definitely isn’t what the directions (or the pros) say to do, but it works for me and leaves very minimal brush strokes.
After the shelves are dry, apply 2 coats of polycrylic to seal the shelves.
Restock The Closet

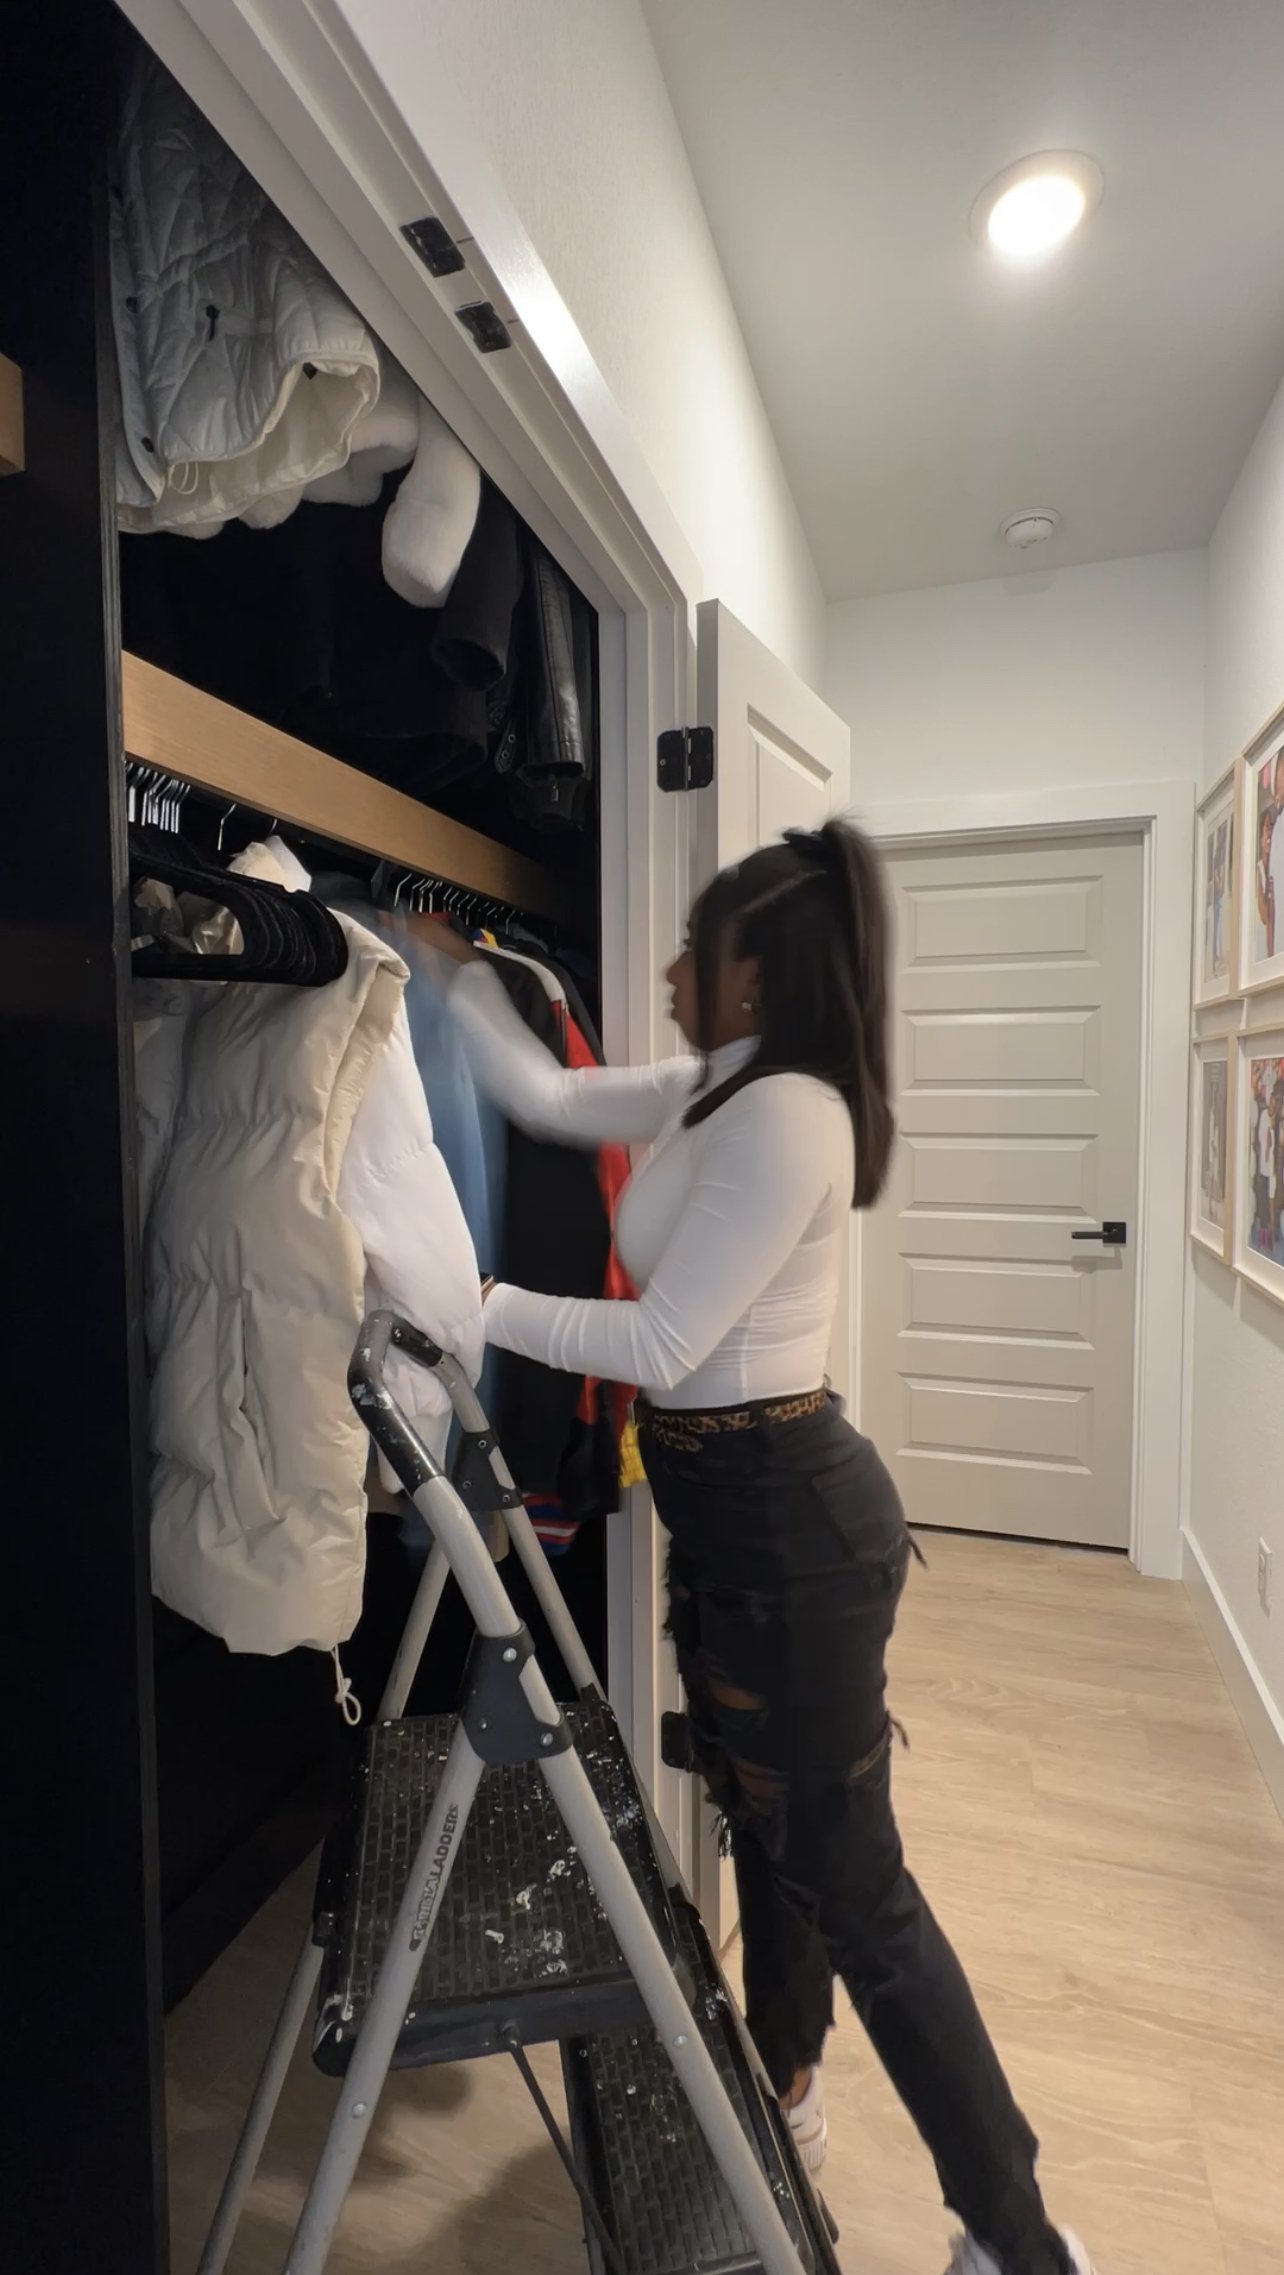
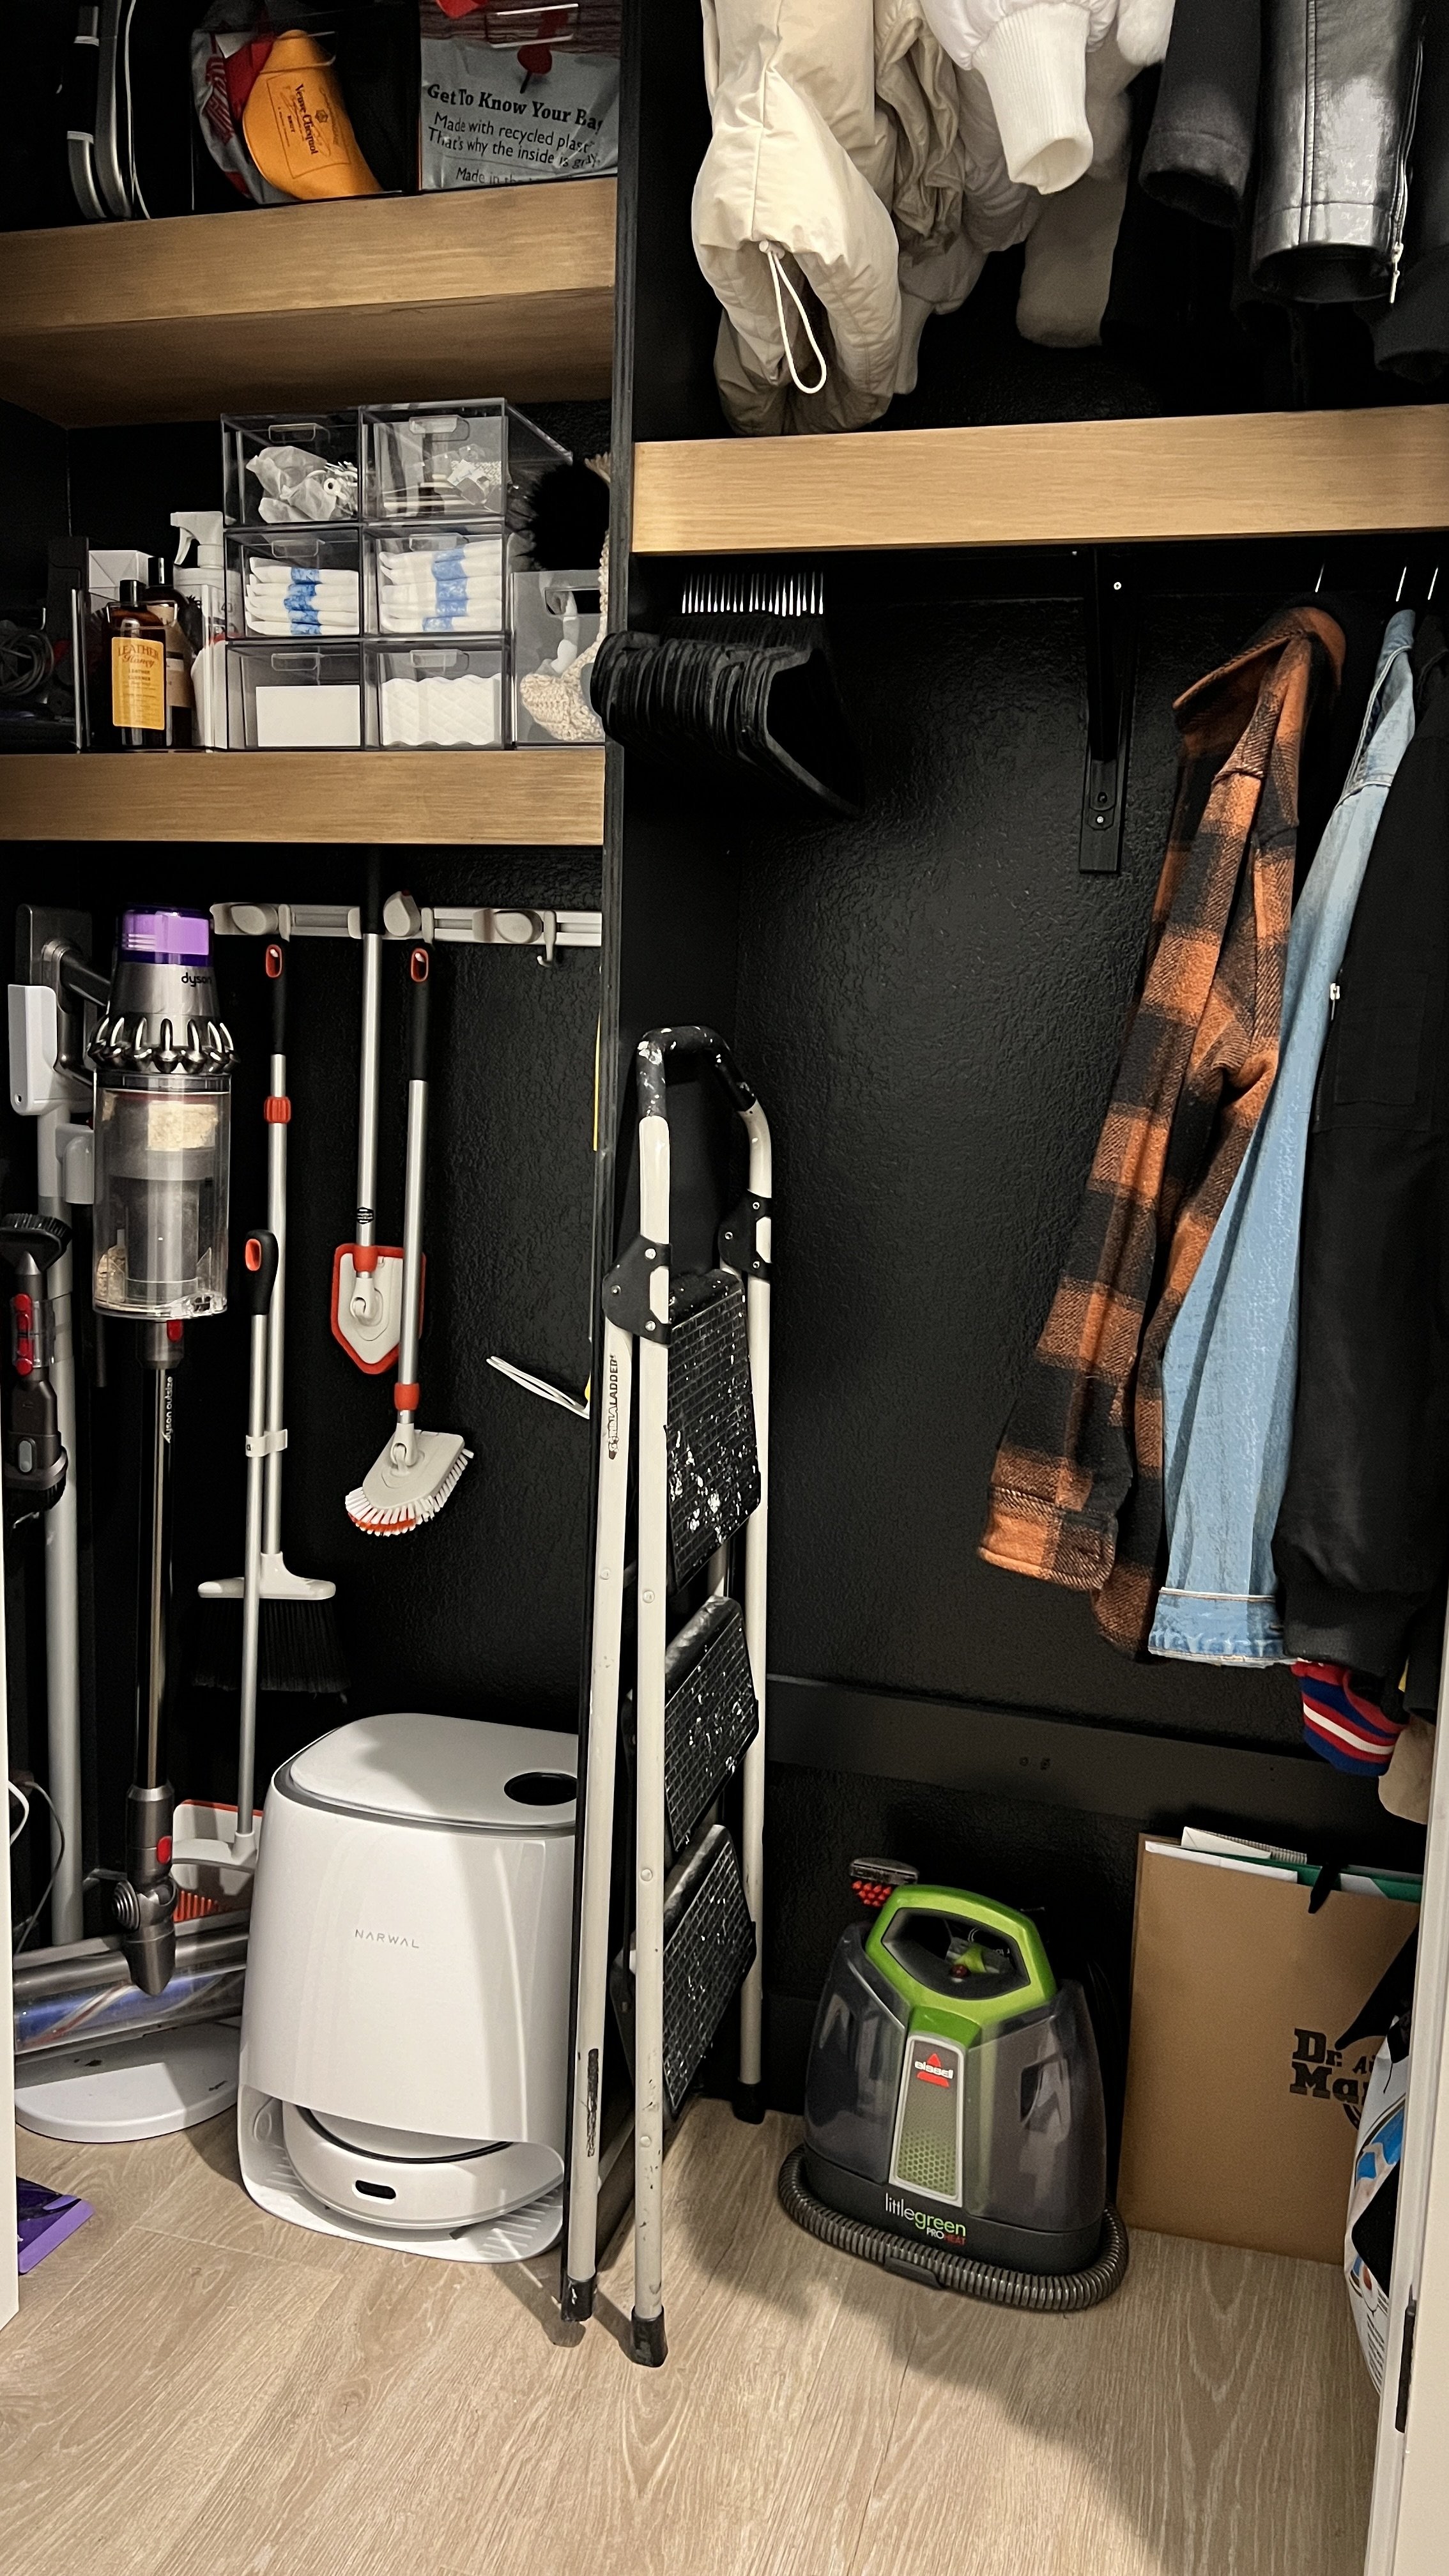
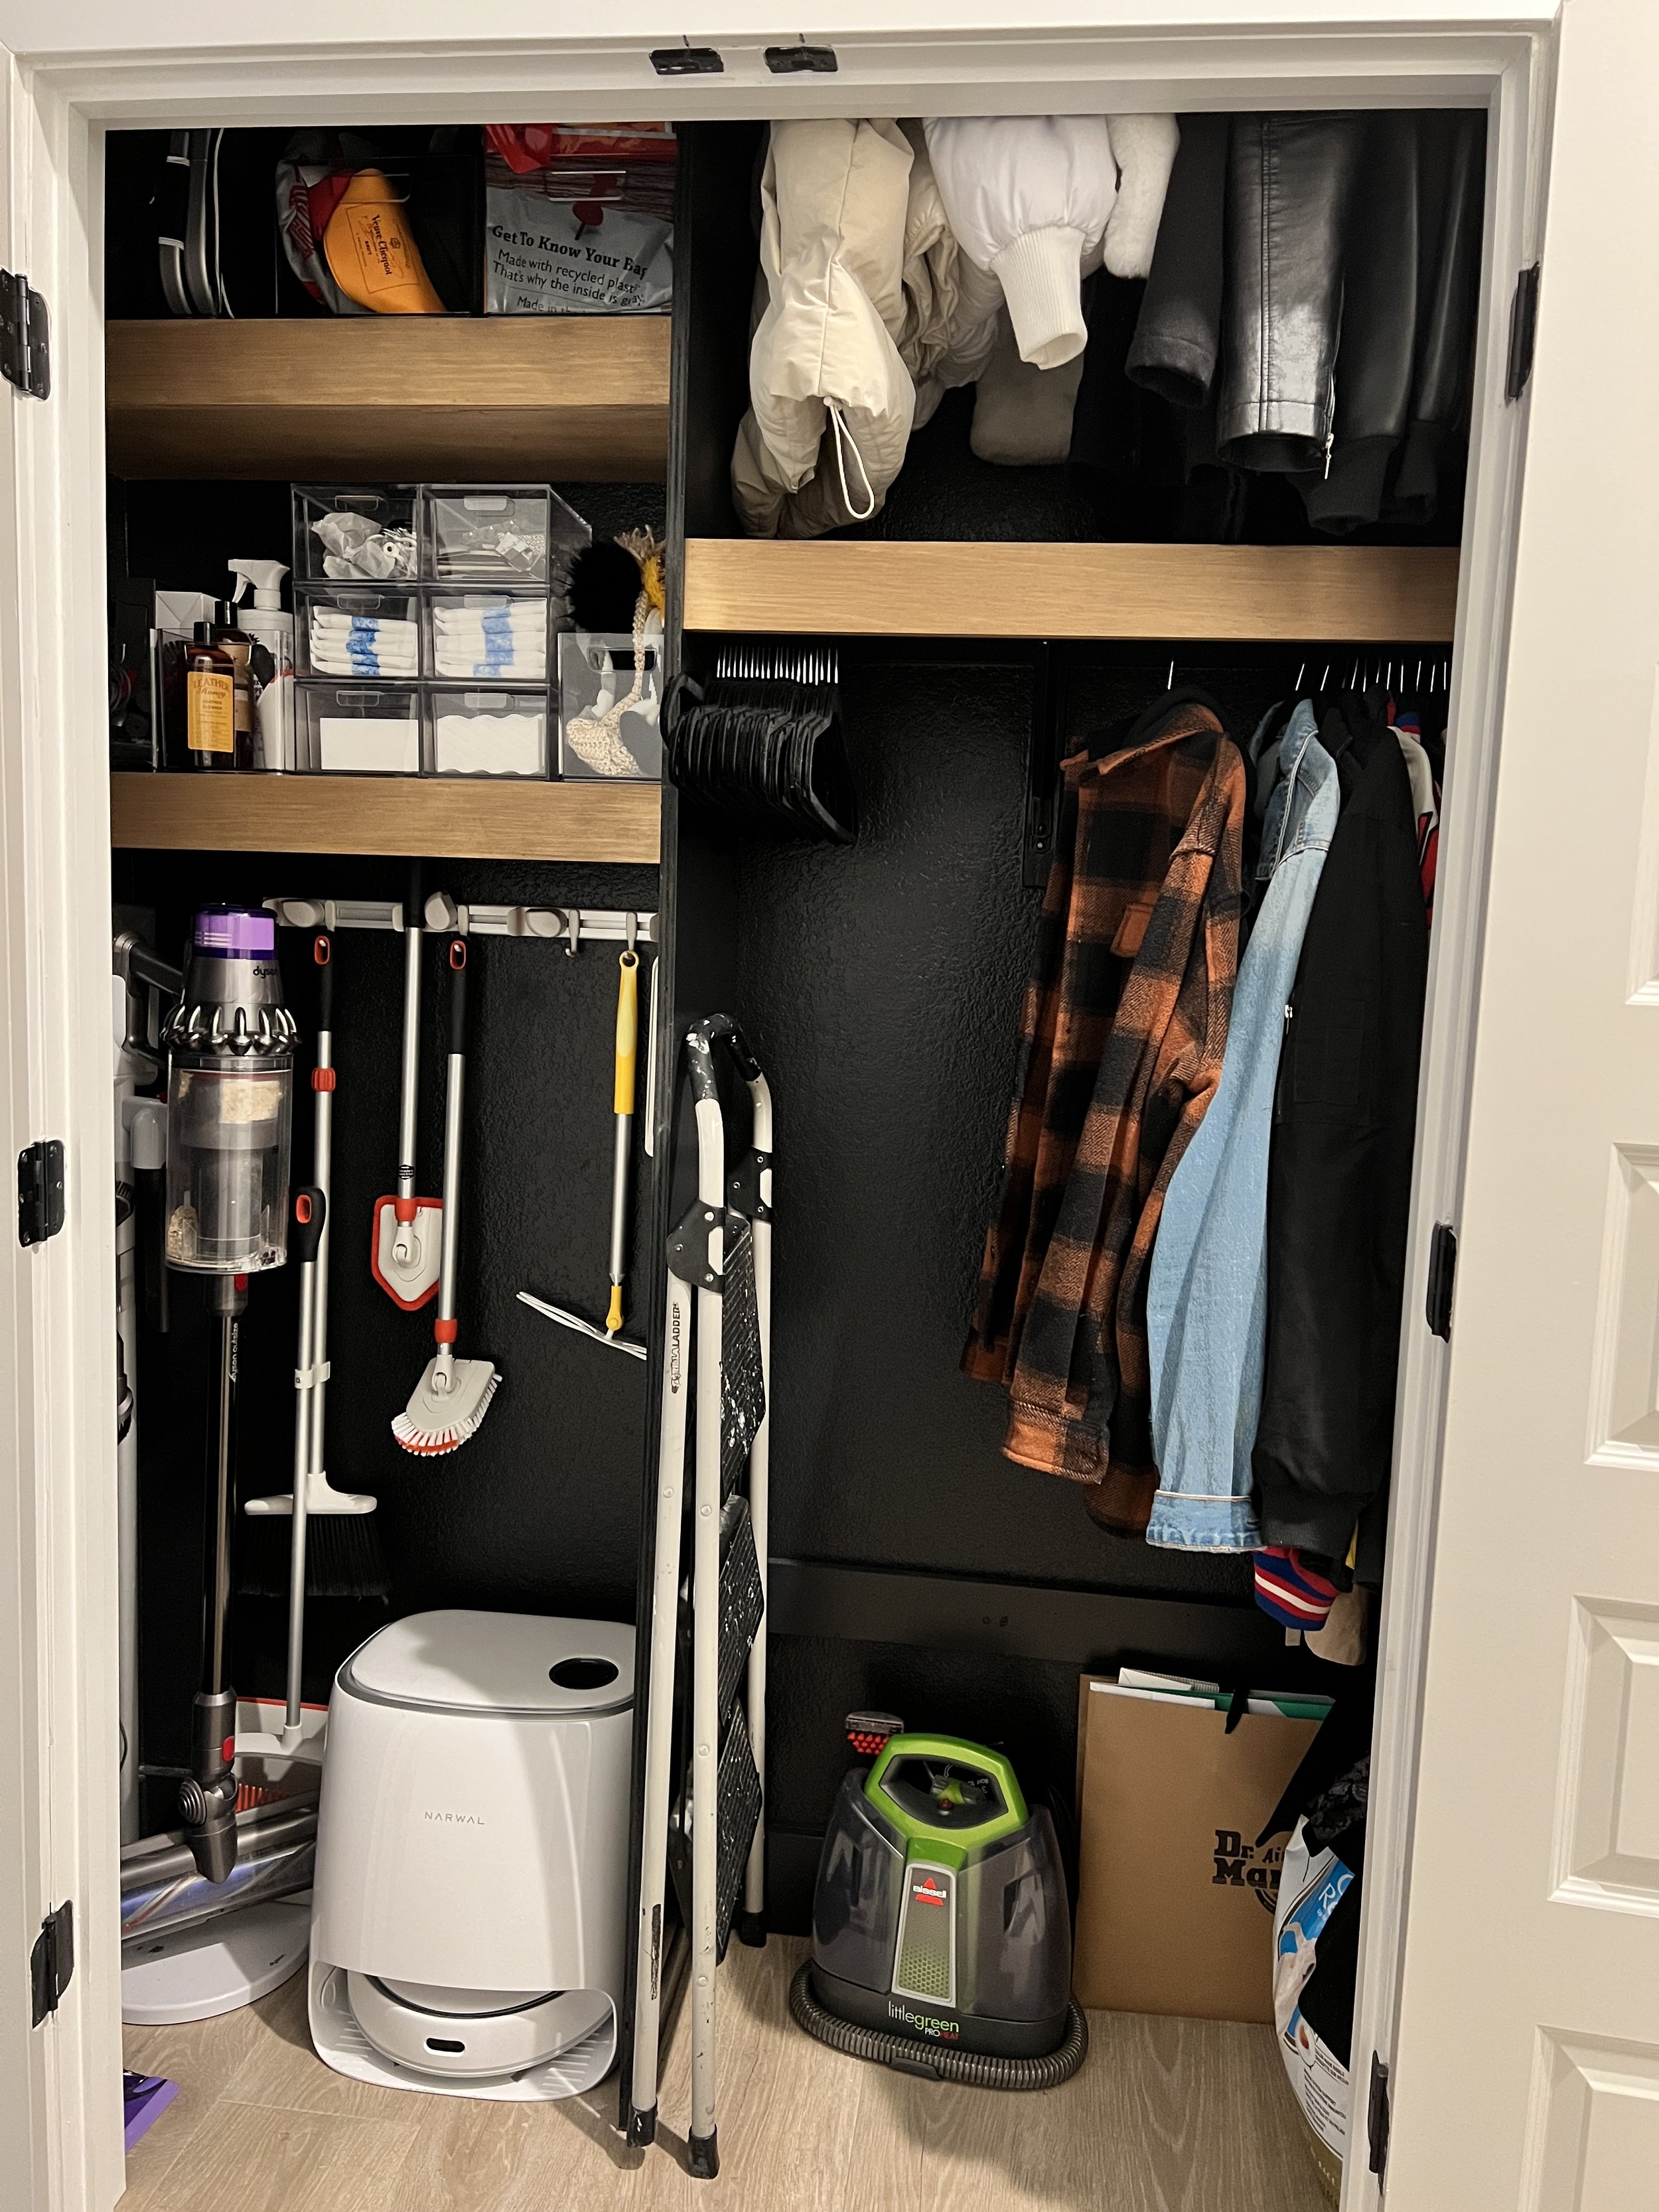
Once my new closet was built, all that was left to do was fill it back up with our stuff! I hung the coats and jackets that we rarely wear in the upper hanging section, and kept the more frequently used ones in the lower hanging space where we can easily reach them. I used clear plastic bins and stackable acrylic drawer boxes to store things like our small cleaning supplies, winter hats & gloves, coolers, and reusable bags on the floating shelves.
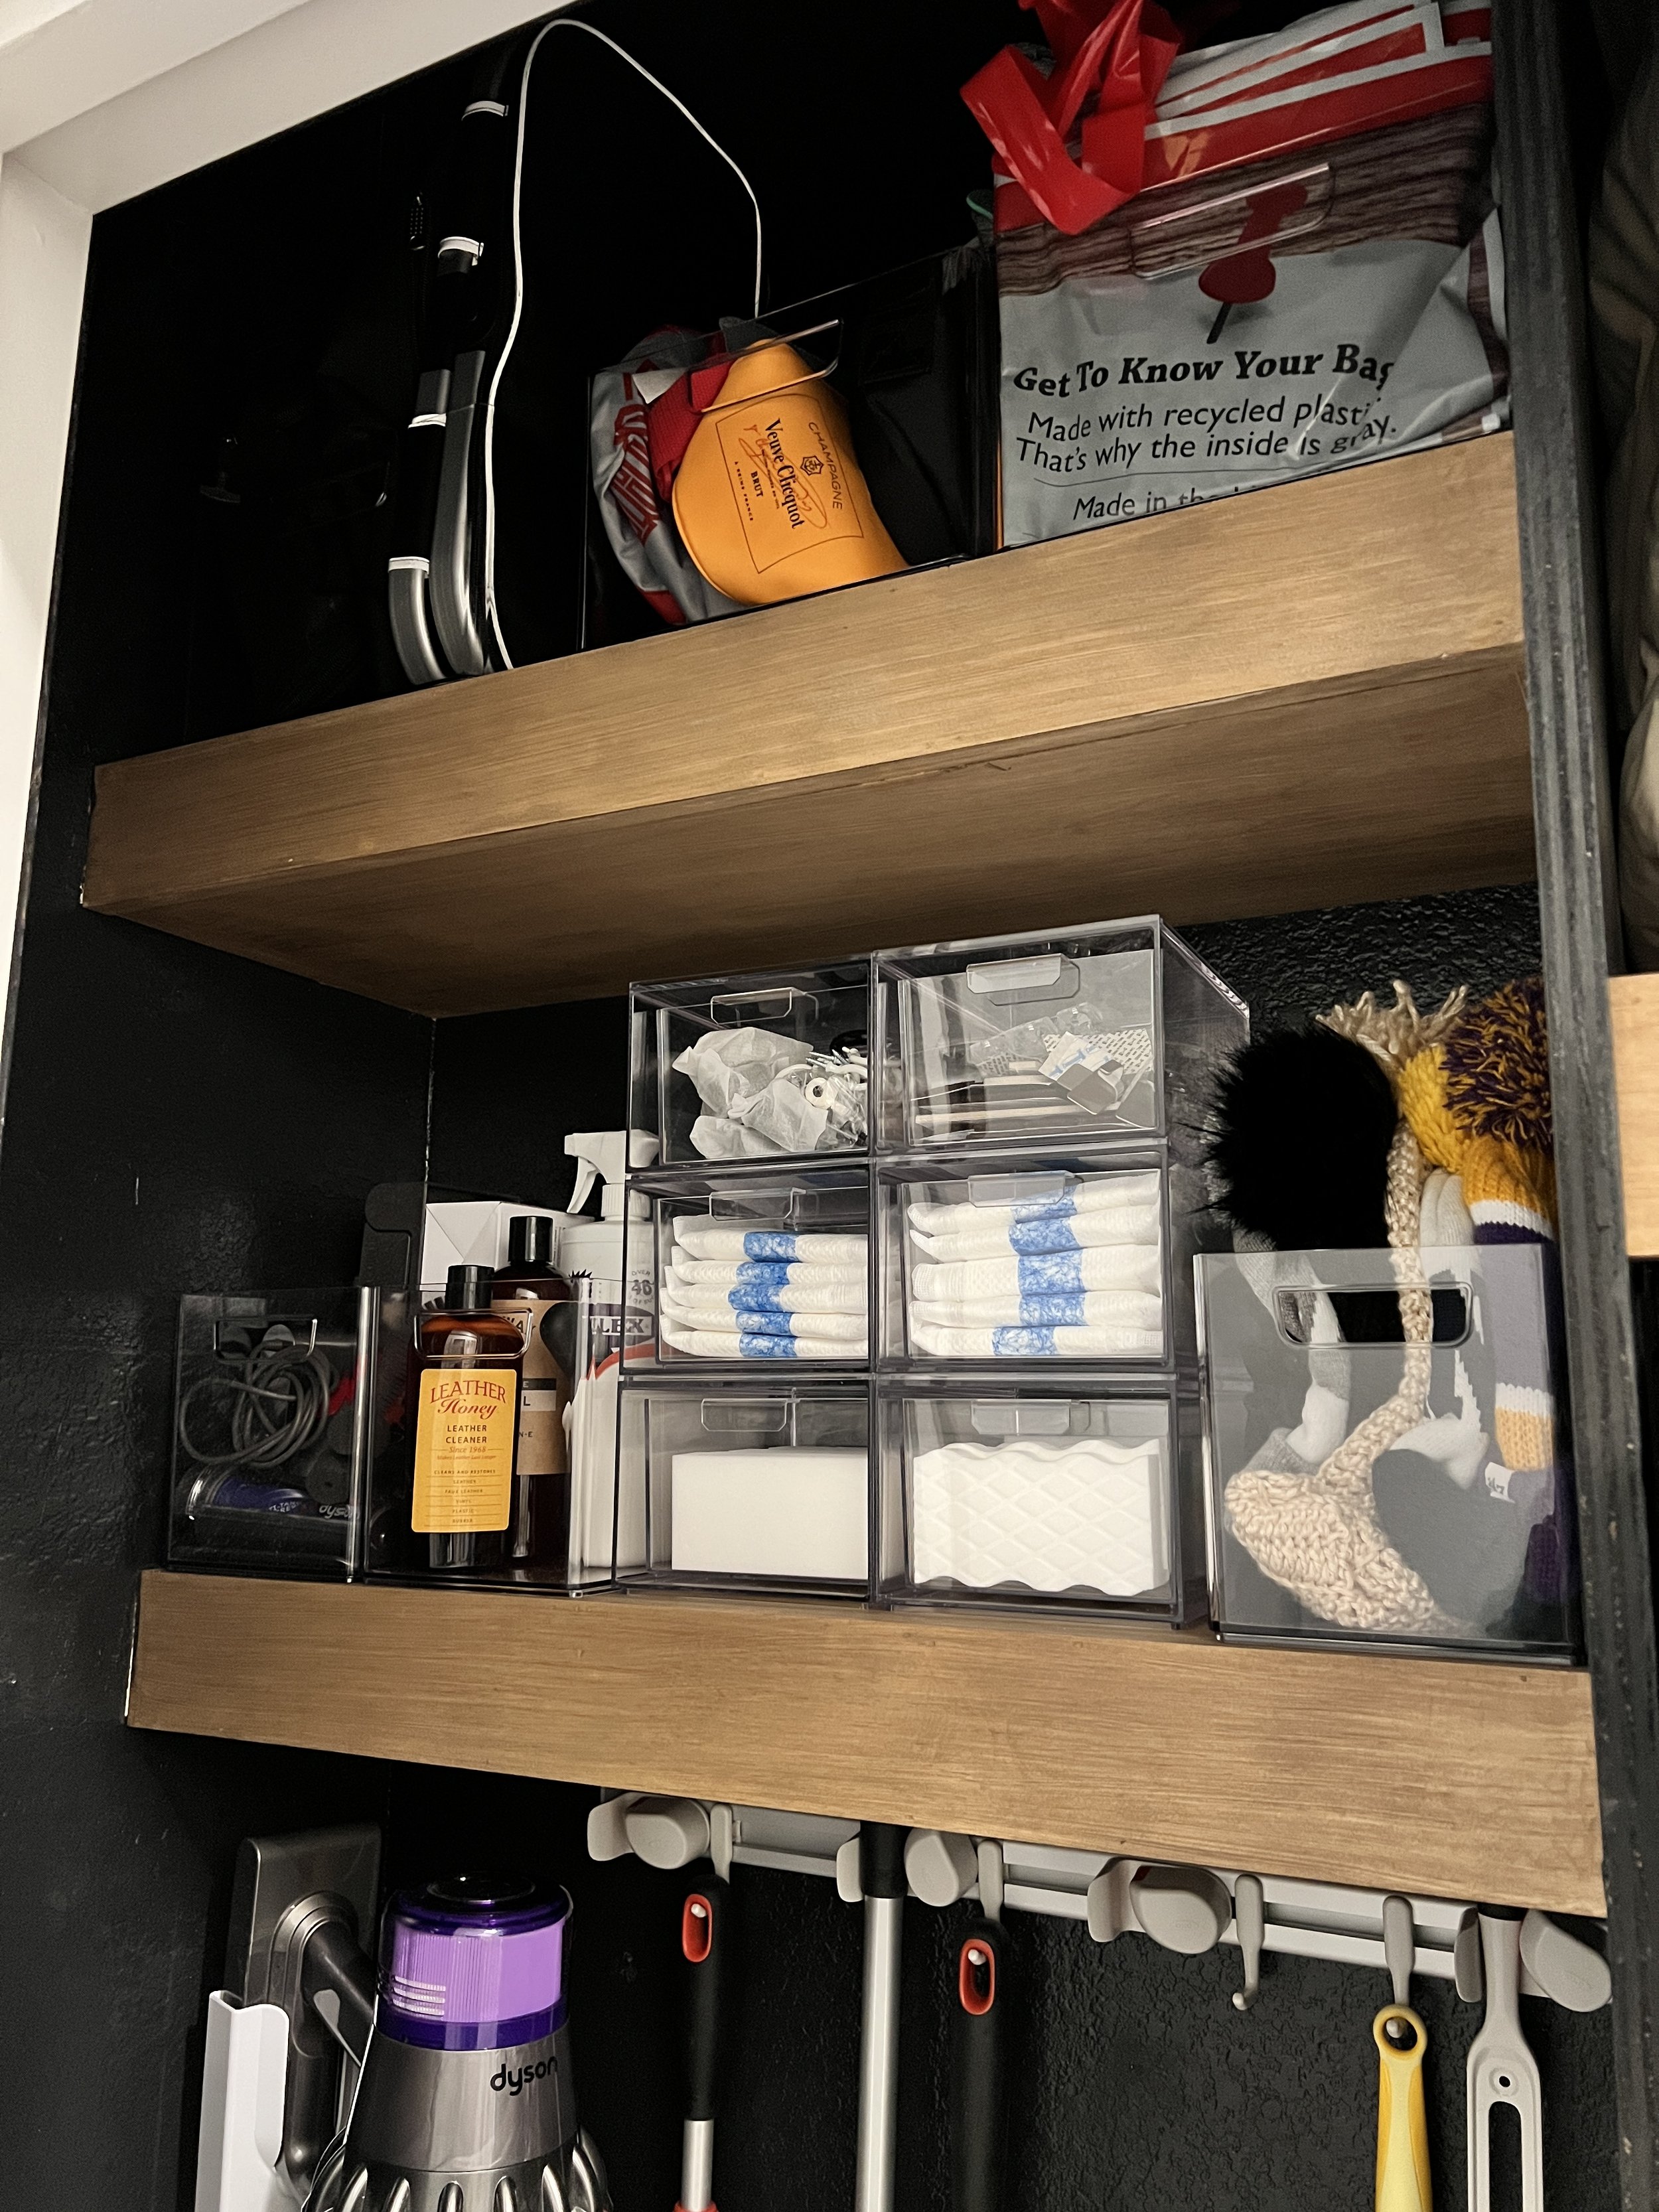
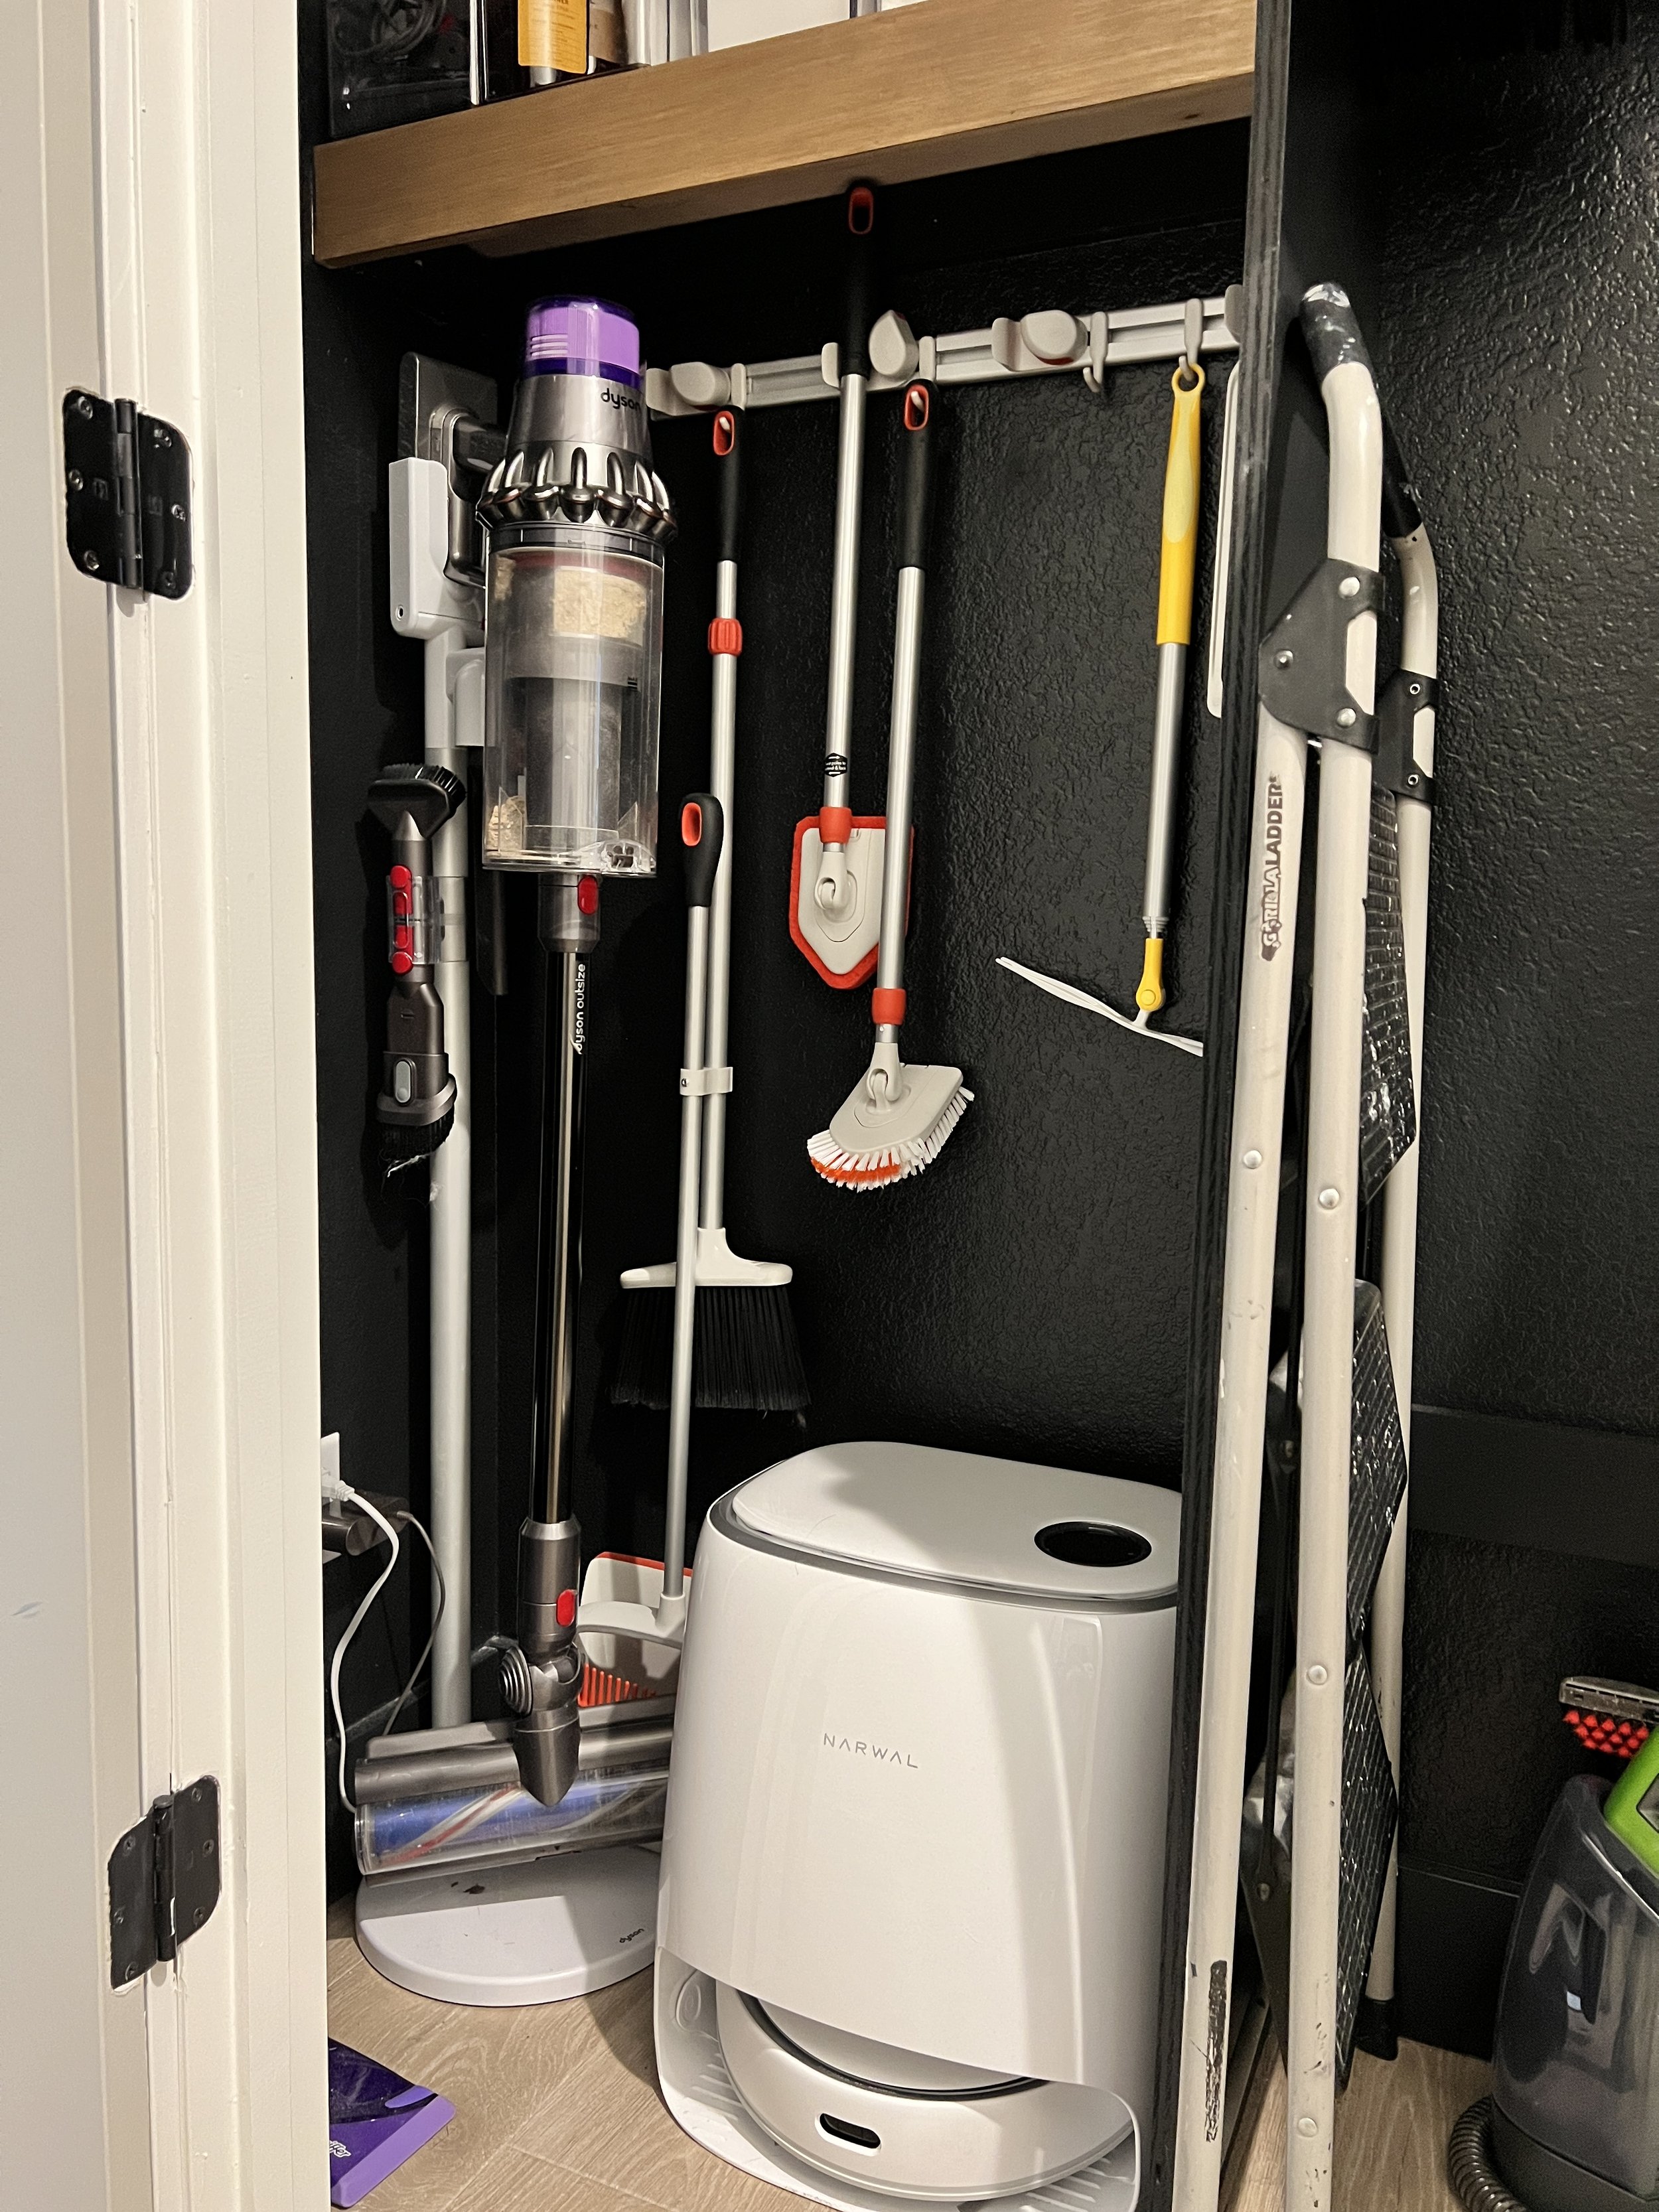
Under the shelves, I mounted a wall organizer for our long-handle cleaning supplies. I love that it’s adjustable and can easily hold multiple different cleaning tools! I installed a coat hook on the wall to keep our Swiffer from falling over and then hung a dispenser above it for our plastic shopping bags. I’m SO glad I had the forethought to have our builder install an outlet in this closet because now we can also keep our Dyson stick vacuum and Narwal Robot Vacuum + Mop also in here with the rest of the cleaning supplies and still have them fully charged and ready to go when we need them!
Eventually, I’ll add another shelf to the lower right area of the closet, under the hanging spaces. I actually already installed the shelf supports for it (go back and look…I’ll wait) and had plans to put a shelf there, but ran out of scrap plywood! At least the cleats are already installed so it’ll just be a quick addon…whenever I get around to it ;)