Throw Some D’s On That! — How To Add Doors To A Bookcase
Just bought a bookcase, throw some doors on that!
Okay so that’s not exactly how the Rich Boy song goes, but you get my point. Today I’m walking you through how to ‘“easily” (and inexpensively) add doors to a bookcase. I say easily in quotation marks because it actually was not very easy for me. At all. However, now that I’ve made probably every mistake possible and worked out all the kinks, it should be pretty easy for you. You’re welcome *Maui voice*.
Quick disclaimer: this post contains affiliate links. By using them to make a purchase, I may receive a small commission at no extra cost to you. Thank you in advance for contributing to my blog and supporting my Target addiction ;)
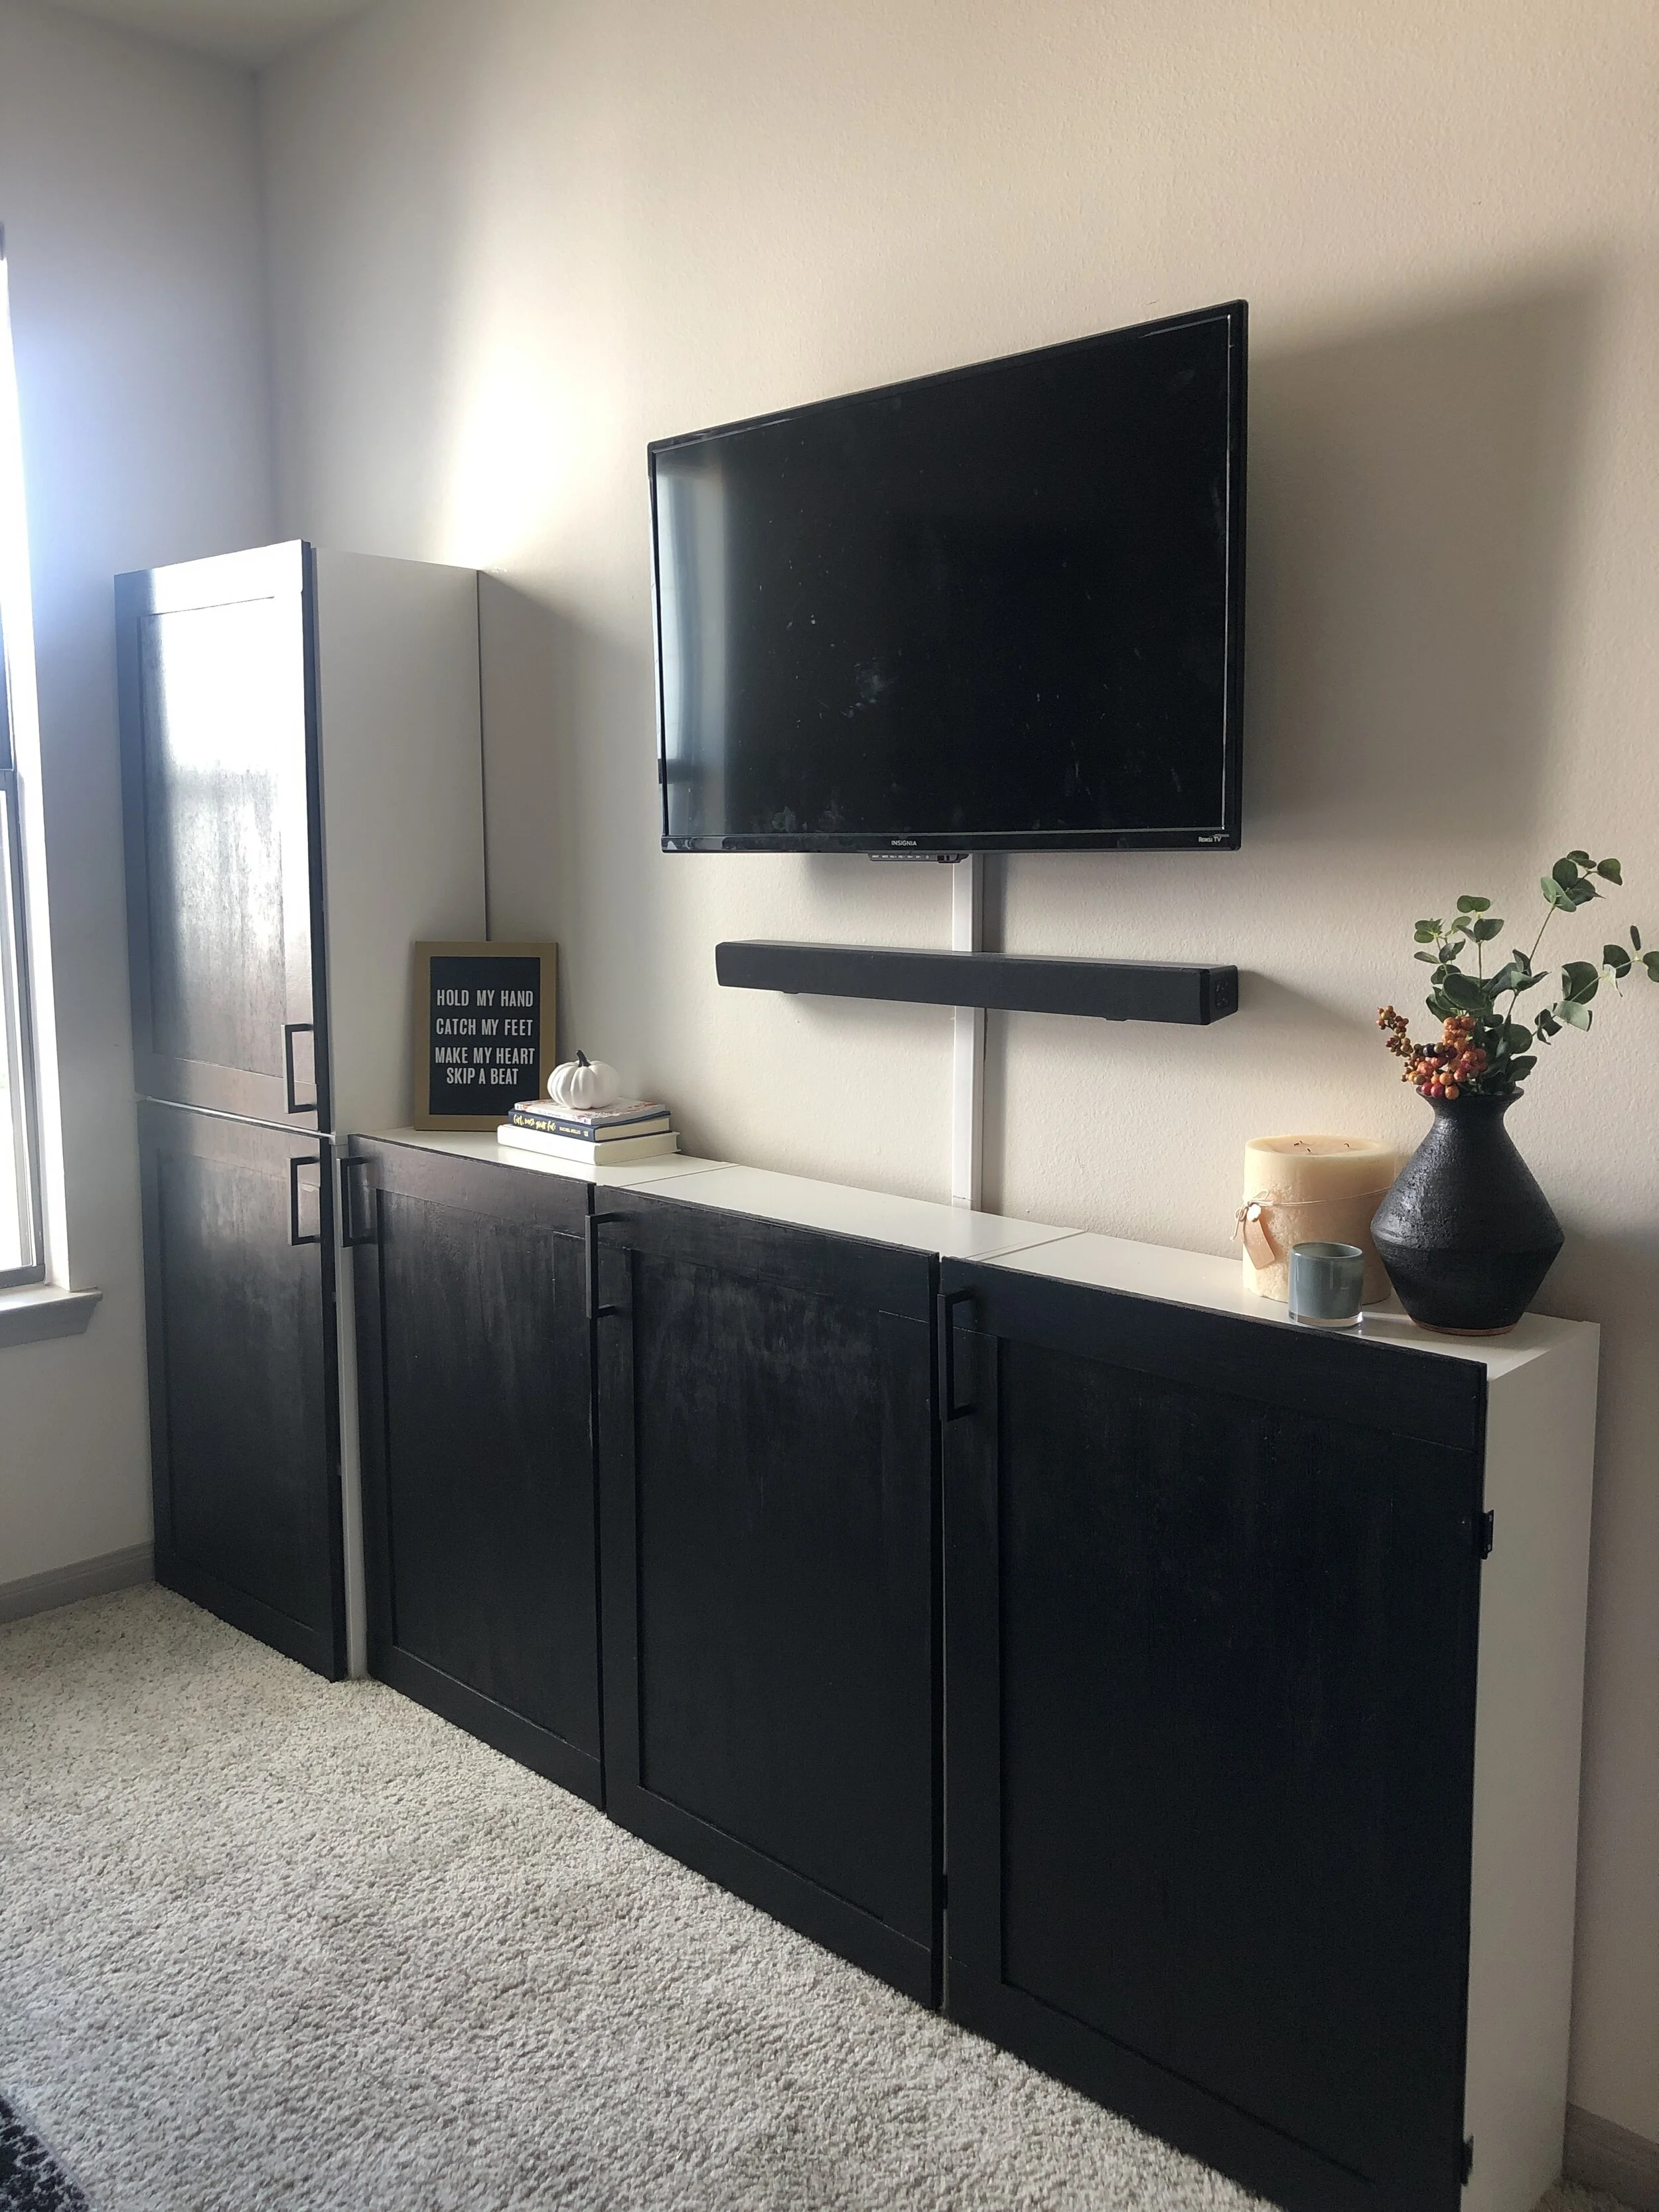
As part of my master bedroom makeover for the One Room Challenge, one of my main goals was to add more storage to the room. As a quick refresher, here’s what the room looked like before the challenge began.
Rough, I know. So, I came up with this layout for the room which has a wall of storage across from our bed. The TV would be mounted on the wall above the storage units, creating a nice ledge for pictures, candles, whatever else.
In my head, the finished product would look a little something like this.


Ira and I have a lot (and I mean a lot) of clothing, accessories, hats, etc. and our (generously sized) closet just can’t hold everything. Because this storage would basically be an extension of our closet, I wanted a closed solution as opposed to open shelving. After looking at multiple closed storage units, I wasn’t finding anything I liked that would (1) fit in the space we had (2) provide ample useable storage space without taking up much floor space and (3) was inexpensive. So of course, it was time to figure out how to DIY it.
I found these 3 shelf bookcases at Target for the perfect price of $15 each(!!!) and they were the right dimensions for the wall. Since my goal was to get the maximum storage possible, what better way to achieve that than to also build up as opposed to just across? Target also carries a 5 shelf bookcase with similar dimensions, so I threw that one in my cart too. To do the entire wall, I used 1 large bookcase and 3 small ones. Then only thing left was to figure out how to turn these open bookcases into closed storage.
Adding Shaker style doors to a Target bookcase
You’ll need:
Bookcases — here’s that link again to the small and large ones I bought from Target. They’re surprisingly very sturdy and not just made of cheap particle board. Plus, you really can’t beat that price.
Plywood — I used 1/2“ plywood for the main part and 1/4” plywood for the trim
Liquid Nails
Caulk
Caulk Gun
Paint
Clear Wood Finish
Hinges
Spray Paint (optional)
Door Handles/Knobs/Pulls — these are the ones I used
How to:
(1) Start by assembling all of your bookcases. This part is very straightforward. Just follow the directions included in the package.
(2) Secure the bookcases to the wall. This is SUPER important because the last thing you want is the entire bookcase to come toppling over onto you when you go to open the door. Use the included hardware to safely secure the bookcase to wall and keep it from falling forward.
(3) Measure and cut your doors. I choose to do just one door per bookcase to keep it simple. Each door should measure 24” x 36”. You’ll need 5 of those.
(4) Measure and cut your trim pieces. *And cue the guy’s at Home Depot starting to hate me* Since we’re making Shaker style doors, you’ll need to add trim pieces around the entire door. I chose to do 3” trim all the way around. You’ll need 2 pieces of 3” x 24” plywood and 2 pieces of 3” x 30” plywood per door, so I ended up with 10 small pieces and 10 large pieces total.
*Note: Because this project requires so many wood cuts, I definitely recommend cutting your own wood at home. Let’s be real, the employees at Home Depot don’t care about your project and they don’t do precision cuts. So you just may end up like me with cabinet doors that are almost the right measurements. After learning this lesson the hard way—and having to make a trip back to Home Depot to get the doors recut—I figured out I needed my own saw.
S/O to my biggest fan (my mom 🖤) for my early birthday present: my very own mini circular saw! This is the one I have and LOVE it. Keep reading to see it in action!*
(5) Sand your wood, dry fit your trim pieces to the doors and use liquid nails to adhere them. Your cuts may not line up perfectly and that’s okay! Let the trim dry in place overnight then use caulk to fill in any small gaps between the trim pieces.
(6) Now that you have a solid, shaker style door, give yourself a round of applause. Take a break. Drink a margarita. As concise as these directions may seem, getting to this point was not easy for me so celebrate with me! I’ll be having a Strawberry Daiquiri with an extra tequila shooter because I absolutely deserve it. And so do you. Luckily, they allow drinks where we’re going next.
(7) Time to paint!
Now you may remember from my original plans that I intended to stain these doors a nice warm wood tone and do a black accent across the top of the bookshelves…that didn’t happen. But it wasn’t for lack of trying!
My newbie DIY mind did not know that in order for the door to stain evenly, the trim and door plywood has to be the same type of wood. Seems like such a duh thing now, but I didn’t know this when I purchased the wood. Soooo after spending close to an hour testing out different combinations of wood conditioner and stains to get the entire door looking like one piece I threw my hands up in the air and said “Screw it. Back to black, baby.” Black paint, you can do no wrong in my book.
So grab your paint brush, take a sip of your drink, and start lathering on your black paint. You’ll be here a while, so now is the perfect time to binge watch your favorite show (I definitely recommend Interior Design Masters on Netflix. It was great.)
Make sure to get the insides of the trim and the edges of the door. I did 2 coats of paint on each door and them let them dry overnight. In the morning, flip the doors over and add a single thick coat of paint to the back/inside of the doors.
(8) Hang your doors. Ahhh, another task that should have been simple yet took me over a week to problem solve.
Because of how the bookcases are nestled next to each other, the first 2 ways that I tried to attach my hinges wouldn’t allow the doors to open in place. There wasn’t any room for the thickness of the door to go without bumping into the next bookcase. Then I tried using a different type of hinge, which made the door extend too far on one side and left a gap on the other. Finally, I got it!
Open the hinge all the way until it can’t rotate anymore. With the hinge in its open position, mount one side to the outside of the bookcase. Then line up your door and screw the hinge to it. (You can ignore the hole on the face of of the bookcase in the picture below. That was one of the fails.)
Because I have carpet, I used an extra piece of wood to prop up the door before screwing it onto the bookcase. This will prevent the door from dragging across the carpet when it opens/closes.
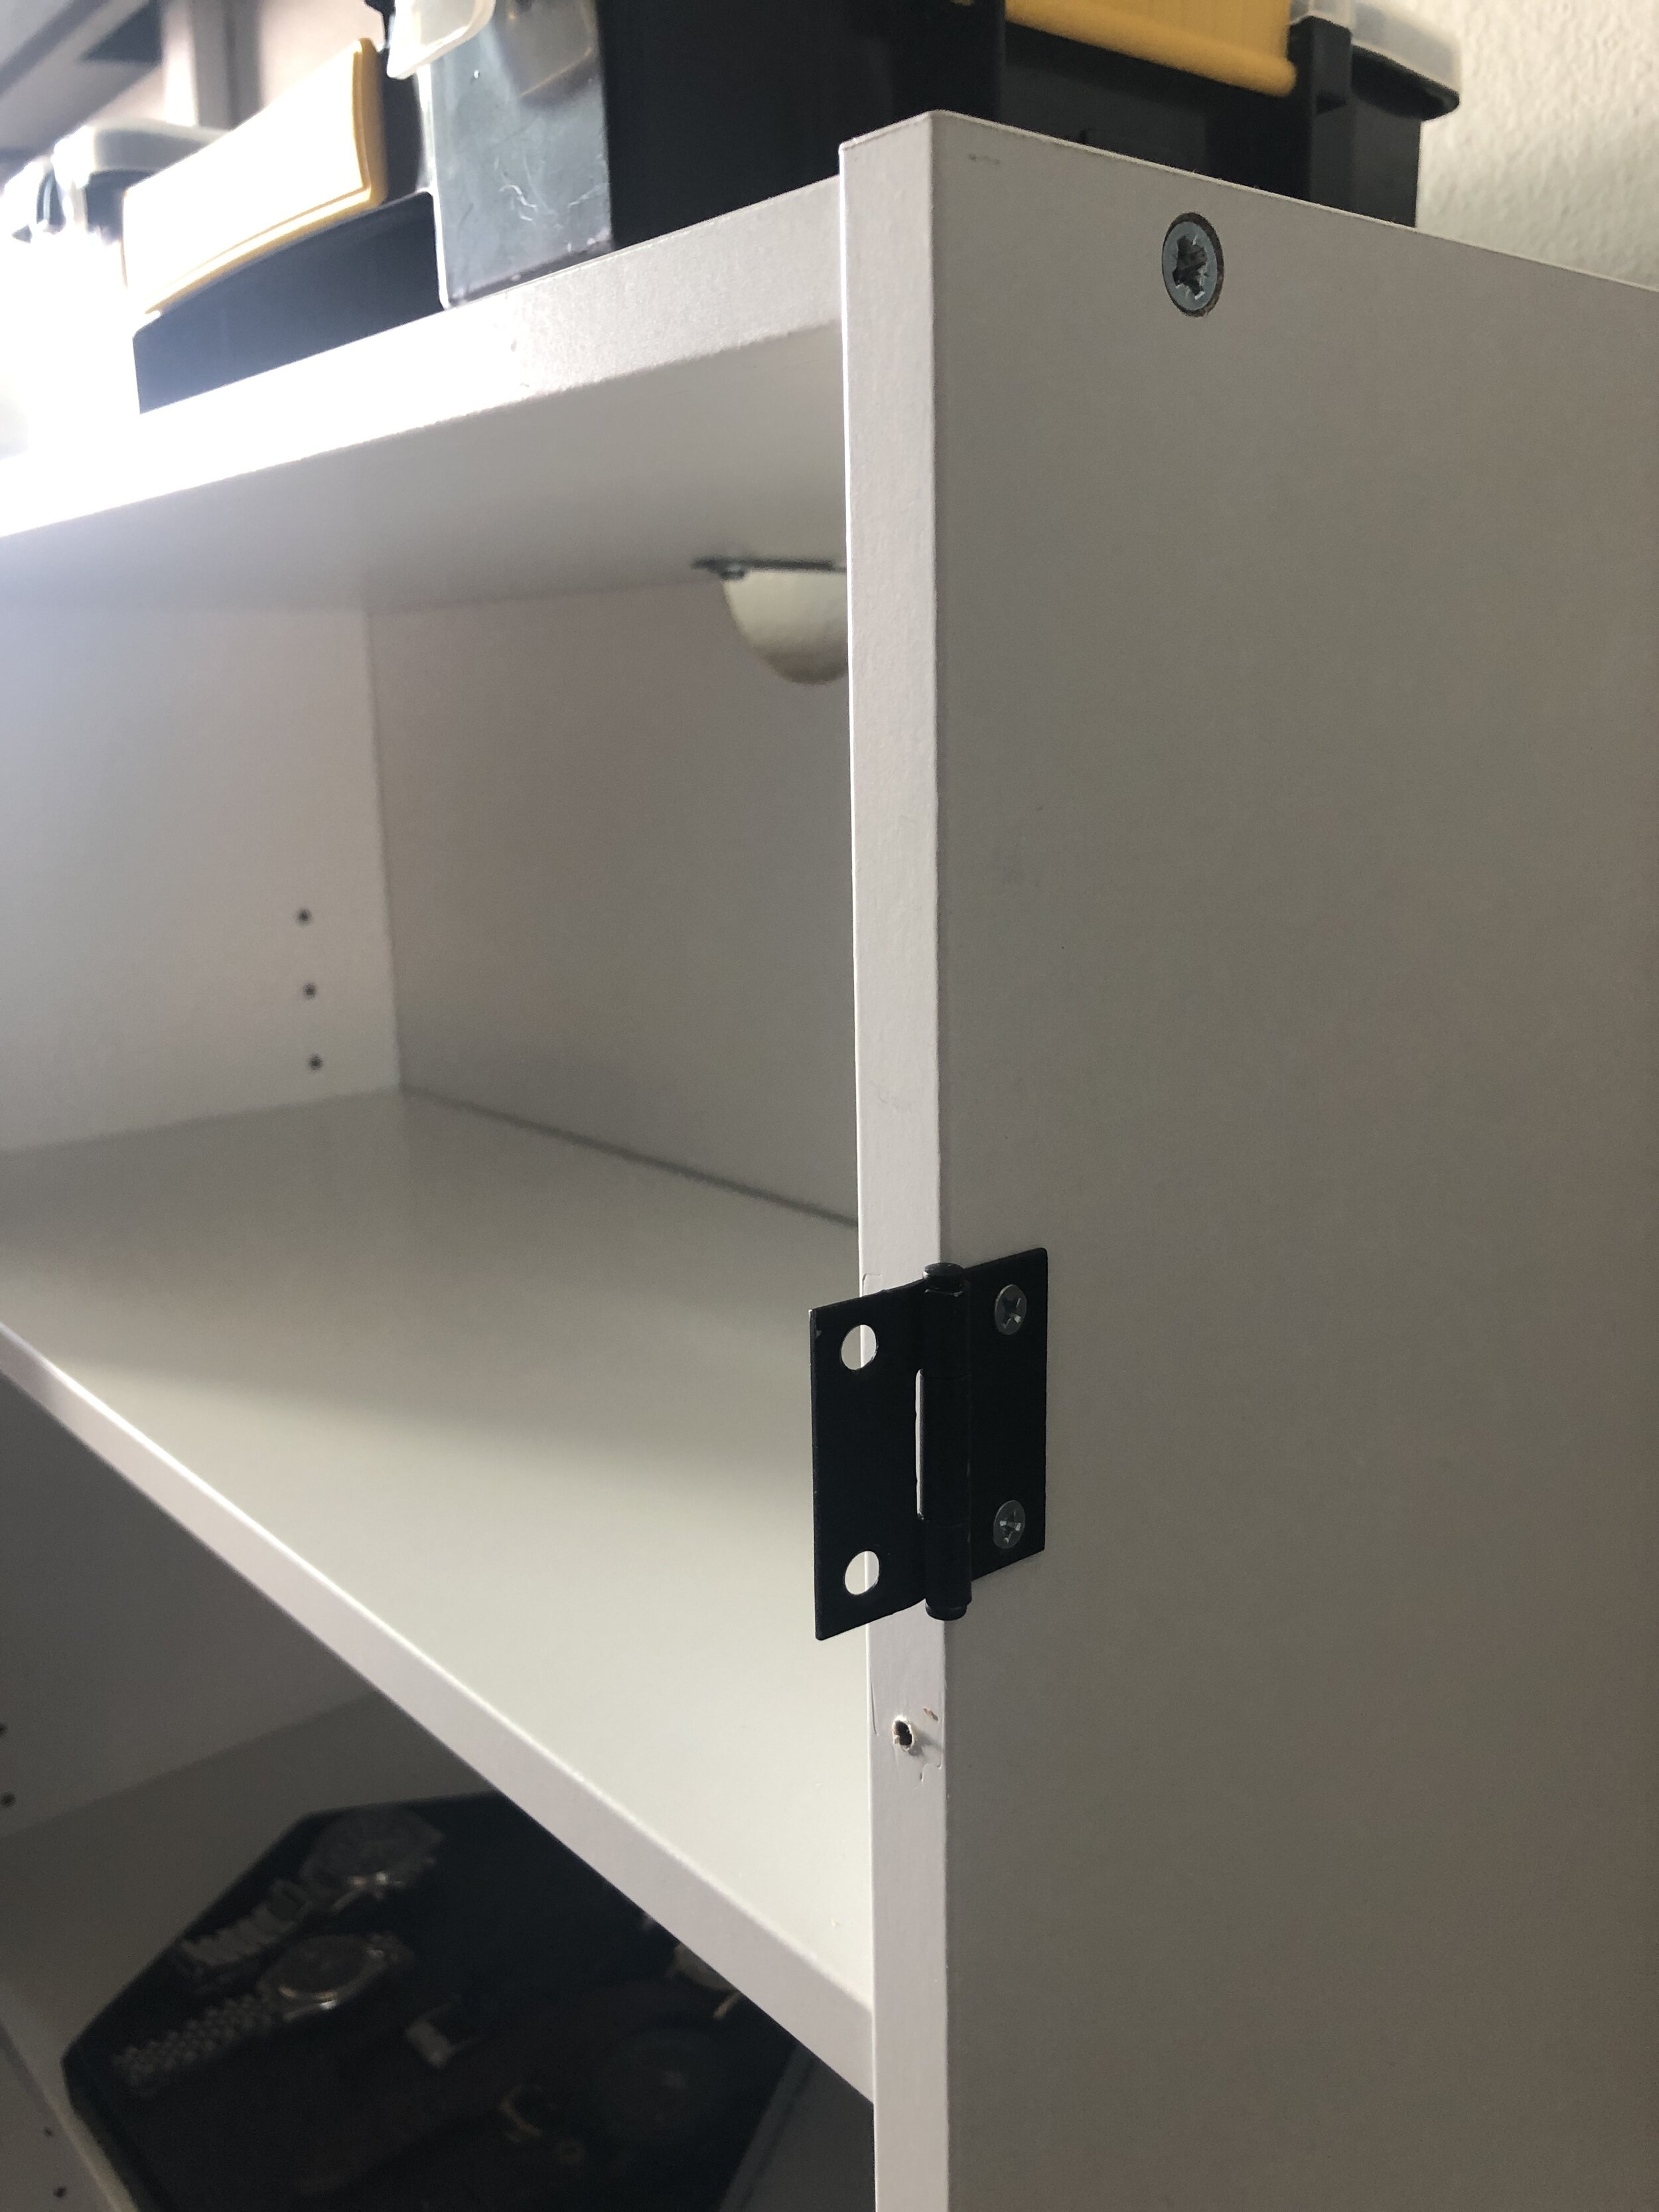
Also, because the hinges were going to show, I spray painted mine black to add a nice accent. This is totally optional and you can leave them silver if you’d like.
(9) Add the clear coat to the doors. I find this is much easier to do after the doors are installed, so I laid a plastic drop cloth down over the carpet and painted on a thin layer of clear wood finish.
Turn on the fan, crack a window, and grab a respirator mask because the fumes are strong! This is definitely a project you’ll want to do earlier in the day, so the room has time to air out—especially if it’s a bedroom.
(10) Add your hardware. I used my cabinet hardware template to easily install the handles on each door after the clear coat dried. If you need a tutorial on how to use the template, read this post!
(11) Now, take another moment to rejoice. We’re not done yet, but it took me almost 4 weeks, 2 broken drill bits, and 273648 trips to Home Depot to get to this point. So we celebrate, again. I’m going to pour myself another drink and I’ll be back after the libations have completely cleared my system, to continue on with part 2 of this adventure.
*Update!: I added a wood plank top to the short bookcases to match the rustic vibe of the room. You can check that out in this post!