Save or Splurge? Your Guide to the Builder Upgrades Actually Worth Paying For
Before we made the design to build our home, we spent a lot of time trying to figure out what our dream home would actually cost us. As a designer by trade and a lover of all things home related, I’ve toured more model homes than I can count. I love looking at the beautiful, unique features that builders put together to sell you on the dream. However, I when touring as a potential homebuyer, the number one thing in my mind was the cardinal rule of model homes: what you see is NOT what you get. I’ve mentioned this in previous post about preparing for your design studio appointment, but don’t make the mistake of assuming that the nice, low sticker price that drew you into the model is what that beautiful designer home is actually going to cost you. Just about every model home you’ll ever come across is chalked FULL up pricey upgrades—from the flooring, to the kitchen faucet, to the number of overhead lights in a room.
So today we’re talking upgrade pricing! This post is not AT ALL meant to brag about the upgrades we chose for our home or how much money we spent. Because our design studio experience was different than most, Ira and I were able to do a lot of research beforehand and compare our builder’s upgrade pricing with the cost of DIYing or upgrading things later. I found it extremely helpful to be able to compare pricing on my own and not have to make all of my decisions real-time during my design studio appointment. However, with most builders (and in most situations) you won’t have access to the pricing until you get to your appointment. So I thought it might be helpful to put together all the research I did in one post for any of you that are building your own home.
This is by no means an exhaustive list of every single upgrade option since I only took note of the ones that were pertinent to our home and there are just SO many choices. But, it does list a lot of the prices we had access to, and go over a few areas where you can definitely save money by DIYing. Keep in mind that all of the upgrade prices you see listed are specific to our home and our builder at the time of writing this post. Upgrade prices change pretty frequently and vary based on builder, community, location, and the size of your home, etc. so even though these prices might not be exactly what you’ll encounter during your own home building process, you’ll have a great starting point for planning whether to buy certain features through your builder or DIY it after.
*This post may contain affiliate links. If you click on the link and purchase the item, I will receive commission on the sale at no extra cost to you. It’s a win for both of us! Keep in mind that I only ever recommend products that I use and love myself and all opinions are 100% my own. Thanks for your support!*
so, should you Save (DIY IT) or Splurge (buy it)?
exterior

The exterior of our new house. We chose an all white color scheme with black windows and exterior doors for a clean, modern look.
Front Door
Builder Price: $800-1600
DIY: $500-$1800
You Should: BUY IT
Our builder offered various mahogany wood front door options in a variety of stains. We opted for a modern door with 4 horizontal glass panels--one of my absolute favorite door styles. Our builder's price was pretty much the same as what we saw online plus they would obviously install it for us so that was an added bonus.
Windows
Builder Price: $6045
DIY: Damn near impossible
You Should: BUY IT
Okay, now. Try not to freak out. I KNOW that number is super high. Black/bronze windows were an absolute must for me, so it just is what it is. If you're like me and you need dark windows, no matter the cost, I totally get it. This is a no judgement zone.
Technically, black windows are not impossible to DIY, but we decided to just buy them from the builder for a few reasons: 1) who wants to replace brand new windows right after moving in? Windows last like 20 years, so replacing them would’ve been such a waste and most likely would’ve cost us more than the original quote. 2) We didn’t want to risk ruining the windows or voiding their warranty by painting the outside ourselves. As I mentioned in my post about choosing the perfect home exterior, our windows will actually be a very dark bronze color, not black. That doesn’t particularly bother me on the outside of the house since they’ll still look pretty dark, but I do think I want true black on the inside. Painting the inside of the windows will be much less of an undertaking and shouldn’t affect the integrity of the windows themselves.
Gutters
Builder Price: $1500
DIY: ~$2000
You Should: BUY IT
When researching the cost to get gutters installed after the house is finished (because I have no idea how to install gutters???) we found it’s about $2000 on average. The builder price was not only better than that, but it also gives us one less thing to worry about later.
7 Zone Sprinkler System
Builder Price: $3750
DIY: $2000-$5000
You Should: BUY IT
The quotes on this varied a ton when looking at different landscaping companies in our area--some were a little higher than our builder’s price, some were lower. Ira really wanted the sprinkler system installed ASAP though so that no one would have to rip up our fresh sod later, so we went with the builder on this one.
Sod
Builder Price: $1165
DIY: $1000-$3000
You Should: BUY IT
Sod came standard in our front yard due to HOA requirements, but we did have to pay extra for the sod to be added to the backyard. I still have no idea what we’re going to do with the space, but one of Ira’s (few) requests was that he wanted lots of lawn to mow. And, why get a sprinkler system and no sod, ya know? Whatcha watering?
Garage Door Opener
Builder Price: $300 per door
DIY: $200-$400 for labor and $100-$300 per door for the actual opener
You Should: BUY IT
Call me petty all you want, but I couldn’t get over how stupid I would feel pulling up to our new house and having to struggle to manually open the garage door if we didn’t have it installed right away. Plus, it was cheaper to just add it to our upgrades.
Fences/Gates
Builder Price: $170
DIY: $100-$400
You Should: BUY IT
Our fence comes standard, but we wanted to add a second gate to it that would let us get directly to the trails behind our backyard without having to go out and around. The additional gate was only $170, so you really can’t beat that price. Plus it will match the fence and the entrance gate which was a must for me.
interior finishes

Style & Finishes Mood Board for our new house. The overall look is a very relaxed, casual feel with modern elements.
Baseboards
Builder Price: $1803
DIY: Varies
You Should: BUY IT
The pricing on this will vary based on the size of your house. If you have a miter saw, nail gun, and a tone of patience, you could probably do this on your own, but what you save in money you might regret spending in time.
Interior Doors
Builder Price: $400 for the entire house
DIY: $185 per door
You Should: BUY IT
The cost savings speaks for itself. Save the money, time, and the headache by just paying your builder to upgrade your doors. (Note: These prices are for Rockport style doors, but the difference in price was about the same for most door styles)
Full Lite Patio Door
Builder Price: $150
DIY: $472
You Should: BUY IT
Again, total no brainer.
Door Hardware
Builder Price: $1130
DIY: $635
You Should: DIY IT
This will vary depending on the type of hardware you want, but the Halifax Black Door Hardware we wanted ended up being almost $500 cheaper to install ourselves.
Trim & Door Paint
Builder Price: $350 for all doors
DIY: $50-$100
You Should: BUYER'S CHOICE
You can clearly DIY this for cheaper than you builder will charge, but do you really want to have to take every. single. door. off of it's hinges and paint them all? Didn't think so.
electrical + lighting

View from the kitchen into the breakfast area and living room.
Almost everything in this section we opted to have the builder do for us. Doing electrical work later would mean hiring an electrician to cut into the walls to run cords. Electrical work is not DIY friendly for the most part, so I don’t have many DIY prices for you, but I can tell you what the upgrade prices were! I won’t list every single thing because boringgg, so here are the most common upgrades.
Surround Sound Pre-Wire - 7.1 System: $443
Surround Sound Pre-Wire - 5.1 System: $382
Exterior (Patio) Speakers (2): $188
Lighting Pre WireStandard: $70 each
Recessed Can Lights: $40 each
Outlets Exterior: $83 each
In-floor Outlets: $525 (yikes!)
Rocker Light Switches
Builder Price: $300
DIY: $365
You Should: BUYER'S CHOICE
We actually decided to do this one ourselves because the “flat” rocker switches our builder offered still had a bit of a bevel to them and weren’t as flat as I wanted. Instead, we’ll be getting these gorgeous switches and plates from Legrand’s Adorne collection. The square shape is much more custom looking and they come in a bunch of different colors so you can match them to accent walls, backsplash, etc.
Lighting Fixtures
I have no idea what the builder wanted to charge to upgrade our lighting fixture package, but I don’t recommend doing this. Builder options are usually very limited and still look kind of...basic. You can find better looking and less-expensive at Lowes, Build.com, Wayfair, or furniture stores like West Elm. So far, we're considering this cute, modern vanity light for our bathroom and pendants like this or this for our kitchen island.
Ceiling Fans
Again, try Build.com, Lowes, or Wayfair. Builder ceiling fans are extremely overpriced and they usually don’t have modern looking options. I linked my favorite options above for you!
Exterior Lighting
Coach Light Prewire: $80
It would’ve been an additional $60 per builder-grade fixture, so we just got these capped and will add our own coach lights later.
Uplights (with fixture): $180 each
plumbing

Rendering of my vision for our secondary bath.
This is another one that you'll want to get done through your builder, since all of your plumbing is laid out out and planned for before your foundation is poured. No sense in hiring someone to do this later and it's definitely not a DIY job.
Add secondary sink to bathroom: $1010
Sink in utility room (plumbing only, standard fixture): $910
Pot filler: $1700-$2400
Whole home Shut Off Valve: $300
Faucets & Hardware
This will vary a lot depending on what type of fixture you want and what comes standard in you home. Here is how we were able to save over $3000 by DIYing our faucets and hardware!
In the kitchen, we will have a standard chrome faucet. This type of faucet requires a one or three hole installation (if you include the base plate) plus an additional hole for the separate sprayer attachment. The faucet we actually want uses a single hole installation and has a pull down sprayer attached. Our builder had us specify exactly where we want all of the holes cut in our countertop, so we told them to only cut a single hole for the faucet (not install the base plate) and install the sprayer to the right of the faucet. This way, we'll be able to install the new faucet in the existing hole, and use the additional hole for a soap dispenser. Our builder wanted to charge us $1,170 for the faucet, but we can buy and install it ourselves for $475!
In the secondary bathroom, we will also be getting the standard chrome hardware. The hardware we actually want is the Genta Matte Black Series by MOEN. Our builder wanted to charge us $1,360 to upgrade this through them, but we can swap everything out ourselves for less than $500! Do your research on what hardware come standard in your home and see if it can easily be swapped with something else. The standard hardware and the hardware we want are both MOEN and run on their M-PACT system. This makes swapping the hardware extremely simple because all we'll have to do is unscrew the old stuff and screw the new pieces on. We'll have the whole project done in a few hours meaning we save money and time!
The master bathroom was the only space where I reallllly wanted to pay the builder to upgrade our hardware, but just couldn't justify the cost. The standard chrome bathroom hardware that I mentioned only comes in a 4" spread for the faucet. It would have been $2,380 to upgrade this to the 8" spread version of our Genta hardware. This is one thing we unfortunately will not be able to DIY because the holes will already be in the countertops (in the wrong spot) when move in. We will still be switching this out to the same hardware as the secondary bath though. So rather than paying for any upgrade through out builder, we'll do it ourselves for a savings of $1,880.
In total, our savings just on kitchen and bathroom hardware is $3,435!! That's HUGE! It pays to do your research, people--literally!
bathrooms
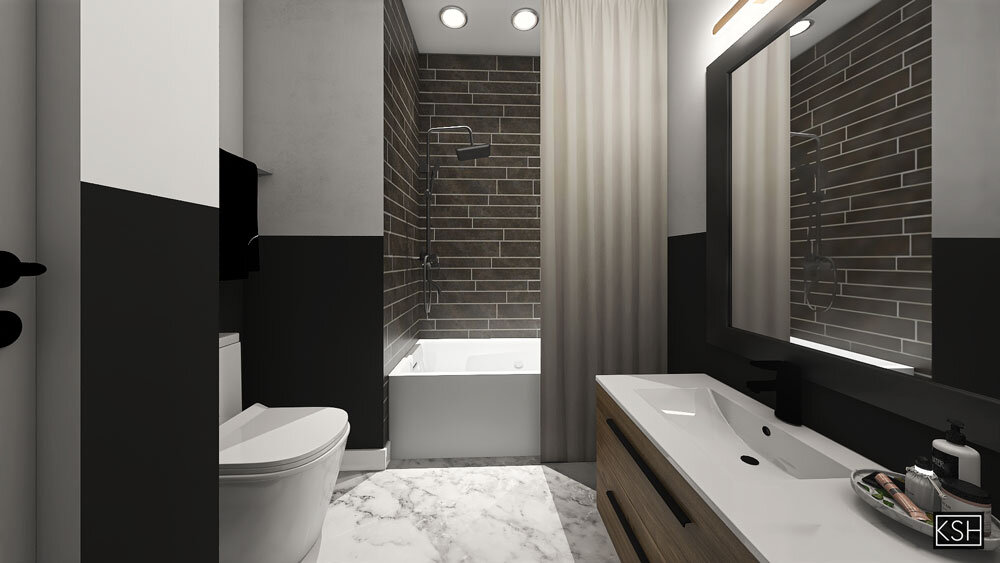
Rendering of my vision for our secondary bathroom.
Rain Glass Windows
Builder Price:$275
DIY: $20
You Should: DIY IT
I don't see any real reason why the window(s) in your bathroom have to be actual rain glass. If you're concerned about privacy, grab a roll of frosted window film and apply it yourself!
Shower Niche
Builder Price: $120
DIY: $75-$300, but you'll have to rip out your brand new tile in the process.
You Should: BUY IT
Raise Shower Head
Builder Price: $20
DIY: $25-300, depending on whether you buy an extender or pay to have a plumber raise the actual shower head.
You Should: BUY IT
Shower Enclosure
Builder Price: $160 for Satin Nickel or Oil Rubbed Bronze. $2073 for frameless enclosure
DIY: $20-$2000
You Should: BUYER'S CHOICE!
We actually weren't able to upgrade our enclosure frame because requires it to match the hardware color--so we had to get the standard chrome. We'll spray paint it ourselves for about $20 and no one will even know the difference! If you want a frameless enclosure though, I'd definitely get the builder to install it for you.
Tub Surround vs Tile
Builder Price: $230
DIY:$700+
You Should: BUY IT
Tiling your tub/shower combo instead of getting the tub walls will instantly elevate the look (and value) of you bathroom! We paid $230 to get just a basic white tile (we basically blew the budget on windows, remember?) and we'll replace the tiles with something cuter later down the line.
kitchen

View from the breakfast area looking into the kitchen and entryway.
For the first few selections, the prices are based on our floor plan. Only your builder will be able to tell you exact prices, so just keep in mind that these prices apply specifically to our home and use them as a guide. The picture above is a to-scale rendering I did of our kitchen and should give you a pretty good idea of the size and style of our kitchen.
Kitchen Layout
The standard kitchen layout for our floor plan included a stainless steel oven/range and microwave above. We upgraded to the built-in microwave/wall oven combo layout for $2,920 and added the full vent hood above the cooktop for $280.
Cabinet Style
Our black shaker style cabinets were $2,040. Adding the cabinets above the refrigerator with the side panel would have been an extra $900. Glass door fronts were $125 per door.
Countertops
We chose Silestone Quartz for our countertops in the color Helix. It has a similar look to the ever popular Carrara Marble, but is more durable and a lot less expensive. The 2cm countertops were $600 for the perimeter and $940 for the large island.
Waterfall Island
One of my absolute must-haves for the kitchen was a waterfall island. I just LOVE the way waterfall islands look and knew it would look amazing in our kitchen because of how large and prominent island is in the space. The waterfall island was a non-standard (custom) upgrade and cost us $3,310.
Sink
The kitchen sink we chose was a single basin, black under-mount sink. We paid $590 for this upgrade. The sink itself is actually cheaper than that to buy on your own, but unfortunatley you cannot DIY it. Because it's an under-mount sink, the sink has to be installed on top of the cabinets and before the countertops are attached. In order to replace the sink, you'd have to lift the countertop off, risking ruining your brand new countertops. Removing the countertops would also be impossible with a waterfall style, so the sink is definitely something you'll need to BUY through your builder.
Drawers
I originally wanted to get drawers installed underneath our cooktop instead of the regular double doors. Drawers make it much easier to access large pots and pans and breakup the look of an etire wall of cabinet doors. This upgrade would've been $375, but you can DIY IT for about $90 per drawer using these.
Hardware
I didn't get any pricing on cabinet hardware from my builder because I knew I wanted to select something more custom on my own. If you want more options than your builder has to offer, DIY IT and checkout Rejuvenation or Etsy.
other finishes

Full view of the living room, breakfast nook, and kitchen.
Other finishes such as flooring, tile work, and trim work are going vary based on selection and the size of your home. My best advice is to get price quotes from your builder and then compare that to how much it will take you to buy the materials yourself. Then consider whether it's a project you can do or if you'll have to hire out to do it. If the savings isn't significant and your budget allows, just BUY IT through your builder. If it looks like you can get a better deal somewhere else, go with the standard option and DIY IT.
For our floors, the only place we upgraded was in the master bathroom. Our builder didn't carry the style wood floors we wanted and the next best option was about $2 more per sq ft. than the floors we plan to install ourselves. We also kept most of our tile work standard because we weren’t too impressed with the available options and their pricing. This is another thing that we'll DIY later ourselves.