Closet Makeover! — 5 Steps To A Functional Closet
If you caught my stories on Instagram last week, you followed along as I ruthlessly purged my closet and reorganized in preparation for our move. In one of the most disappointing twists of fate ever, our closet in our new house will actually be smaller than the closet we currently have in our apartment, so a closet cleanout was absolutely necessary. As I got rid of old leggings and divided my clothes into seasons, I got to thinking that my methods for cleaning out my closet might be helpful as a blog post so that I can go into a little more detail about each step of my process. I clean out my closet at least twice a year, but usually more than that because I’m always running out of space. I’m no Marie Kondo, and I’m definitely not a minimalist, but I have been color-coding my closet since middle school so I’m basically a pro at this point haha. Here are my five steps to a functional closet—without having to give up every single piece of clothing you own!
*This post may contain affiliate links. If you click on the link and purchase the item, I will receive commission on the sale at no extra cost to you. It’s a win for both of us! Keep in mind that I only ever recommend products that I use and love myself and all opinions are 100% my own. Thanks for your support!*
[ step 01 ] - keep, sell, donate, or throw away
*A moment of silence please for all of the leggings I lost during this step.* This is the most important step of a closet makeover, and usually, the toughest for people to follow through with. We tend to accumulate a lot of stuff over time (I still have sweatpants from almost 10 years ago!), but we don’t do such a great job of getting rid of things. We grow attached to it, or think it might come back in style, promise ourselves we’ll be able to fit it by next summer…we make excuses. I used to (and still sometimes) do the same thing. However, now that I’m having to share a closet, I’ve gotten much more honest with myself about what I actually need to keep so that I can maximize space.
Go through every single thing in your closet and decide whether it’s worth keeping or it can go away. You should get rid of anything that:
You haven’t worn in over a year, excluding fancy/party dresses or special occasion attire.
Is stained, torn, missing a button, etc. if you don’t plan on fixing it within the next month.
Is a duplicate of another item. If you have two nearly identical tops, you probably already wear one more than the other, so free up some space and get rid of the clone.
Doesn’t fit and won’t reasonably fit anytime soon. (Goodbye size 0 jeans. We shall never meet again).
Doesn’t spark joy (the KonMari method does make some good points).
You just plain old don’t like.
As you’re going through your clothes and deciding what to get rid of, take note of the item’s style and condition. Is it brand new? Still on-trend? Sell it at a local consignment store or Plato’s Closet. I’ve never had much luck selling clothing online, but you could also try Poshmark or Mercari. If the item is a little more worn, but still in wearable condition, donate it. Goodwill is the obvious go-to, but churches and women’s shelters often gladly accept donations as well. For anything else past its’ prime, just throw it away. Don’t feel like you need to keep something just because you spent money on it. If you got enough wear out of it to “recoup” what you spent, great! If not, your cost per wear ratio wasn’t getting any better having the item sitting in your closet anyway.

[ step 02 ] - separate by season
Now that you’ve narrowed down your closet to just the clothes you intend to keep, divide it by season. I used this trick to maximize space growing up, but wasn’t really able to keep it going afterward—storage space isn’t really at an all-time high when you’re living in an apartment. In our house, I’ll be storing my off-season clothes in the garage. I like to store them in the same way that they’ll be organized in my closet—so hanging clothes stay on hangers and folded clothes stay folded. This makes it super easy to swap them out when the weather changes. If you’re in an apartment though, you can use the extra space at the top of your closet (you know, the space that you can’t really reach anyway), for storage bins! Maximize what you can fit into each bin with vacuum bags—these are perfect for bulky items like sweaters and jeans.
Separating your clothes by season not only frees up space in your closet but it also makes getting dressed SO much easier. I can’t stand rifling through thick winter sweaters when I’m trying to find a strapless top. Clearing out the items you definitely won’t be wearing anytime soon gets them out of the way and allows you to focus on your actual options.

[ step 03 ] - inventory your wardrobe
If you’re anything like me, your entire room has turned into a complete mess of clothing at this point. It’s starting to look reminiscent of Victoria’s Secret on Black Friday (0/10 would recommend btw if you value your sanity or your limbs even the slightest bit). But don’t worry! You know how they say it' gets worse before it gets better? Well, we’re finally at the part where it’s going to start getting better.
Go through wardrobe now and take inventory of what you’re left with. Do you have a lot of t-shirts? Some jeans, but mostly leggings? All suits and no dresses? Determine what you have a little and a lot of because this will influence how you arrange everything in your closet. You don’t want to dedicate an entire shelf to jeans if you only have a few pairs. For example, in my closet I know I’ll always need a lot of space for leggings and sweatshirts, but not that much space for dress clothes and tops.

[ step 04 ] - create a cohesive organization system
Now that you know what you own and how much of it, time to come up with a plan for organizing it all.
color code
Always, always, always color code your closet. Not only does it look nice, but it also makes it easier to see what you have, what you don’t, and what you’re drawn to. Getting dressed in the mornings will be 1023874x simpler when you can grab a black shirt without having to sift through every other color to find it. Start by arranging your clothes in ROY G. BIV (rainbow) order, followed by neutrals (grey, black, nude, white).
Arrange By Type
When I first started on my journey to a perfectly organized closet years ago, I color-coded my clothes and stopped there. I loved the way the perfect rainbow of colors looked when I opened my closet doors, but I didn’t realize that I was sacrificing function for style. When you keep all of your different types of clothing in the same run (like tops, dresses, sweatshirts) you’re still going to be wasting time each time you go to get dressed even if your closet is purged, in-season, and color-coordinated. Why? You’ll still have to flip through dresses and jackets every time you’re looking for a top. Arranging your clothing by type AND color will give you the most streamlined dressing experience you’ve ever had.
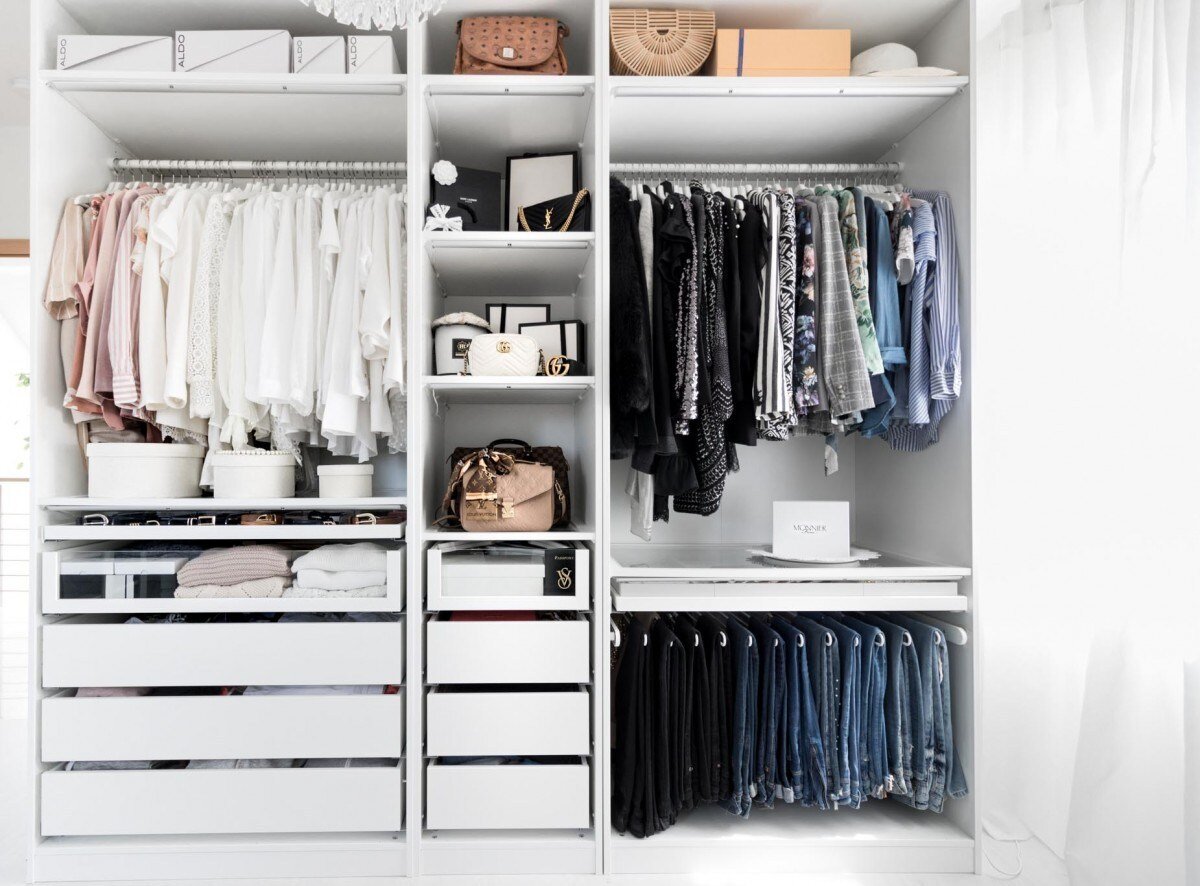
In my current closet, I have 3 large hanging sections. Here’s how I divided them up:
Section 1: Full body outfits. This section is meant to be a one-stop-shop so it holds everything that can be worn as-is, on its own. This is where I keep my dresses, rompers, and two-piece sets. This section has the most vertical hanging space, so it’s also where I keep my long cardigans, vests, or any other throw overs that are too long for the other two hanging sections.
Section 2: Sweatshirts, hoodies, and jackets. These take up a lot of space so I didn’t want them mixing in with my more dainty tops.
Section 3: All tops, shorts, and dressy clothes. Since I don’t have any dividers in my closets (just your standard wire shelf system) I alternate tops and bottoms to create a clear break between type. I arranged this section like this: Short Sleeve Tops | Jean Shorts | Long Sleeve Tops | Skirts | Dressy Tops | Dressy Pants
give everything a place
If everything in your closet has a designated place, nothing should ever get lost, forgotten, or stored incorrectly. Right? Well, a girl can dream. But giving everything in your closet a designated place will make your closet that much easier to keep organized. I have separate drawers in my closet for Bras | Underwear | Socks | Tanks | Exercise Shorts/Sweatpants | Bathing Suits, cubbies to hold all of my shoes, and then a wardrobe (check out the DIY here!) with separate sections for Hats | Purses/Bags | Scarves | Jewelry | Sunglasses. Everything has a place, so there’s no excuse for not putting things away.
Use matching hangers
It is a huge pet peeve of mine to see mismatched hangers in a closet. Even if you don’t follow any other tip I’ve given you today, follow this—get matching hangers! It will change your life. Matching your hangers helps them fade into the background, whereas mismatched hangers jump out at you and look distracting. After years of swearing up and down that I hated velvet hangers, I finally caved bought these thin black velvet ones. I’ve never been a fan of the way they feel, but you really can’t beat the look or the space savings. I’ve always used regular old plastic hangers, which aren’t that much larger than the velvet ones but WHOA the difference was unbelievable. I don’t have to worry about my clothes sliding off anymore, the metal hooks on the velvet hangers look much better than the white plastic, and they really do save a ton of space in my closet. If you’re short on space, definitely avoid the bulky wooden hangers—as beautiful as they are—because they’ll eat up all of your space. For shorts and skirts, I recommend tier hangers (like these that I use) because they allow you to hang up 4 pairs all on the same hanger. It takes up about the same amount of space as a single shirt which is awesome. If you hang your pants or other items like scarves or belts, they also make tier hangers for those too.

[ Step 05 ] - Know Yourself + Your Habits
It’s finally time to put everything away! Now that you have everything that you’ve going to keep arranged by type and color, and have created an organization system, put your the clothes away in the way that makes the most sense for you and your habits. Don’t like folding clothes? Try to hang as many items as possible and fold items that require minimal effort, like pants. If you have certain items you wear a lot, like your work clothes, keep those items front and center and easy to access. Tuck formal wear and special occasion items away in the back of your closet, out of the way of everyday stuff. Don’t place anything you wear often too far out of reach or at least don’t be surprised when it doesn’t get worn. You’ve got to find the perfect balance between creating a pretty space, maximizing functionality, and catering to your routine—that is what’s going to make your closet the best dressed!
I hope my tips are helpful during your next closet clean out! If you’d like to see the full video walkthrough of my tips, check my Instagram highlight labeled “CLOSET”— I saved everything there and linked all of the products I used for you below. I’ll be reorganizing again in just a few months when we move into the new house and you may have guessed from the images in this post which organization system I’m currently eyeing…my dreams of a custom-look closet are finally going to come true! We’ll be installing the IKEA Pax System in our new closet to make sure we maximize functionality in every inch of that tiny space, so stay tuned for another fun closet makeover post!
Image Sources: 1 | 2 | 3 | 4 | 5
Shop The Post
